Fuzzing Like A Caveman
Introduction
I’ve been passively consuming a lot of fuzzing-related material in the last few months as I’ve primarily tried to up my Windows exploitation game from Noob-Level to 1%-Less-Noob-Level, and I’ve found it utterly fascinating. In this post I will show you how to create a really simple mutation fuzzer and hopefully we can find some crashes in some open source projects with it.
The fuzzer we’ll be creating is from just following along with @gynvael’s fuzzing tutorial on YouTube. I had no idea that Gynvael had streams so now I have dozens more hours of content to add to the never ending list of things to watch/read.
I must also mention that Brandon Faulk’s fuzzing streams are incredible. I don’t understand roughly 99% of the things Brandon says, but these streams are captivating. My personal favorites so far have been his fuzzing of calc.exe and c-tags. He also has this wonderful introduction to fuzzing concepts video here: NYU Fuzzing Talk.
Picking a Target
I wanted to find a binary that was written in C or C++ and parsed data from a file. One of the first things I came across was binaries that parse Exif data out of images. We also want to pick a target with virtually no security implications since I’m publishing these findings in real time.
From https://www.media.mit.edu/pia/Research/deepview/exif.html, Basically, Exif file format is the same as JPEG file format. Exif inserts some of image/digicam information data and thumbnail image to JPEG in conformity to JPEG specification. Therefore you can view Exif format image files by JPEG compliant Internet browser/Picture viewer/Photo retouch software etc. as a usual JPEG image files.
So Exif inserts metadata type information into images in conformity with the JPEG spec, and there exists no shortage of programs/utilities which helpfully parse this data out.
Getting Started
We’ll be using Python3 to build a rudimentary mutation fuzzer that subtly (or not so subtly) alters valid Exif-filled JPEGs and feeds them to a parser hoping for a crash. We’ll also be working on an x86 Kali Linux distro.
First thing’s first, we need a valid Exif-filled JPEG. A Google search for ‘Sample JPEG with Exif’ helpfully leads us to this repo. I’ll be using the Canon_40D.jpg image for testing.
Getting to Know the JPEG and EXIF Spec
Before we start just scribbling Python into Sublime Text, let’s first take some time to learn about the JPEG and Exif specification so that we can avoid some of the more obvious pitfalls of corrupting the image to the point that the parser doesn’t attempt to parse it and wastes precious fuzzing cycles.
One thing to know from the previously referenced specification overview, is that all JPEG images start with byte values 0xFFD8 and end with byte values 0xFFD9. This first couple of bytes are what are known as ‘magic bytes’. This allows for straightforward file-type identification on *Nix systems.
root@kali:~# file Canon_40D.jpg
Canon_40D.jpg: JPEG image data, JFIF standard 1.01, resolution (DPI), density 72x72, segment length 16, Exif Standard: [TIFF image data, little-endian, direntries=11, manufacturer=Canon, model=Canon EOS 40D, orientation=upper-left, xresolution=166, yresolution=174, resolutionunit=2, software=GIMP 2.4.5, datetime=2008:07:31 10:38:11, GPS-Data], baseline, precision 8, 100x68, components 3
We can take the .jpg off and get the same output.
root@kali:~# file Canon
Canon: JPEG image data, JFIF standard 1.01, resolution (DPI), density 72x72, segment length 16, Exif Standard: [TIFF image data, little-endian, direntries=11, manufacturer=Canon, model=Canon EOS 40D, orientation=upper-left, xresolution=166, yresolution=174, resolutionunit=2, software=GIMP 2.4.5, datetime=2008:07:31 10:38:11, GPS-Data], baseline, precision 8, 100x68, components 3
If we hexdump the image, we can see the first and last bytes are in fact 0xFFD8 and 0xFFD9.
root@kali:~# hexdump Canon
0000000 d8ff e0ff 1000 464a 4649 0100 0101 4800
------SNIP------
0001f10 5aed 5158 d9ff
Another interesting piece of information in the specification overview is that ‘markers’ begin with 0xFF. There are several known static markers such as:
- the ‘Start of Image’ (SOI) marker:
0xFFD8 - APP1 marker:
0xFFE1 - generic markers:
0xFFXX - the ‘End of Image’ (EOI) marker:
0xFFD9
Since we don’t want to change the image length or the file type, let’s go ahead and plan to keep the SOI and EOI markers intact when possible. We don’t want to insert 0xFFD9 into the middle of the image for example as that would truncate the image or cause the parser to misbehave in a non-crashy way. ‘Non-crashy’ is a real word. Also, this could be misguided and maybe we should be randomly putting EOI markers in the byte stream? Let’s see.
Starting Our Fuzzer
The first thing we’ll need to do is extract all of the bytes from the JPEG we want to use as our ‘valid’ input sample that we’ll of course mutate.
Our code will start off like this:
#!/usr/bin/env python3

import sys

# read bytes from our valid JPEG and return them in a mutable bytearray
def get_bytes(filename):

	f = open(filename, "rb").read()

	return bytearray(f)

if len(sys.argv) < 2:
	print("Usage: JPEGfuzz.py <valid_jpg>")

else:
	filename = sys.argv[1]
	data = get_bytes(filename)
If we want to see how this data looks, we can print the first 10 or so byte values in the array and see how we’ll be interacting with them. We’ll just temporarily add something like:
else:
	filename = sys.argv[1]
	data = get_bytes(filename)
	counter = 0
	for x in data:
		if counter < 10:
			print(x)
		counter += 1
Running this shows that we’re dealing with neatly converted decimal integers which makes everything much easier in my opinion.
root@kali:~# python3 fuzzer.py Canon_40D.jpg
255
216
255
224
0
16
74
70
73
70
Let’s just quickly see if we can create a new valid JPEG from our byte array. We’ll add this function to our code and run it.
def create_new(data):

	f = open("mutated.jpg", "wb+")
	f.write(data)
	f.close()
So now we have mutated.jpg in our directory, let’s hash the two files and see if they match.
root@kali:~# shasum Canon_40D.jpg mutated.jpg
c3d98686223ad69ea29c811aaab35d343ff1ae9e  Canon_40D.jpg
c3d98686223ad69ea29c811aaab35d343ff1ae9e  mutated.jpg
Awesome, we have two identical files. Now we can get into the business of mutating the data before creating our mutated.jpg.
Mutating
We’ll keep our fuzzer relatively simple and only implement two different mutation methods. These methods will be:
- bit flipping
- overwriting byte sequences with Gynvael’s ‘Magic Numbers’
Let’s start with bit flipping. 255 (or 0xFF) in binary would be 11111111 if we were to randomly flip a bit in this number, let say at index number 2, we’d end up with 11011111. This new number would be 223 or 0xDF.
I’m not entirely sure how different this mutation method is from randomly selecting a value from 0 - 255 and overwritng a random byte with it. My intuiton says that bit flipping is extremely similar to randomly overwriting bytes with an arbitrary byte.
Let’s go ahead and say we want to only flip a bit in 1% of the bytes we have. We can get to this number in Python by doing:
num_of_flips = int((len(data) - 4) * .01)
We want to subtract 4 from the length of our bytearray because we don’t want to count the first 2 bytes or the last 2 bytes in our array as those were the SOI and EOI markers and we are aiming to keep those intact.
Next we’ll want to randomly select that many indexes and target those indexes for bit flipping. We’ll go ahead and create a range of possible indexes we can change and then choose num_of_flips of them to randomly bit flip.
indexes = range(4, (len(data) - 4))

chosen_indexes = []

# iterate selecting indexes until we've hit our num_of_flips number
counter = 0
while counter < num_of_flips:
	chosen_indexes.append(random.choice(indexes))
	counter += 1
Let’s add import random to our script, and also add these debug print statements to make sure everything is working correctly.
print("Number of indexes chosen: " + str(len(chosen_indexes)))
print("Indexes chosen: " + str(chosen_indexes))
Our function right now looks like this:
def bit_flip(data):

	num_of_flips = int((len(data) - 4) * .01)

	indexes = range(4, (len(data) - 4))

	chosen_indexes = []

	# iterate selecting indexes until we've hit our num_of_flips number
	counter = 0
	while counter < num_of_flips:
		chosen_indexes.append(random.choice(indexes))
		counter += 1

	print("Number of indexes chosen: " + str(len(chosen_indexes)))
	print("Indexes chosen: " + str(chosen_indexes))
If we run this, we get a nice output as expected:
root@kali:~# python3 fuzzer.py Canon_40D.jpg
Number of indexes chosen: 79
Indexes chosen: [6580, 930, 6849, 6007, 5020, 33, 474, 4051, 7722, 5393, 3540, 54, 5290, 2106, 2544, 1786, 5969, 5211, 2256, 510, 7147, 3370, 625, 5845, 2082, 2451, 7500, 3672, 2736, 2462, 5395, 7942, 2392, 1201, 3274, 7629, 5119, 1977, 2986, 7590, 1633, 4598, 1834, 445, 481, 7823, 7708, 6840, 1596, 5212, 4277, 3894, 2860, 2912, 6755, 3557, 3535, 3745, 1780, 252, 6128, 7187, 500, 1051, 4372, 5138, 3305, 872, 6258, 2136, 3486, 5600, 651, 1624, 4368, 7076, 1802, 2335, 3553]
Next we need to actually mutate the bytes at those indexes. We need to bit flip them. I chose to do this in a really hacky way, feel free to implement your own solution. We’re going to covert the bytes at these indexes to binary strings and pad them so that they are 8 digits long. Let’s add this code and see what I’m talking about. We’ll be converting the byte value (which is in decimal remember) to a binary string and then padding it with leading zeroes if it’s less than 8 digits long. The last line is a temporary print statement for debugging.
for x in chosen_indexes:
        current = data[x]
        current = (bin(current).replace("0b",""))
        current = "0" * (8 - len(current)) + current
As you can see, we have a nice output of binary numbers as strings.
root@kali:~# python3 fuzzer.py Canon_40D.jpg
10100110
10111110
10010010
00110000
01110001
00110101
00110010
-----SNIP-----
Now for each of these, we’ll randomly select an index, and flip it. Take the first one, 10100110, if select index 0, we have a 1, we’ll flip it to 0.
Last considering for this code segment is that these are strings not integers remember. So the last thing we need to do is convert the flipped binary string to integer.
We’ll create an empty list, add each digit to the list, flip the digit we randomly picked, and the construct a new string from all the list members. (We have to use this intermediate list step since strings are mutable). Finally, we convert it to an integer and return the data to our create_new() function to create a new JPEG.
Our script now looks like this in total:
#!/usr/bin/env python3

import sys
import random

# read bytes from our valid JPEG and return them in a mutable bytearray
def get_bytes(filename):

	f = open(filename, "rb").read()

	return bytearray(f)

def bit_flip(data):

	num_of_flips = int((len(data) - 4) * .01)

	indexes = range(4, (len(data) - 4))

	chosen_indexes = []

	# iterate selecting indexes until we've hit our num_of_flips number
	counter = 0
	while counter < num_of_flips:
		chosen_indexes.append(random.choice(indexes))
		counter += 1

	for x in chosen_indexes:
		current = data[x]
		current = (bin(current).replace("0b",""))
		current = "0" * (8 - len(current)) + current

		indexes = range(0,8)

		picked_index = random.choice(indexes)

		new_number = []

		# our new_number list now has all the digits, example: ['1', '0', '1', '0', '1', '0', '1', '0']
		for i in current:
			new_number.append(i)

		# if the number at our randomly selected index is a 1, make it a 0, and vice versa
		if new_number[picked_index] == "1":
			new_number[picked_index] = "0"
		else:
			new_number[picked_index] = "1"

		# create our new binary string of our bit-flipped number
		current = ''
		for i in new_number:
			current += i

		# convert that string to an integer
		current = int(current,2)

		# change the number in our byte array to our new number we just constructed
		data[x] = current

	return data


# create new jpg with mutated data
def create_new(data):

	f = open("mutated.jpg", "wb+")
	f.write(data)
	f.close()

if len(sys.argv) < 2:
	print("Usage: JPEGfuzz.py <valid_jpg>")

else:
	filename = sys.argv[1]
	data = get_bytes(filename)
	mutated_data = bit_flip(data)
	create_new(mutated_data)
Analyzing Mutation
If we run our script, we can shasum the output and compare to the original JPEG.
root@kali:~# shasum Canon_40D.jpg mutated.jpg
c3d98686223ad69ea29c811aaab35d343ff1ae9e  Canon_40D.jpg
a7b619028af3d8e5ac106a697b06efcde0649249  mutated.jpg
This looks promising as they have different hashes now. We can further analyze by comparing them with a program called Beyond Compare or bcompare. We’ll get two hexdumps with differences highlighted.
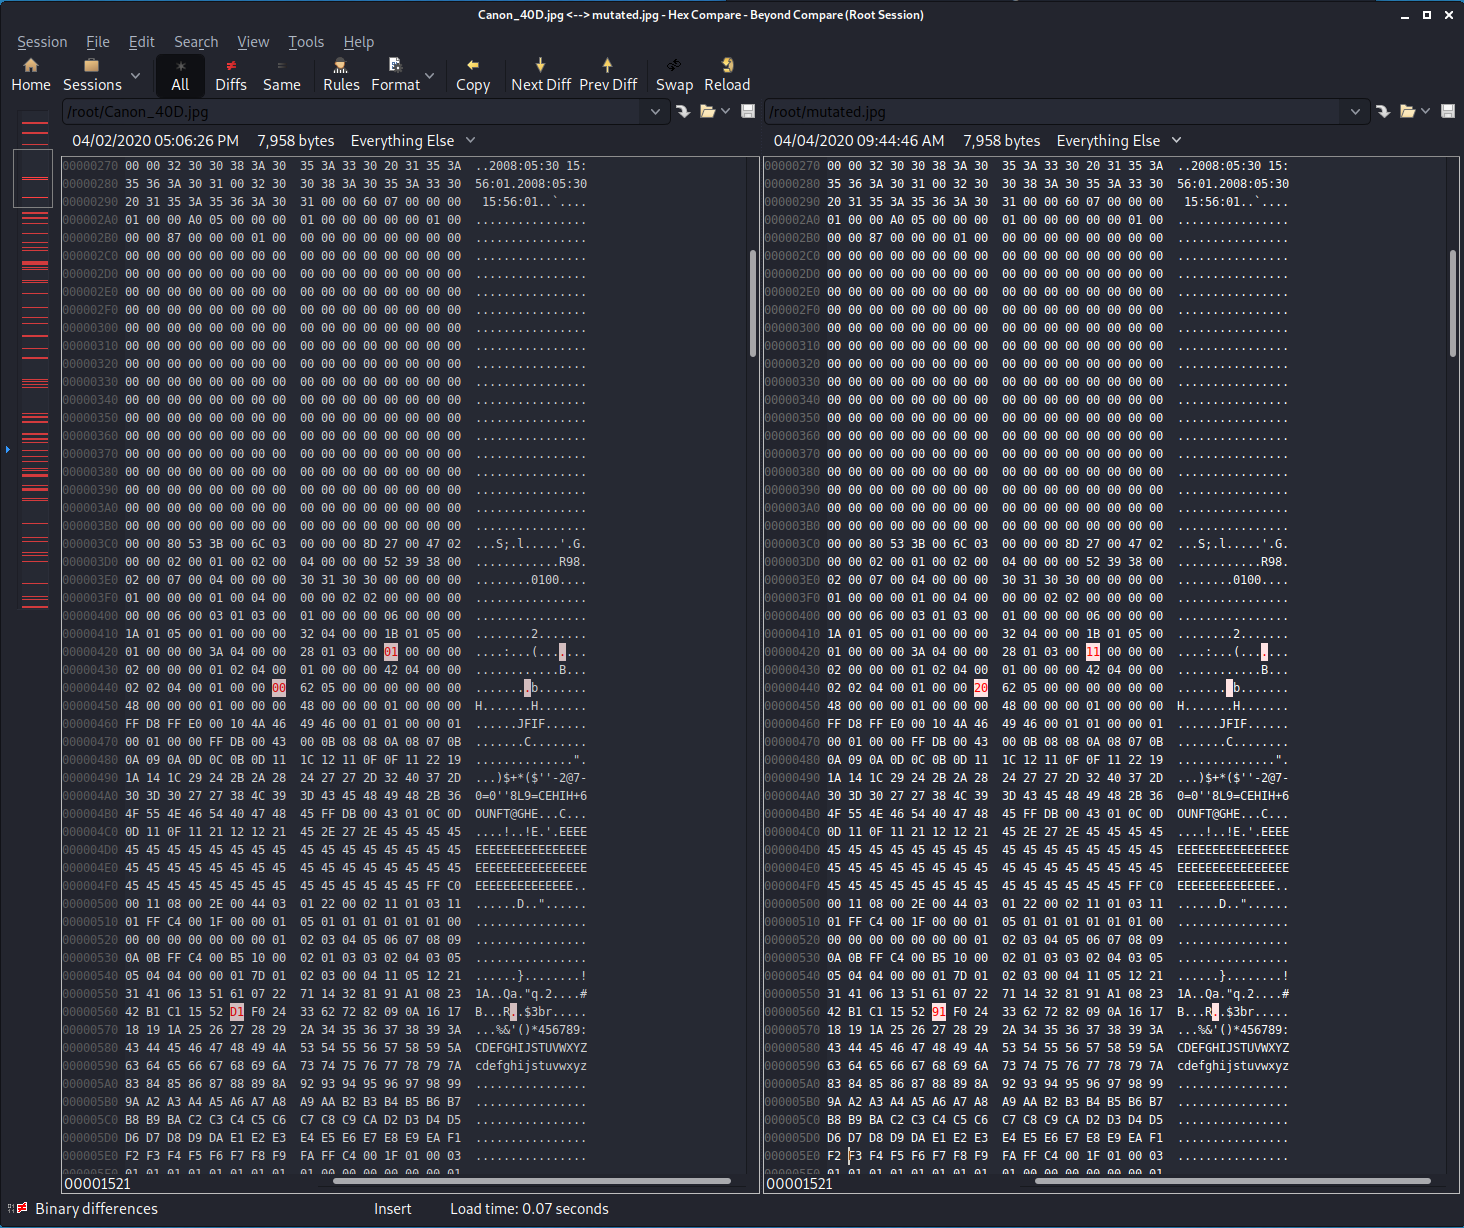
As you can see, in just this one screen share we have 3 different bytes that have had their bits flipped. The original is on the left, the mutated sample is on the right.
This mutation method appears to have worked. Let’s move onto implementing our second mutation method
Gynvael’s Magic Numbers
During the aformentioned GynvaelColdwind ‘Basics of fuzzing’ stream, he enumerates several ‘magic numbers’ which can have devestating effects on programs. Typically, these numbers relate to data type sizes and arithmetic-induced errors. The numbers discussed were:
0xFF0x7F0x000xFFFF0x00000xFFFFFFFF0x000000000x80000000<—- minimum 32-bit int0x40000000<—- just half of that amount0x7FFFFFFF<—- max 32-bit int
If there is any kind of arithmetic performed on these types of values in the course of malloc() or other types of operations, overflows can be common. For instance if you add 0x1 to 0xFF on a one-byte register, it would roll over to 0x00 this can be unintended behavior. HEVD actually has an integer overflow bug similar to this concept.
Let’s say our fuzzer chooses 0x7FFFFFFF as the magic number it wants to use, that value is 4 bytes long so we would have to find a byte index in our array, and overwrite that byte plus the next three. Let’s go ahead and start implementing this in our fuzzer.
Implementing Mutation Method #2
First we’ll want to create a list of tuples like Gynvael did where the first number in the tuple is the byte-size of the magic number and the second number is the byte value in decimal of the first byte.
def magic(data):

	magic_vals = [
	(1, 255),
	(1, 255),
	(1, 127),
	(1, 0),
	(2, 255),
	(2, 0),
	(4, 255),
	(4, 0),
	(4, 128),
	(4, 64),
	(4, 127)
	]

	picked_magic = random.choice(magic_vals)

	print(picked_magic)
If we run this we can see that it’s randomly selecting a magic value tuple.
root@kali:~# python3 fuzzer.py Canon_40D.jpg
(4, 64)
root@kali:~# python3 fuzzer.py Canon_40D.jpg
(4, 128)
root@kali:~# python3 fuzzer.py Canon_40D.jpg
(4, 0)
root@kali:~# python3 fuzzer.py Canon_40D.jpg
(2, 255)
root@kali:~# python3 fuzzer.py Canon_40D.jpg
(4, 0)
We now need to overwrite a random 1 to 4 byte value in the JPEG with this new magic 1 to 4 byte value. We will set up our possible indexes the same as the previous method, select an index, and then overwrite the bytes at that index with our picked_magic number.
So if we get (4, 128) for instance, we know its 4 bytes, and the magic number is 0x80000000. So we’ll do something like:
byte[x] = 128
byte[x+1] = 0
byte[x+2] = 0
byte[x+3] = 0
All in all, our function will look like this:
def magic(data):

	magic_vals = [
	(1, 255),
	(1, 255),
	(1, 127),
	(1, 0),
	(2, 255),
	(2, 0),
	(4, 255),
	(4, 0),
	(4, 128),
	(4, 64),
	(4, 127)
	]

	picked_magic = random.choice(magic_vals)

	length = len(data) - 8
	index = range(0, length)
	picked_index = random.choice(index)

	# here we are hardcoding all the byte overwrites for all of the tuples that begin (1, )
	if picked_magic[0] == 1:
		if picked_magic[1] == 255:			# 0xFF
			data[picked_index] = 255
		elif picked_magic[1] == 127:			# 0x7F
			data[picked_index] = 127
		elif picked_magic[1] == 0:			# 0x00
			data[picked_index] = 0

	# here we are hardcoding all the byte overwrites for all of the tuples that begin (2, )
	elif picked_magic[0] == 2:
		if picked_magic[1] == 255:			# 0xFFFF
			data[picked_index] = 255
			data[picked_index + 1] = 255
		elif picked_magic[1] == 0:			# 0x0000
			data[picked_index] = 0
			data[picked_index + 1] = 0

	# here we are hardcoding all of the byte overwrites for all of the tuples that being (4, )
	elif picked_magic[0] == 4:
		if picked_magic[1] == 255:			# 0xFFFFFFFF
			data[picked_index] = 255
			data[picked_index + 1] = 255
			data[picked_index + 2] = 255
			data[picked_index + 3] = 255
		elif picked_magic[1] == 0:			# 0x00000000
			data[picked_index] = 0
			data[picked_index + 1] = 0
			data[picked_index + 2] = 0
			data[picked_index + 3] = 0
		elif picked_magic[1] == 128:			# 0x80000000
			data[picked_index] = 128
			data[picked_index + 1] = 0
			data[picked_index + 2] = 0
			data[picked_index + 3] = 0
		elif picked_magic[1] == 64:			# 0x40000000
			data[picked_index] = 64
			data[picked_index + 1] = 0
			data[picked_index + 2] = 0
			data[picked_index + 3] = 0
		elif picked_magic[1] == 127:			# 0x7FFFFFFF
			data[picked_index] = 127
			data[picked_index + 1] = 255
			data[picked_index + 2] = 255
			data[picked_index + 3] = 255

	return data
Analyzing Mutation #2
Running our script now and analyzing the results in Beyond Compare, we can see that a two byte value of 0xA6 0x76 was overwritten with 0xFF 0xFF.
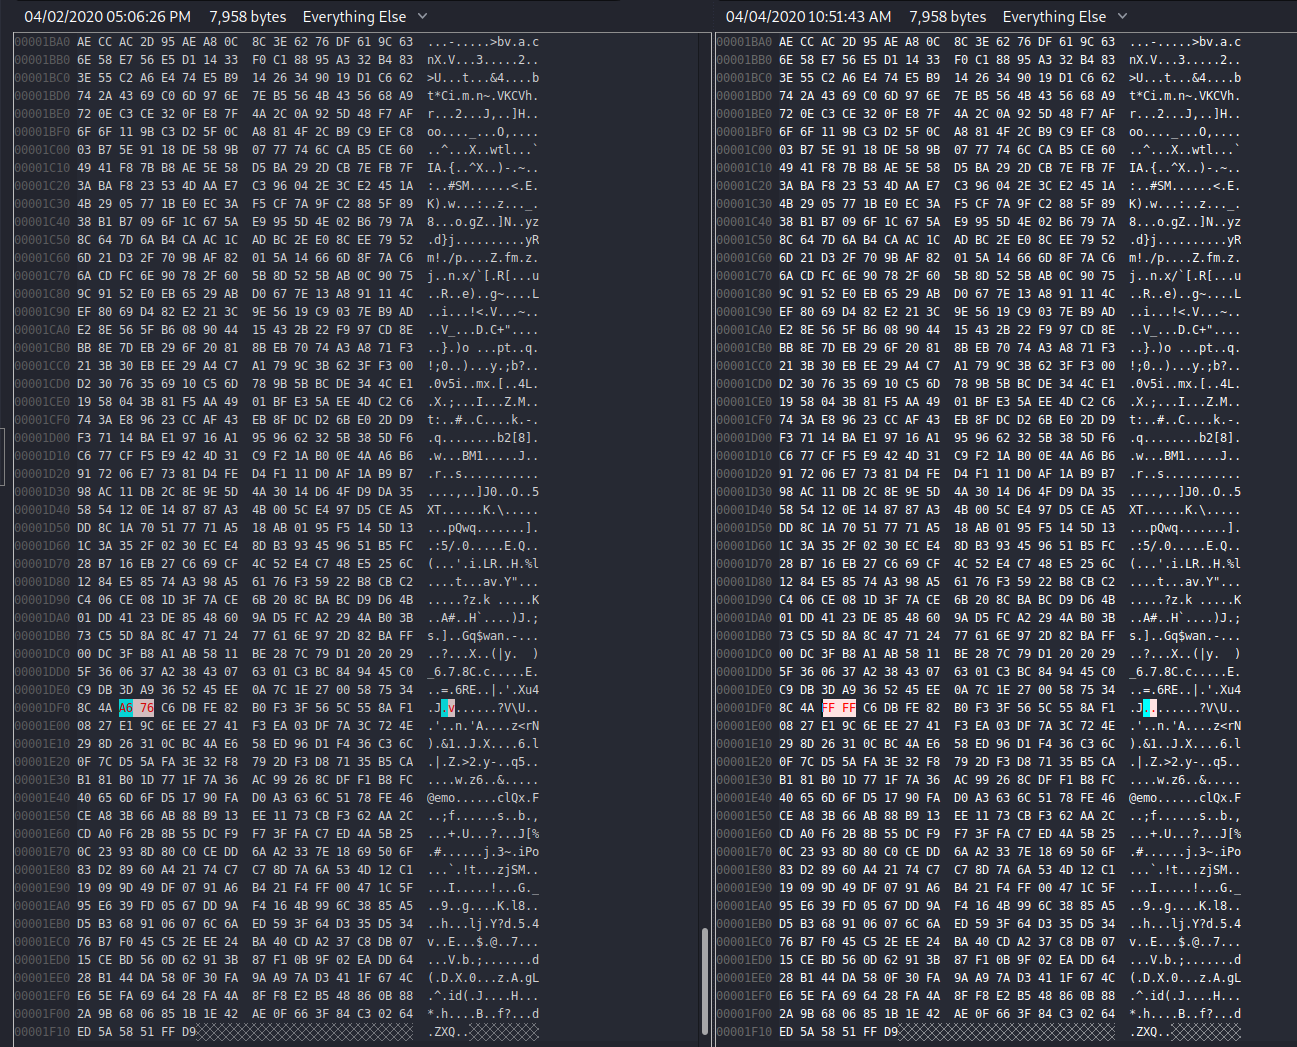
This is exactly what we wanted to accomplish.
Starting to Fuzz
Now that we have two reliable ways of mutating the data, we need to:
- mutate the data with one of our functions,
- create new picture with mutated data,
- feed mutated picture to our binary for parsing,
- catch any
Segmentation faultsand log the picture that caused it
Victim?
For our victim program, we will search Google with site:github.com "exif" language:c to find Github projects written in C that have a reference to ‘exif’.
A quick looksie brings us to https://github.com/mkttanabe/exif.
We can install by git cloning the repo, and using the building with gcc instructions included in the README. (I’ve placed the compiled binary in /usr/bin just for ease.)
Let’s first see how the program handles our valid JPEG.
root@kali:~# exif Canon_40D.jpg -verbose
system: little-endian
  data: little-endian
[Canon_40D.jpg] createIfdTableArray: result=5

{0TH IFD} tags=11
tag[00] 0x010F Make
        type=2 count=6 val=[Canon]
tag[01] 0x0110 Model
        type=2 count=14 val=[Canon EOS 40D]
tag[02] 0x0112 Orientation
        type=3 count=1 val=1
tag[03] 0x011A XResolution
        type=5 count=1 val=72/1
tag[04] 0x011B YResolution
        type=5 count=1 val=72/1
tag[05] 0x0128 ResolutionUnit
        type=3 count=1 val=2
tag[06] 0x0131 Software
        type=2 count=11 val=[GIMP 2.4.5]
tag[07] 0x0132 DateTime
        type=2 count=20 val=[2008:07:31 10:38:11]
tag[08] 0x0213 YCbCrPositioning
        type=3 count=1 val=2
tag[09] 0x8769 ExifIFDPointer
        type=4 count=1 val=214
tag[10] 0x8825 GPSInfoIFDPointer
        type=4 count=1 val=978

{EXIF IFD} tags=30
tag[00] 0x829A ExposureTime
        type=5 count=1 val=1/160
tag[01] 0x829D FNumber
        type=5 count=1 val=71/10
tag[02] 0x8822 ExposureProgram
        type=3 count=1 val=1
tag[03] 0x8827 PhotographicSensitivity
        type=3 count=1 val=100
tag[04] 0x9000 ExifVersion
        type=7 count=4 val=0 2 2 1
tag[05] 0x9003 DateTimeOriginal
        type=2 count=20 val=[2008:05:30 15:56:01]
tag[06] 0x9004 DateTimeDigitized
        type=2 count=20 val=[2008:05:30 15:56:01]
tag[07] 0x9101 ComponentsConfiguration
        type=7 count=4 val=0x01 0x02 0x03 0x00
tag[08] 0x9201 ShutterSpeedValue
        type=10 count=1 val=483328/65536
tag[09] 0x9202 ApertureValue
        type=5 count=1 val=368640/65536
tag[10] 0x9204 ExposureBiasValue
        type=10 count=1 val=0/1
tag[11] 0x9207 MeteringMode
        type=3 count=1 val=5
tag[12] 0x9209 Flash
        type=3 count=1 val=9
tag[13] 0x920A FocalLength
        type=5 count=1 val=135/1
tag[14] 0x9286 UserComment
        type=7 count=264 val=0x00 0x00 0x00 0x00 0x00 0x00 0x00 0x00 0x00 0x00 0x00 0x00 0x00 0x00 0x00 0x00 (omitted)
tag[15] 0x9290 SubSecTime
        type=2 count=3 val=[00]
tag[16] 0x9291 SubSecTimeOriginal
        type=2 count=3 val=[00]
tag[17] 0x9292 SubSecTimeDigitized
        type=2 count=3 val=[00]
tag[18] 0xA000 FlashPixVersion
        type=7 count=4 val=0 1 0 0
tag[19] 0xA001 ColorSpace
        type=3 count=1 val=1
tag[20] 0xA002 PixelXDimension
        type=4 count=1 val=100
tag[21] 0xA003 PixelYDimension
        type=4 count=1 val=68
tag[22] 0xA005 InteroperabilityIFDPointer
        type=4 count=1 val=948
tag[23] 0xA20E FocalPlaneXResolution
        type=5 count=1 val=3888000/876
tag[24] 0xA20F FocalPlaneYResolution
        type=5 count=1 val=2592000/583
tag[25] 0xA210 FocalPlaneResolutionUnit
        type=3 count=1 val=2
tag[26] 0xA401 CustomRendered
        type=3 count=1 val=0
tag[27] 0xA402 ExposureMode
        type=3 count=1 val=1
tag[28] 0xA403 WhiteBalance
        type=3 count=1 val=0
tag[29] 0xA406 SceneCaptureType
        type=3 count=1 val=0

{Interoperability IFD} tags=2
tag[00] 0x0001 InteroperabilityIndex
        type=2 count=4 val=[R98]
tag[01] 0x0002 InteroperabilityVersion
        type=7 count=4 val=0 1 0 0

{GPS IFD} tags=1
tag[00] 0x0000 GPSVersionID
        type=1 count=4 val=2 2 0 0

{1ST IFD} tags=6
tag[00] 0x0103 Compression
        type=3 count=1 val=6
tag[01] 0x011A XResolution
        type=5 count=1 val=72/1
tag[02] 0x011B YResolution
        type=5 count=1 val=72/1
tag[03] 0x0128 ResolutionUnit
        type=3 count=1 val=2
tag[04] 0x0201 JPEGInterchangeFormat
        type=4 count=1 val=1090
tag[05] 0x0202 JPEGInterchangeFormatLength
        type=4 count=1 val=1378

0th IFD : Model = [Canon EOS 40D]
Exif IFD : DateTimeOriginal = [2008:05:30 15:56:01]
We see that the program is parsing out the tags and stating the byte values associated with them. This is pretty much exactly what we set out to find.
Chasing Segfaults
Ideally we’d like to feed this binary some mutated data and have it segfault meaning we have found a bug. The problem I ran into was that when I monitored stdout and stderr for the Segmentation fault message, it never appeared. That’s because the Segmentation fault message comes from our command shell instead of the binary. It means the shell received a SIGSEGV signal and in response prints the message.
One way I found to monitor this was to use the run() method from the pexpect Python module and the quote() method from the pipes Python module.
We’ll add a new function, that will take in a counter parameter which will be what fuzzing iteration we’re on and also the mutated data in another parameter. If we see Segmentation in the output of our run() command, we’ll write the mutated data to a file and save it so that we have the JPEG image that crashed the binary.
Let’s create a new folder called crashes and we’ll save JPEGs in there that cause crashes in the format crash.<fuzzing iteration (counter)>.jpg. So if fuzzing iteration 100 caused a crash, we should get a file like: /crashes/crash.100.jpg.
We’ll keep printing to the same line in the terminal to keep a count of every 100 fuzzing iterations. Our function looks like this:
def exif(counter,data):

    command = "exif mutated.jpg -verbose"

    out, returncode = run("sh -c " + quote(command), withexitstatus=1)

    if b"Segmentation" in out:
    	f = open("crashes/crash.{}.jpg".format(str(counter)), "ab+")
    	f.write(data)

    if counter % 100 == 0:
    	print(counter, end="\r")
Next, we’ll alter our execution stub at the bottom of our script to run on a counter. Once we hit 1000 iterations, we’ll stop fuzzing. We’ll also have our fuzzer randomly select one of our mutation methods. So it might bit-flip or it might use a magic number. Let’s run it and then check our crashes folder when it completes.
Once the fuzzer completes, you can see we got ~30 crashes!
root@kali:~/crashes# ls
crash.102.jpg  crash.317.jpg  crash.52.jpg   crash.620.jpg  crash.856.jpg
crash.129.jpg  crash.324.jpg  crash.551.jpg  crash.694.jpg  crash.861.jpg
crash.152.jpg  crash.327.jpg  crash.559.jpg  crash.718.jpg  crash.86.jpg
crash.196.jpg  crash.362.jpg  crash.581.jpg  crash.775.jpg  crash.984.jpg
crash.252.jpg  crash.395.jpg  crash.590.jpg  crash.785.jpg  crash.985.jpg
crash.285.jpg  crash.44.jpg   crash.610.jpg  crash.84.jpg   crash.987.jpg
We can test this now with a quick one-liner to confirm the results: root@kali:~/crashes# for i in *.jpg; do exif "$i" -verbose > /dev/null 2>&1; done. Remember, we can route both STDOUT and STDERR to /dev/null because “Segmentation fault” comes from the shell, not from the binary.
We run this and this is the output:
root@kali:~/crashes# for i in *.jpg; do exif "$i" -verbose > /dev/null 2>&1; done
Segmentation fault
Segmentation fault
Segmentation fault
Segmentation fault
Segmentation fault
Segmentation fault
Segmentation fault
-----SNIP-----
You can’t see all of them, but that’s 30 segfaults, so everything appears to be working as planned!
Triaging Crashes
Now that we have ~30 crashes and the JPEGs that caused them, the next step would be to analyze these crashes and figure out how many of them are unique. This is where we’ll leverage some of the things I’ve learned watching Brandon Faulk’s streams. A quick look at the crash samples in Beyond Compare tells me that most were caused by our bit_flip() mutation and not the magic() mutation method. Interesting. As a test, while we progress, we can turn off the randomness of the function selection and run let’s say 100,000 iterations with just the magic() mutator and see if we get any crashes.
Using ASan to Analyze Crashes
ASan is the “Address Sanitizer” and it’s a utility that comes with newer versions of gcc that allows users to compile a binary with the -fsanitize=address switch and get access to a very detailed information in the event that a memory access bug occurs, even those that cause a crash. Obviously we’ve pre-selected for crashing inputs here so we will miss out on that utility but perhaps we’ll save it for another time.
To use ASan, I follwed along with the Fuzzing Project and recompiled exif with the flags: cc -fsanitize=address -ggdb -o exifsan sample_main.c exif.c.
I then moved exifsan to /usr/bin for ease of use. If we run this newly compiled binary on a crash sample, let’s see the output.
root@kali:~/crashes# exifsan crash.252.jpg -verbose
system: little-endian
  data: little-endian
=================================================================
==18831==ERROR: AddressSanitizer: heap-buffer-overflow on address 0xb4d00758 at pc 0x00415b9e bp 0xbf8c91f8 sp 0xbf8c91ec
READ of size 4 at 0xb4d00758 thread T0
    #0 0x415b9d in parseIFD /root/exif/exif.c:2356
    #1 0x408f10 in createIfdTableArray /root/exif/exif.c:271
    #2 0x4076ba in main /root/exif/sample_main.c:63
    #3 0xb77d0ef0 in __libc_start_main ../csu/libc-start.c:308
    #4 0x407310 in _start (/usr/bin/exifsan+0x2310)

0xb4d00758 is located 0 bytes to the right of 8-byte region [0xb4d00750,0xb4d00758)
allocated by thread T0 here:
    #0 0xb7aa2097 in __interceptor_malloc (/lib/i386-linux-gnu/libasan.so.5+0x10c097)
    #1 0x415a9f in parseIFD /root/exif/exif.c:2348
    #2 0x408f10 in createIfdTableArray /root/exif/exif.c:271
    #3 0x4076ba in main /root/exif/sample_main.c:63
    #4 0xb77d0ef0 in __libc_start_main ../csu/libc-start.c:308

SUMMARY: AddressSanitizer: heap-buffer-overflow /root/exif/exif.c:2356 in parseIFD
Shadow bytes around the buggy address:
  0x369a0090: fa fa fa fa fa fa fa fa fa fa fa fa fa fa fa fa
  0x369a00a0: fa fa fa fa fa fa fa fa fa fa fa fa fa fa fa fa
  0x369a00b0: fa fa fa fa fa fa fa fa fa fa fa fa fa fa fa fa
  0x369a00c0: fa fa fa fa fa fa fa fa fa fa fa fa fa fa fa fa
  0x369a00d0: fa fa fa fa fa fa fa fa fa fa fa fa fa fa fa fa
=>0x369a00e0: fa fa fa fa fa fa fa fa fa fa 00[fa]fa fa 04 fa
  0x369a00f0: fa fa 00 06 fa fa 06 fa fa fa fa fa fa fa fa fa
  0x369a0100: fa fa fa fa fa fa fa fa fa fa fa fa fa fa fa fa
  0x369a0110: fa fa fa fa fa fa fa fa fa fa fa fa fa fa fa fa
  0x369a0120: fa fa fa fa fa fa fa fa fa fa fa fa fa fa fa fa
  0x369a0130: fa fa fa fa fa fa fa fa fa fa fa fa fa fa fa fa
Shadow byte legend (one shadow byte represents 8 application bytes):
  Addressable:           00
  Partially addressable: 01 02 03 04 05 06 07
  Heap left redzone:       fa
  Freed heap region:       fd
  Stack left redzone:      f1
  Stack mid redzone:       f2
  Stack right redzone:     f3
  Stack after return:      f5
  Stack use after scope:   f8
  Global redzone:          f9
  Global init order:       f6
  Poisoned by user:        f7
  Container overflow:      fc
  Array cookie:            ac
  Intra object redzone:    bb
  ASan internal:           fe
  Left alloca redzone:     ca
  Right alloca redzone:    cb
  Shadow gap:              cc
==18831==ABORTING
This is wonderful. Not only do we get detailed information but ASan also classifies the bug class for us, tells us the crash address and provides a nice stack trace. As you can see, we were performing a 4-byte read operation in the parseIFD function inside of exif.c.
READ of size 4 at 0xb4d00758 thread T0
    #0 0x415b9d in parseIFD /root/exif/exif.c:2356
    #1 0x408f10 in createIfdTableArray /root/exif/exif.c:271
    #2 0x4076ba in main /root/exif/sample_main.c:63
    #3 0xb77d0ef0 in __libc_start_main ../csu/libc-start.c:308
    #4 0x407310 in _start (/usr/bin/exifsan+0x2310)
Since this is all standard binary output now, we can actually triage these crashes and try to make sense of them. Let’s first try to deduplicate the crashes. It’s possible here that all 30 of our crashes are the same bug. It’s also possible that we have 30 unique crashes (not likely lol). So we need to sort that out.
Let’s again appeal to a Python script, we’ll iterate through this folder, run the ASan enabled binary against each crash and log where the crashing address is for each. We’ll also try to capture if it’s a 'READ' or 'WRITE' operation as well. So for example, for crash.252.jpg, we’ll format the log file as: crash.252.HBO.b4f00758.READ and we’ll write the ASan output to the log. This way we know the crash image that caused it, the bug class, the address, and the operation before we even open the log. (I’ll post the triage script at the end, it’s so gross ugh, I hate it.)
After running the triage script on our crashes folder, we can now see we have triaged our crashes and there is something very interesting.
crash.102.HBO.b4f006d4.READ
crash.102.jpg
crash.129.HBO.b4f005dc.READ
crash.129.jpg
crash.152.HBO.b4f005dc.READ
crash.152.jpg
crash.317.HBO.b4f005b4.WRITE
crash.317.jpg
crash.285.SEGV.00000000.READ
crash.285.jpg
------SNIP-----
After a big SNIP there, out of my 30 crashes, I only had one WRITE operation. You can’t tell from the snipped output but I also had a lot of SEGV bugs where a NULL address was referenced (0x00000000).
Let’s also check in on our modified fuzzer that was running only the magic() mutator for 100,000 iterations and see if it turned up any bugs.
root@kali:~/crashes2# ls
crash.10354.jpg  crash.2104.jpg   crash.3368.jpg   crash.45581.jpg  crash.64750.jpg  crash.77850.jpg  crash.86367.jpg  crash.94036.jpg
crash.12771.jpg  crash.21126.jpg  crash.35852.jpg  crash.46757.jpg  crash.64987.jpg  crash.78452.jpg  crash.86560.jpg  crash.9435.jpg
crash.13341.jpg  crash.23547.jpg  crash.39494.jpg  crash.46809.jpg  crash.66340.jpg  crash.78860.jpg  crash.88799.jpg  crash.94770.jpg
crash.14060.jpg  crash.24492.jpg  crash.40953.jpg  crash.49520.jpg  crash.6637.jpg   crash.79019.jpg  crash.89072.jpg  crash.95438.jpg
crash.14905.jpg  crash.25070.jpg  crash.41505.jpg  crash.50723.jpg  crash.66389.jpg  crash.79824.jpg  crash.89738.jpg  crash.95525.jpg
crash.18188.jpg  crash.27783.jpg  crash.41700.jpg  crash.52051.jpg  crash.6718.jpg   crash.81206.jpg  crash.90506.jpg  crash.96746.jpg
crash.18350.jpg  crash.2990.jpg   crash.43509.jpg  crash.54074.jpg  crash.68527.jpg  crash.8126.jpg   crash.90648.jpg  crash.98727.jpg
crash.19441.jpg  crash.30599.jpg  crash.43765.jpg  crash.55183.jpg  crash.6987.jpg   crash.82472.jpg  crash.90745.jpg  crash.9969.jpg
crash.19581.jpg  crash.31243.jpg  crash.43813.jpg  crash.5857.jpg   crash.70713.jpg  crash.83282.jpg  crash.92426.jpg
crash.19907.jpg  crash.31563.jpg  crash.44974.jpg  crash.59625.jpg  crash.77590.jpg  crash.83284.jpg  crash.92775.jpg
crash.2010.jpg   crash.32642.jpg  crash.4554.jpg   crash.64255.jpg  crash.77787.jpg  crash.84766.jpg  crash.92906.jpg
That’s a lot of crashes!
Getting Serious, Conclusion
The fuzzer could be optimized a ton, it’s really crude at the moment and only meant to demonstrate very basic mutation fuzzing. The bug triaging process is also a mess and felt really hacky the whole way, I guess I need to watch some more @gamozolabs streams. Maybe next time we do fuzzing we’ll try a harder target, write the fuzzer in a cool language like Rust or Go, and we’ll try to really refine the triaging process/exploit one of the bugs!
Thanks to everyone referenced in the blogpost, huge thanks.
Until next time!
Code
JPEGfuzz.py
#!/usr/bin/env python3

import sys
import random
from pexpect import run
from pipes import quote

# read bytes from our valid JPEG and return them in a mutable bytearray
def get_bytes(filename):

	f = open(filename, "rb").read()

	return bytearray(f)

def bit_flip(data):

	num_of_flips = int((len(data) - 4) * .01)

	indexes = range(4, (len(data) - 4))

	chosen_indexes = []

	# iterate selecting indexes until we've hit our num_of_flips number
	counter = 0
	while counter < num_of_flips:
		chosen_indexes.append(random.choice(indexes))
		counter += 1

	for x in chosen_indexes:
		current = data[x]
		current = (bin(current).replace("0b",""))
		current = "0" * (8 - len(current)) + current

		indexes = range(0,8)

		picked_index = random.choice(indexes)

		new_number = []

		# our new_number list now has all the digits, example: ['1', '0', '1', '0', '1', '0', '1', '0']
		for i in current:
			new_number.append(i)

		# if the number at our randomly selected index is a 1, make it a 0, and vice versa
		if new_number[picked_index] == "1":
			new_number[picked_index] = "0"
		else:
			new_number[picked_index] = "1"

		# create our new binary string of our bit-flipped number
		current = ''
		for i in new_number:
			current += i

		# convert that string to an integer
		current = int(current,2)

		# change the number in our byte array to our new number we just constructed
		data[x] = current

	return data

def magic(data):

	magic_vals = [
	(1, 255),
	(1, 255),
	(1, 127),
	(1, 0),
	(2, 255),
	(2, 0),
	(4, 255),
	(4, 0),
	(4, 128),
	(4, 64),
	(4, 127)
	]

	picked_magic = random.choice(magic_vals)

	length = len(data) - 8
	index = range(0, length)
	picked_index = random.choice(index)

	# here we are hardcoding all the byte overwrites for all of the tuples that begin (1, )
	if picked_magic[0] == 1:
		if picked_magic[1] == 255:			# 0xFF
			data[picked_index] = 255
		elif picked_magic[1] == 127:		# 0x7F
			data[picked_index] = 127
		elif picked_magic[1] == 0:			# 0x00
			data[picked_index] = 0

	# here we are hardcoding all the byte overwrites for all of the tuples that begin (2, )
	elif picked_magic[0] == 2:
		if picked_magic[1] == 255:			# 0xFFFF
			data[picked_index] = 255
			data[picked_index + 1] = 255
		elif picked_magic[1] == 0:			# 0x0000
			data[picked_index] = 0
			data[picked_index + 1] = 0

	# here we are hardcoding all of the byte overwrites for all of the tuples that being (4, )
	elif picked_magic[0] == 4:
		if picked_magic[1] == 255:			# 0xFFFFFFFF
			data[picked_index] = 255
			data[picked_index + 1] = 255
			data[picked_index + 2] = 255
			data[picked_index + 3] = 255
		elif picked_magic[1] == 0:			# 0x00000000
			data[picked_index] = 0
			data[picked_index + 1] = 0
			data[picked_index + 2] = 0
			data[picked_index + 3] = 0
		elif picked_magic[1] == 128:		# 0x80000000
			data[picked_index] = 128
			data[picked_index + 1] = 0
			data[picked_index + 2] = 0
			data[picked_index + 3] = 0
		elif picked_magic[1] == 64:			# 0x40000000
			data[picked_index] = 64
			data[picked_index + 1] = 0
			data[picked_index + 2] = 0
			data[picked_index + 3] = 0
		elif picked_magic[1] == 127:		# 0x7FFFFFFF
			data[picked_index] = 127
			data[picked_index + 1] = 255
			data[picked_index + 2] = 255
			data[picked_index + 3] = 255

	return data

# create new jpg with mutated data
def create_new(data):

	f = open("mutated.jpg", "wb+")
	f.write(data)
	f.close()

def exif(counter,data):

    command = "exif mutated.jpg -verbose"

    out, returncode = run("sh -c " + quote(command), withexitstatus=1)

    if b"Segmentation" in out:
    	f = open("crashes2/crash.{}.jpg".format(str(counter)), "ab+")
    	f.write(data)

    if counter % 100 == 0:
    	print(counter, end="\r")

if len(sys.argv) < 2:
	print("Usage: JPEGfuzz.py <valid_jpg>")

else:
	filename = sys.argv[1]
	counter = 0
	while counter < 100000:
		data = get_bytes(filename)
		functions = [0, 1]
		picked_function = random.choice(functions)
		if picked_function == 0:
			mutated = magic(data)
			create_new(mutated)
			exif(counter,mutated)
		else:
			mutated = bit_flip(data)
			create_new(mutated)
			exif(counter,mutated)

		counter += 1
triage.py
#!/usr/bin/env python3

import os
from os import listdir

def get_files():

	files = os.listdir("/root/crashes/")

	return files

def triage_files(files):

	for x in files:

		original_output = os.popen("exifsan " + x + " -verbose 2>&1").read()
		output = original_output

		# Getting crash reason
		crash = ''
		if "SEGV" in output:
			crash = "SEGV"
		elif "heap-buffer-overflow" in output:
			crash = "HBO"
		else:
			crash = "UNKNOWN"


		if crash == "HBO":
			output = output.split("\n")
			counter = 0
			while counter < len(output):
				if output[counter] == "=================================================================":
					target_line = output[counter + 1]
					target_line2 = output[counter + 2]
					counter += 1
				else:
					counter += 1
			target_line = target_line.split(" ")
			address = target_line[5].replace("0x","")


			target_line2 = target_line2.split(" ")
			operation = target_line2[0]


		elif crash == "SEGV":
			output = output.split("\n")
			counter = 0
			while counter < len(output):
				if output[counter] == "=================================================================":
					target_line = output[counter + 1]
					target_line2 = output[counter + 2]
					counter += 1
				else:
					counter += 1
			if "unknown address" in target_line:
				address = "00000000"
			else:
				address = None

			if "READ" in target_line2:
				operation = "READ"
			elif "WRITE" in target_line2:
				operation = "WRITE"
			else:
				operation = None

		log_name = (x.replace(".jpg","") + "." + crash + "." + address + "." + operation)
		f = open(log_name,"w+")
		f.write(original_output)
		f.close()


files = get_files()
triage_files(files)