Fuzzer Development 1: The Soul of a New Machine
Introduction && Credit to Gamozolabs
For a long time I’ve wanted to develop a fuzzer on the blog during my weekends and freetime, but for one reason or another, I could never really conceptualize a project that would be not only worthwhile as an educational tool, but also offer some utility to the fuzzing community in general. Recently, for Linux Kernel exploitation reasons, I’ve been very interested in Nyx. Nyx is a KVM-based hypervisor fuzzer that you can use to snapshot fuzz traditionally hard to fuzz targets. A lot of the time (most of the time?), we want to fuzz things that don’t naturally lend themselves well to traditional fuzzing approaches. When faced with target complexity in fuzzing (leaving input generation and nuance aside for now), there have generally been two approaches.
One approach is to lobotomize the target such that you can isolate a small subset of the target that you find “interesting” and only fuzz that. That can look like a lot of things, such as ripping a small portion of a Kernel subsystem out of the kernel and compiling it into a userland application that can be fuzzed with traditional fuzzing tools. This could also look like taking an input parsing routine out of a Web Browser and fuzzing just the parsing logic. This approach has its limits though, in an ideal world, we want to fuzz anything that may come in contact with or be affected by the artifacts of this “interesting” target logic. This lobotomy approach is reducing the amount of target state we can explore to a large degree. Imagine if the hypothetical parsing routine successfully produces a data structure that is later consumed by separate target logic that actually reveals a bug. This fuzzing approach fails to explore that possibility.
Another approach, is to effectively sandbox your target in such a way that you can exert some control over its execution environment and fuzz the target in its entirety. This is the approach that fuzzers like Nyx take. By snapshot fuzzing an entire Virtual Machine, we are able to fuzz complex targets such as a Web Browser or Kernel in a way that we are able to explore much more state. Nyx provides us with a way to snapshot fuzz an entire Virtual Machine/system. This is, in my opinion, the ideal way to fuzz things because you are drastically closing the gap between a contrived fuzzing environment and how the target applications exist in the “real-world”. Now obviously there are tradeoffs here, one being the complexity of the fuzzing tooling itself. But, I think given the propensity of complex native code applications to harbor infinite bugs, the manual labor and complexity are worth it in order to increase the bug-finding potential of our fuzzing workflow.
And so, in my pursuit of understanding how Nyx works so that I could build a fuzzer ontop of it, I revisited gamozolabs (Brandon Falk’s) stream paper review he did on the Nyx paper. It’s a great stream, the Nyx authors were present in Twitch chat and so there were some good back and forths and the stream really highlights what an amazing utility Nyx is for fuzzing. But something else besides Nyx piqued my interest during the stream! During the stream, Gamozo described a fuzzing architecture he had previously built that utilized the Bochs emulator to snapshot fuzz complex targets and entire systems. This architecture sounded extremely interesting and clever to me, and coincidentally it had several attributes in common with a sandboxing utility I had been designing with a friend for fuzzing as well.
This fuzzing architecture seemed to meet several criteria that I personally value when it comes to doing a fuzzer development project on the blog:
- it is relatively simple in its design,
- it allows for almost endless introspection utilities to be added,
- it lends itself well to iterative development cycles,
- it can scale and be used on my servers I bought for fuzzing (but haven’t used yet because I don’t have a fuzzer!),
- it can fuzz the Linux Kernel,
- it can fuzz userland and kernel components on other OSes and platforms (Windows, MacOS),
- it is pretty unique in its design compared to open source fuzzing tools that exist,
- it can be designed from scratch to work well with existing flexible tooling such as LibAFL,
- there is no source code available anywhere publicly, so I’m free to implement it from scratch the way I see fit,
- it can be made to be portable, ie, there is nothing stopping us for running this fuzzer on Windows instead of just Linux,
- it will allow me to do a lot of learning and low-level computing research and learning.
So all things considered, this seemed like the ideal project to implement on the blog and so I reached out to Gamozo to make sure he’d be ok with it as I didn’t want to be seen as clout chasing off of his ideas and he was very charitable and encouraged me to do it. So huge thanks to Gamozo for sharing so much content and we’re off to developing the fuzzer.
Also huge shoutout to @is_eqv and @ms_s3c at least two of the Nyx authors who are always super friendly and charitable with their time/answering questions. Some great people to have around.
Another huge shoutout to @Kharosx0 for helping me understand Bochs and for answering all my questions about my design intentions, another very charitable person who is always helping out on the Fuzzing discord.
Misc
Please let me know if you find any programming errors or have some nitpicks with the code. I’ve tried to heavily comment everything, and given that I cobbled this together over the course of a couple of weekends, there are probably some issues with the code. I also haven’t really fleshed out how the repository will look, or what files will be called, or anything like that so please be patient with the code-quality. This is mostly for learning purposes and at this point it is just a proof-of-concept of loading Bochs into memory to explain the first portion of the architecture.
I’ve decided to name the project “Lucid” for now, as reference to lucid dreaming since our fuzz target is in somewhat of a dream state being executed within a simulator.
Bochs
What is Bochs? Good question. Bochs is an x86 full-system emulator capable of running an entire operating system with software-simulated hardware devices. In short, it’s a JIT-less, smaller, less-complex emulation tool similar to QEMU but with way less use-cases and way less performant. Instead of taking QEMU’s approach of “let’s emulate anything and everything and do it with good performance”, Bochs has taken the approach of “let’s emulate an entire x86 system 100% in software without worrying about performance for the most part. This approach has its obvious drawbacks, but if you are only interested in running x86 systems, Bochs is a great utility. We are going to use Bochs as the target execution engine in our fuzzer. Our target code will run inside Bochs. So if we are fuzzing the Linux Kernel for instance, that kernel will live and execute inside Bochs. Bochs is written in C++ and apparently still maintained, but do not expect much code changes or rapid development, the last release was over 2 years ago.
Fuzzer Architecture
This is where we discuss how the fuzzer will be designed according to the information laid out on stream by Gamozo. In simple terms, we will create a “fuzzer” process, which will execute Bochs, which in turn is executing our fuzz target. Instead of snapshotting and restoring our target each fuzzing iteration, we will reset Bochs which contains the target and all of the target system’s simulated state. By snapshotting and restoring Bochs, we are snapshotting and restoring our target.
Going a bit deeper, this setup requires us to sandbox Bochs and run it inside of our “fuzzer” process. In an effort to isolate Bochs from the user’s OS and Kernel, we will sandbox Bochs so that it cannot interact with our operating system. This allows us to achieve a few things, but chiefly this should make Bochs deterministic. As Gamozo explains on stream, isolating Bochs from the operating system, prevents Bochs from accessing any random/randomish data sources. This means that we will prevent Bochs from making syscalls into the kernel as well as executing any instructions that retrieve hardware-sourced data such as CPUID or something similar. I actually haven’t given much thought to the latter yet, but syscalls I have a plan for. With Bochs isolated from the operating system, we can expect it to behave the same way each fuzzing iteration. Given Fuzzing Input A, Bochs should execute exactly the same way for 1 trillion successive iterations.
Secondly, it also means that the entirety of Bochs’ state will be contained within our sandbox, which should enable us to reset Bochs’ state more easily instead of it being a remote process. In a paradigm where Bochs executes as intended as a normal Linux process for example, resetting its state is not trivial and may require a heavy handed approach such as page table walking in the kernel for each fuzzing iteration or something even worse.
So in general, this is how our fuzzing setup should look:
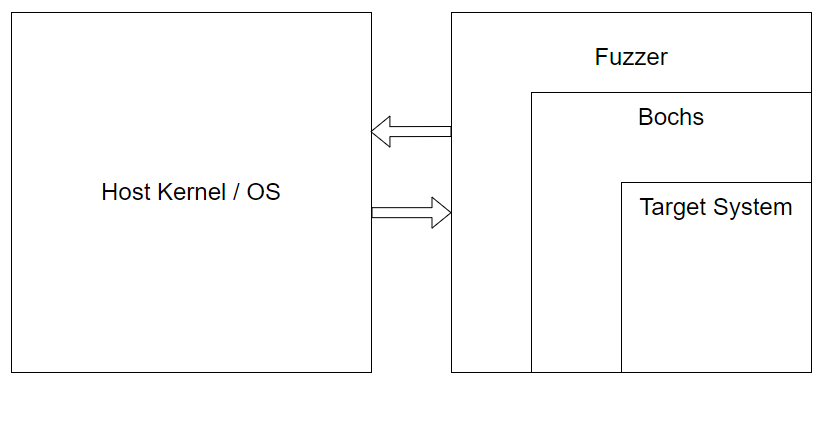
In order to provide a sandboxed environment, we must load an executable Bochs image into our own fuzzer process. So for this, I’ve chosen to build Bochs as an ELF and then load the ELF into my fuzzer process in memory. Let’s dive into how that has been accomplished thus far.
Loading an ELF in Memory
So in order to make this portion of loading Bochs in memory in the most simplistic way possible, I’ve chosen to compile Bochs as a -static-pie ELF. Now this means that the built ELF has no expectations about where it is loaded. In its _start routine, it actually has all of the logic of the normal OS ELF loader necessary to perform all of its own relocations. How cool is that? But before we get too far ahead of ourselves, the first goal will just be to simply build and load a -static-pie test program and make sure we can do that correctly.
In order to make sure we have everything correctly implemented, we’ll make sure that the test program can correctly access any command line arguments we pass and can execute and exit.
#include <stdio.h>
#include <unistd.h>

int main(int argc, char *argv[]) {
    printf("Argument count: %d\n", argc);
    printf("Args:\n");
    for (int i = 0; i < argc; i++) {
        printf("   -%s\n", argv[i]);
    }

    size_t iters = 0;
    while (1) {
        printf("Test alive!\n");
        sleep(1);
        iters++;

        if (iters > 5) { return 0; }
    }
}
Remember, at this point we don’t sandbox our loaded program at all, all we’re trying to do at this point is load it in our fuzzer virtual address space and jump to it and make sure the stack and everything is correctly setup. So we could run into issues that aren’t real issues if we jump straight into executing Bochs at this point.
So compiling the test program and examining it with readelf -l, we can see that there is actually a DYNAMIC segment. Likely because of the relocations that need to be performed during the aforementioned _start routine.
dude@lol:~/lucid$ gcc test.c -o test -static-pie
dude@lol:~/lucid$ file test
test: ELF 64-bit LSB shared object, x86-64, version 1 (GNU/Linux), dynamically linked, BuildID[sha1]=6fca6026edb756fa32c966844b29529d579e83b9, for GNU/Linux 3.2.0, not stripped
dude@lol:~/lucid$ readelf -l test

Elf file type is DYN (Shared object file)
Entry point 0x9f50
There are 12 program headers, starting at offset 64

Program Headers:
  Type           Offset             VirtAddr           PhysAddr
                 FileSiz            MemSiz              Flags  Align
  LOAD           0x0000000000000000 0x0000000000000000 0x0000000000000000
                 0x0000000000008158 0x0000000000008158  R      0x1000
  LOAD           0x0000000000009000 0x0000000000009000 0x0000000000009000
                 0x0000000000094d01 0x0000000000094d01  R E    0x1000
  LOAD           0x000000000009e000 0x000000000009e000 0x000000000009e000
                 0x00000000000285e0 0x00000000000285e0  R      0x1000
  LOAD           0x00000000000c6de0 0x00000000000c7de0 0x00000000000c7de0
                 0x0000000000005350 0x0000000000006a80  RW     0x1000
  DYNAMIC        0x00000000000c9c18 0x00000000000cac18 0x00000000000cac18
                 0x00000000000001b0 0x00000000000001b0  RW     0x8
  NOTE           0x00000000000002e0 0x00000000000002e0 0x00000000000002e0
                 0x0000000000000020 0x0000000000000020  R      0x8
  NOTE           0x0000000000000300 0x0000000000000300 0x0000000000000300
                 0x0000000000000044 0x0000000000000044  R      0x4
  TLS            0x00000000000c6de0 0x00000000000c7de0 0x00000000000c7de0
                 0x0000000000000020 0x0000000000000060  R      0x8
  GNU_PROPERTY   0x00000000000002e0 0x00000000000002e0 0x00000000000002e0
                 0x0000000000000020 0x0000000000000020  R      0x8
  GNU_EH_FRAME   0x00000000000ba110 0x00000000000ba110 0x00000000000ba110
                 0x0000000000001cbc 0x0000000000001cbc  R      0x4
  GNU_STACK      0x0000000000000000 0x0000000000000000 0x0000000000000000
                 0x0000000000000000 0x0000000000000000  RW     0x10
  GNU_RELRO      0x00000000000c6de0 0x00000000000c7de0 0x00000000000c7de0
                 0x0000000000003220 0x0000000000003220  R      0x1

 Section to Segment mapping:
  Segment Sections...
   00     .note.gnu.property .note.gnu.build-id .note.ABI-tag .gnu.hash .dynsym .dynstr .rela.dyn .rela.plt
   01     .init .plt .plt.got .plt.sec .text __libc_freeres_fn .fini
   02     .rodata .stapsdt.base .eh_frame_hdr .eh_frame .gcc_except_table
   03     .tdata .init_array .fini_array .data.rel.ro .dynamic .got .data __libc_subfreeres __libc_IO_vtables __libc_atexit .bss __libc_freeres_ptrs
   04     .dynamic
   05     .note.gnu.property
   06     .note.gnu.build-id .note.ABI-tag
   07     .tdata .tbss
   08     .note.gnu.property
   09     .eh_frame_hdr
   10
   11     .tdata .init_array .fini_array .data.rel.ro .dynamic .got
So what portions of the this ELF image do we actually care about for our loading purposes? We probably don’t need most of this information to simply get the ELF loaded and running. At first, I didn’t know what I needed so I just parsed all of the ELF headers.
Keeping in mind that this ELF parsing code doesn’t need to be robust, because we are only using it to parse and load our own executable, I simply made sure that there were no glaring issues in the built executable when parsing the various headers.
ELF Headers
I’ve written ELF parsing code before, but didn’t really remember how it worked so I had to relearn everything from Wikipedia: https://en.wikipedia.org/wiki/Executable_and_Linkable_Format. Luckily, we’re not trying to parse an arbitrary ELF, just a 64-bit ELF that we built ourselves. The goal is to create a data-structure out of the ELF header information that gives us the data we need to load the ELF in memory. So I skipped some of the ELF header values but ended up parsing the ELF header into the following data structure:
// Constituent parts of the Elf
#[derive(Debug)]
pub struct ElfHeader {
    pub entry: u64,
    pub phoff: u64,
    pub shoff: u64,
    pub phentsize: u16,
    pub phnum: u16,
    pub shentsize: u16,
    pub shnum: u16,
    pub shrstrndx: u16,
}
We really care about a few of these struct members. For one, we definitely need to know the entry, this is where you’re supposed to start executing from. So eventually, our code will jump to this address to start executing the test program. We also care about phoff. This is the offset into the ELF where we can find the base of the Program Header table. This is just an array of Program Headers basically. Along with phoff, we also need to know the number of entries in that array and the size of each entry so that we can parse them. That is where phnum and phentsize come in handy respectively. Given the offset of index 0 in the array, the number of array members, and the size of each member, we can parse the Program Headers.
A single program header, ie, a single entry in the array, can be synthesized into the following data structure:
#[derive(Debug)]
pub struct ProgramHeader {
    pub typ: u32,
    pub flags: u32,
    pub offset: u64,
    pub vaddr: u64,
    pub paddr: u64,
    pub filesz: u64,
    pub memsz: u64,
    pub align: u64,
}
These program headers describe segments in the ELF image as it should exist in memory. In particular, we care about the loadable segments with type LOAD, as these segments are the ones we have to account for when loading the ELF image. Take our readelf output for example:
Program Headers:
  Type           Offset             VirtAddr           PhysAddr
                 FileSiz            MemSiz              Flags  Align
  LOAD           0x0000000000000000 0x0000000000000000 0x0000000000000000
                 0x0000000000008158 0x0000000000008158  R      0x1000
  LOAD           0x0000000000009000 0x0000000000009000 0x0000000000009000
                 0x0000000000094d01 0x0000000000094d01  R E    0x1000
  LOAD           0x000000000009e000 0x000000000009e000 0x000000000009e000
                 0x00000000000285e0 0x00000000000285e0  R      0x1000
  LOAD           0x00000000000c6de0 0x00000000000c7de0 0x00000000000c7de0
                 0x0000000000005350 0x0000000000006a80  RW     0x1000
We can see that there are 4 loadable segments. They also have several attributes we need to be keeping track of:
Flagsdescribes the memory permissions this segment should have, we have 3 distinct memory protection schemesREAD,READ | EXECUTE, andREAD | WRITEOffsetdescribes how far into the physical file contents we can expect to find this segmentPhysAddrwe don’t much care aboutVirtAddrthe virtual address this segment should be loaded at, you can tell that the first segment value for this is0x0000000000000000which means that it has no expectations about where it’s to be loaded.MemSizhow large the segment should be in virtual memoryAlignhow to align the segments in virtual memory
For our very simplistic use-case of only loading a -static-pie ELF that we ourselves create, we can basically ignore all the other portions of the parsed ELF.
Loading the ELF
Now that we’ve successfully parsed out the relevant attributes of the ELF file, we can create an executable image in memory. For now, I’ve chosen to only implement what’s needed in a Linux environment, but there’s no reason why we couldn’t load this ELF into our memory if we happened to be a Windows userland process. That’s kind of why this whole design is cool. At some point, maybe someone will want Windows support and we’ll add it.
The first thing we need to do, is calculate the size of the virtual memory that we need in order to load the ELF based on the combined size of the segments that are marked LOAD. We also have to keep in mind that there is some padding after the segments that aren’t page aligned, so to do this, I used the following logic:
// Read the executable file into memory
let data = read(BOCHS_IMAGE).map_err(|_| LucidErr::from(
    "Unable to read binary data from Bochs binary"))?;

// Parse ELF
let elf = parse_elf(&data)?;

// We need to iterate through all of the loadable program headers and
// determine the size of the address range we need
let mut mapping_size: usize = 0;
for ph in elf.program_headers.iter() {
    if ph.is_load() {
        let end_addr = (ph.vaddr + ph.memsz) as usize;
        if mapping_size < end_addr { mapping_size = end_addr; }
    }
}

// Round the mapping up to a page
if mapping_size % PAGE_SIZE > 0 {
    mapping_size += PAGE_SIZE - (mapping_size % PAGE_SIZE);
}
We iterate through all of the Program Headers in the parsed ELF, and we just see where the largest “end_addr” is. This accounts for the page-aligning padding in between segments as well. And as you can see, we also page-align the last segment as well by making sure that the size is rounded up to the nearest page. At this point we know how much memory we need to mmap to hold the loadable ELF segments. We mmap a contiguous range of memory here:
// Call `mmap` to map memory into our process to hold all of the loadable
// program header contents in a contiguous range. Right now the perms will be
// generic across the entire range as PROT_WRITE,
// later we'll go back and `mprotect` them appropriately
fn initial_mmap(size: usize) -> Result<usize, LucidErr> {
    // We don't want to specify a fixed address
    let addr = LOAD_TARGET as *mut libc::c_void;

    // Length is straight forward
    let length = size as libc::size_t;

    // Set the protections for now to writable
    let prot = libc::PROT_WRITE;

    // Set the flags, this is anonymous memory
    let flags = libc::MAP_ANONYMOUS | libc::MAP_PRIVATE;

    // We don't have a file to map, so this is -1
    let fd = -1 as libc::c_int;

    // We don't specify an offset
    let offset = 0 as libc::off_t;

    // Call `mmap` and make sure it succeeds
    let result = unsafe {
        libc::mmap(
            addr,
            length,
            prot,
            flags,
            fd,
            offset
        )
    };

    if result == libc::MAP_FAILED {
        return Err(LucidErr::from("Failed to `mmap` memory for Bochs"));
    }

    Ok(result as usize)
}
So now we have carved out enough memory to write the loadable segments to. The segment data is sourced from the file of course, and so the first thing we do is once again iterate through the Program Headers and extract all the relevant data we need to do a memcpy from the file data in memory, to the carved out memory we just created. You can see that logic here:
let mut load_segments = Vec::new();
    for ph in elf.program_headers.iter() {
        if ph.is_load() {
            load_segments.push((
                ph.flags,               // segment.0
                ph.vaddr    as usize,   // segment.1
                ph.memsz    as usize,   // segment.2
                ph.offset   as usize,   // segment.3
                ph.filesz   as usize,   // segment.4
            ));
        }
    }
After the segment metadata has been extracted, we can copy the contents over as well as call mprotect on the segment in memory so that its permissions perfectly match the Flags segment metadata we discussed earlier. That logic is here:
// Iterate through the loadable segments and change their perms and then
// copy the data over
for segment in load_segments.iter() {
    // Copy the binary data over, the destination is where in our process
    // memory we're copying the binary data to. The source is where we copy
    // from, this is going to be an offset into the binary data in the file,
    // len is going to be how much binary data is in the file, that's filesz
    // This is going to be unsafe no matter what
    let len = segment.4;
    let dst = (addr + segment.1) as *mut u8;
    let src = (elf.data[segment.3..segment.3 + len]).as_ptr();

    unsafe {
        std::ptr::copy_nonoverlapping(src, dst, len);
    }

    // Calculate the `mprotect` address by adding the mmap address plus the
    // virtual address offset, we also mask off the last 0x1000 bytes so
    // that we are always page-aligned as required by `mprotect`
    let mprotect_addr = ((addr + segment.1) & !(PAGE_SIZE - 1))
        as *mut libc::c_void;

    // Get the length
    let mprotect_len = segment.2 as libc::size_t;

    // Get the protection
    let mut mprotect_prot = 0 as libc::c_int;
    if segment.0 & 0x1 == 0x1 { mprotect_prot |= libc::PROT_EXEC; }
    if segment.0 & 0x2 == 0x2 { mprotect_prot |= libc::PROT_WRITE; }
    if segment.0 & 0x4 == 0x4 { mprotect_prot |= libc::PROT_READ; }

    // Call `mprotect` to change the mapping perms
    let result = unsafe {
        libc::mprotect(
            mprotect_addr,
            mprotect_len,
            mprotect_prot
        )
    };

    if result < 0 {
        return Err(LucidErr::from("Failed to `mprotect` memory for Bochs"));
    }
}
After that is successful, our ELF image is basically complete. We can just jump to it and start executing! Just kidding, we have to first setup a stack for the new “process” which I learned was a huge pain.
Setting Up a Stack for Bochs
I spent a lot of time on this and there actually might still be bugs! This was the hardest part I’d say as everything else was pretty much straightforward. To complete this part, I heavily leaned on this resource which describes how x86 32-bit application stacks are fabricated: https://articles.manugarg.com/aboutelfauxiliaryvectors.
Here is an extremely useful diagram describing the 32-bit stack cribbed from the linked resource above:
position            content                     size (bytes) + comment
  ------------------------------------------------------------------------
  stack pointer ->  [ argc = number of args ]     4
                    [ argv[0] (pointer) ]         4   (program name)
                    [ argv[1] (pointer) ]         4
                    [ argv[..] (pointer) ]        4 * x
                    [ argv[n - 1] (pointer) ]     4
                    [ argv[n] (pointer) ]         4   (= NULL)

                    [ envp[0] (pointer) ]         4
                    [ envp[1] (pointer) ]         4
                    [ envp[..] (pointer) ]        4
                    [ envp[term] (pointer) ]      4   (= NULL)

                    [ auxv[0] (Elf32_auxv_t) ]    8
                    [ auxv[1] (Elf32_auxv_t) ]    8
                    [ auxv[..] (Elf32_auxv_t) ]   8
                    [ auxv[term] (Elf32_auxv_t) ] 8   (= AT_NULL vector)

                    [ padding ]                   0 - 16

                    [ argument ASCIIZ strings ]   >= 0
                    [ environment ASCIIZ str. ]   >= 0

  (0xbffffffc)      [ end marker ]                4   (= NULL)

  (0xc0000000)      < bottom of stack >           0   (virtual)
  ------------------------------------------------------------------------
When we pass arguments to a process on the command line like ls / -laht, the Linux OS has to load the ls ELF into memory and create its environment. In this example, we passed a couple argument values to the process as well / and -laht. The way that the OS passes these arguments to the process is on the stack via the argument vector or argv for short, which is an array of string pointers. The number of arguments is represented by the argument count or argc. The first member of argv is usually the name of the executable that was passed on the command line, so in our example it would be ls. As you can see the first thing on the stack, the top of the stack, which is at the lower end of the address range of the stack, is argc, followed by all the pointers to string data representing the program arguments. It is also important to note that the array is NULL terminated at the end.
After that, we have a similar data structure with the envp array, which is an array of pointers to string data representing environment variables. You can retrieve this data yourself by running a program under GDB and using the command show environment, the environment variables are usually in the form “KEY=VALUE”, for instance on my machine the key-value pair for the language environment variable is "LANG=en_US.UTF-8". For our purposes, we can ignore the environment variables. This vector is also NULL terminated.
Next, is the auxiliary vector, which is extremely important to us. This information details several aspects of the program. These auxiliary entries in the vector are 16-bytes a piece. They comprise a key and a value just like our environment variable entries, but these are basically u64 values. For the test program, we can actually dump the auxiliary information by using info aux under GDB.
gef➤  info aux
33   AT_SYSINFO_EHDR      System-supplied DSO's ELF header 0x7ffff7f2e000
51   ???                                                 0xe30
16   AT_HWCAP             Machine-dependent CPU capability hints 0x1f8bfbff
6    AT_PAGESZ            System page size               4096
17   AT_CLKTCK            Frequency of times()           100
3    AT_PHDR              Program headers for program    0x7ffff7f30040
4    AT_PHENT             Size of program header entry   56
5    AT_PHNUM             Number of program headers      12
7    AT_BASE              Base address of interpreter    0x0
8    AT_FLAGS             Flags                          0x0
9    AT_ENTRY             Entry point of program         0x7ffff7f39f50
11   AT_UID               Real user ID                   1000
12   AT_EUID              Effective user ID              1000
13   AT_GID               Real group ID                  1000
14   AT_EGID              Effective group ID             1000
23   AT_SECURE            Boolean, was exec setuid-like? 0
25   AT_RANDOM            Address of 16 random bytes     0x7fffffffe3b9
26   AT_HWCAP2            Extension of AT_HWCAP          0x2
31   AT_EXECFN            File name of executable        0x7fffffffefe2 "/home/dude/lucid/test"
15   AT_PLATFORM          String identifying platform    0x7fffffffe3c9 "x86_64"
0    AT_NULL              End of vector                  0x0
The keys are on the left the values are on the right. For instance, on the stack we can expect the value 0x5 for AT_PHNUM, which describes the number of Program Headers, to be accompanied by 12 as the value. We can dump the stack and see this in action as well.
gef➤  x/400gx $rsp
0x7fffffffe0b0:	0x0000000000000001	0x00007fffffffe3d6
0x7fffffffe0c0:	0x0000000000000000	0x00007fffffffe3ec
0x7fffffffe0d0:	0x00007fffffffe3fc	0x00007fffffffe44e
0x7fffffffe0e0:	0x00007fffffffe461	0x00007fffffffe475
0x7fffffffe0f0:	0x00007fffffffe4a2	0x00007fffffffe4b9
0x7fffffffe100:	0x00007fffffffe4e5	0x00007fffffffe505
0x7fffffffe110:	0x00007fffffffe52e	0x00007fffffffe542
0x7fffffffe120:	0x00007fffffffe559	0x00007fffffffe56c
0x7fffffffe130:	0x00007fffffffe588	0x00007fffffffe59d
0x7fffffffe140:	0x00007fffffffe5b8	0x00007fffffffe5c5
0x7fffffffe150:	0x00007fffffffe5da	0x00007fffffffe60e
0x7fffffffe160:	0x00007fffffffe61d	0x00007fffffffe646
0x7fffffffe170:	0x00007fffffffe667	0x00007fffffffe674
0x7fffffffe180:	0x00007fffffffe67d	0x00007fffffffe68d
0x7fffffffe190:	0x00007fffffffe69b	0x00007fffffffe6ad
0x7fffffffe1a0:	0x00007fffffffe6be	0x00007fffffffeca0
0x7fffffffe1b0:	0x00007fffffffecc1	0x00007fffffffeccd
0x7fffffffe1c0:	0x00007fffffffecde	0x00007fffffffed34
0x7fffffffe1d0:	0x00007fffffffed63	0x00007fffffffed73
0x7fffffffe1e0:	0x00007fffffffed8b	0x00007fffffffedad
0x7fffffffe1f0:	0x00007fffffffedc4	0x00007fffffffedd8
0x7fffffffe200:	0x00007fffffffedf8	0x00007fffffffee02
0x7fffffffe210:	0x00007fffffffee21	0x00007fffffffee2c
0x7fffffffe220:	0x00007fffffffee34	0x00007fffffffee46
0x7fffffffe230:	0x00007fffffffee65	0x00007fffffffee7c
0x7fffffffe240:	0x00007fffffffeed1	0x00007fffffffef7b
0x7fffffffe250:	0x00007fffffffef8d	0x00007fffffffefc3
0x7fffffffe260:	0x0000000000000000	0x0000000000000021
0x7fffffffe270:	0x00007ffff7f2e000	0x0000000000000033
0x7fffffffe280:	0x0000000000000e30	0x0000000000000010
0x7fffffffe290:	0x000000001f8bfbff	0x0000000000000006
0x7fffffffe2a0:	0x0000000000001000	0x0000000000000011
0x7fffffffe2b0:	0x0000000000000064	0x0000000000000003
0x7fffffffe2c0:	0x00007ffff7f30040	0x0000000000000004
0x7fffffffe2d0:	0x0000000000000038	0x0000000000000005
0x7fffffffe2e0:	0x000000000000000c	0x0000000000000007
You can see the towards the end of the data at 0x7fffffffe2d8 we can see the key 0x5, and at 0x7fffffffe2e0 we can see the value 0xc which is 12 in hex. We need some of these in order to load our ELF properly as the ELF _start routine requires some of them in order to set the environment up properly. The ones I included on my stack were the following, they might not all be necessary:
AT_ENTRYwhich holds the program entry point,AT_PHDRwhich is a pointer to the program header data,AT_PHNUMwhich is the number of program headers,AT_RANDOMwhich is a pointer to 16-bytes of a random seed, which is supposed to be placed by the kernel. This 16-byte value serves as an RNG seed to construct stack canary values. I found out that the program we load actually does need this information because I ended up with a NULL-ptr deref during my initial testing and then placed this auxp pair with a value of0x4141414141414141and ended up crashing trying to access that address. For our purposes, we don’t really care that the stack canary values are crytographically secure, so I just placed another pointer to the program entry as that is guaranteed to exist.AT_NULLwhich is used to terminate the auxiliary vector
So with those values all accounted for, we now know all of the data we need to construct the program’s stack.
Allocating the Stack
First, we need to allocate memory to hold the Bochs stack since we will need to know the address it’s mapped at in order to formulate our pointers. We will know offsets within a vector representing the stack data, but we won’t know what the absolute addresses are unless we know ahead of time where this stack is going in memory. Allocating the stack was very straightforward as I just used mmap the same way we did with the program segments. Right now I’m using a 1MB stack which seems to be large enough.
Constructing the Stack Data
In my stack creation logic, I created the stack starting from the bottom and then inserting values on top of the stack.
So the first value we place onto the stack is the “end-marker” from the diagram which is just a 0u64 in Rust.
Next, we need to place all of the strings we need onto the stack, namely our command line arguments. To separate command line arguments meant for the fuzzer from command line arguments meant for Bochs, I created a command line argument --bochs-args which is meant to serve as a delineation point between the two argument categories. Every argument after --bochs-args is meant for Bochs. I iterate through all of the command line arguments provided and then place them onto the stack. I also log the length of each string argument so that later on, we can calculate their absolute address for when we need to place pointers to the strings in the argv vector. As a sidenote, I also made sure that we maintained 8-byte alignment throughout the string pushing routine just so we didn’t have to deal with any weird pointer values. This isn’t necessary but makes the stack state easier for me to reason about. This is performed with the following logic:
// Create a vector to hold all of our stack data
let mut stack_data = Vec::new();

// Add the "end-marker" NULL, we're skipping adding any envvar strings for
// now
push_u64(&mut stack_data, 0u64);

// Parse the argv entries for Bochs
let args = parse_bochs_args();

// Store the length of the strings including padding
let mut arg_lens = Vec::new();

// For each argument, push a string onto the stack and store its offset
// location
for arg in args.iter() {
    let old_len = stack_data.len();
    push_string(&mut stack_data, arg.to_string());

    // Calculate arg length and store it
    let arg_len = stack_data.len() - old_len;
    arg_lens.push(arg_len);
}
Pushing strings is performed like this:
// Pushes a NULL terminated string onto the "stack" and pads the string with
// NULL bytes until we achieve 8-byte alignment
fn push_string(stack: &mut Vec<u8>, string: String) {
    // Convert the string to bytes and append it to the stack
    let mut bytes = string.as_bytes().to_vec();

    // Add a NULL terminator
    bytes.push(0x0);

    // We're adding bytes in reverse because we're adding to index 0 always,
    // we want to pad these strings so that they remain 8-byte aligned so that
    // the stack is easier to reason about imo
    if bytes.len() % U64_SIZE > 0 {
        let pad = U64_SIZE - (bytes.len() % U64_SIZE);
        for _ in 0..pad { bytes.push(0x0); }
    }

    for &byte in bytes.iter().rev() {
        stack.insert(0, byte);
    }
}
Then we add some padding and the auxiliary vector members:
// Add some padding
push_u64(&mut stack_data, 0u64);

// Next we need to set up the auxiliary vectors, terminate the vector with
// the AT_NULL key which is 0, with a value of 0
push_u64(&mut stack_data, 0u64);
push_u64(&mut stack_data, 0u64);

// Add the AT_ENTRY key which is 9, along with the value from the Elf header
// for the program's entry point. We need to calculate
push_u64(&mut stack_data, elf.elf_header.entry + base as u64);
push_u64(&mut stack_data, 9u64);

// Add the AT_PHDR key which is 3, along with the address of the program
// headers which is just ELF_HDR_SIZE away from the base
push_u64(&mut stack_data, (base + ELF_HDR_SIZE) as u64);
push_u64(&mut stack_data, 3u64);

// Add the AT_PHNUM key which is 5, along with the number of program headers
push_u64(&mut stack_data, elf.program_headers.len() as u64);
push_u64(&mut stack_data, 5u64);

// Add AT_RANDOM key which is 25, this is where the start routines will
// expect 16 bytes of random data as a seed to generate stack canaries, we
// can just use the entry again since we don't care about security
push_u64(&mut stack_data, elf.elf_header.entry + base as u64);
push_u64(&mut stack_data, 25u64);
Then, since we ignored the environment variables, we just push a NULL pointer onto the stack and also the NULL pointer terminating the argv vector:
// Since we skipped ennvars for now, envp[0] is going to be NULL
push_u64(&mut stack_data, 0u64);

// argv[n] is a NULL
push_u64(&mut stack_data, 0u64);
This is where I spent a lot of time debugging. We now have to add the pointers to our arguments. To do this, I first calculated the total length of the stack data now that we know all of the variable parts like the number of arguments and the length of all the strings. We have the stack length as it currently exists which includes the strings, and we know how many pointers and members we have left to add to the stack (number of args and argc). Since we know this, we can calculate the absolute addresses of where the string data will be as we push the argv pointers onto the stack. We calculate the length as follows:
// At this point, we have all the information we need to calculate the total
// length of the stack. We're missing the argv pointers and finally argc
let mut stack_length = stack_data.len();

// Add argv pointers
stack_length += args.len() * POINTER_SIZE;

// Add argc
stack_length += std::mem::size_of::<u64>();
Next, we start at the bottom of the stack and create a movable offset which will track through the stack stopping at the beginning of each string so that we can calculate its absolute address. The offset represents how deep into the stack from the top we are. At first, the offset is the largest value it can be because it’s at the bottom of the stack (higher-memory address). We subtract from it in order to point us towards the beginning of each argv string we pushed onto the stack. So the bottom of the stack looks something like this:
NULL
string_1
string_2
end-marker <--- offset
So armed with the arguments and their lengths that we recorded, we can adjust the offset each time we iterate through the argument lengths to point to the beginning of the strings. There is one gotcha though, on the first iteration, we have to account for the end-marker and its 8-bytes. So this is how the logic goes:
// Right now our offset is at the bottom of the stack, for the first
// argument calculation, we have to accomdate the "end-marker" that we added
// to the stack at the beginning. So we need to move the offset up the size
// of the end-marker and then the size of the argument itself. After that,
// we only have to accomodate the argument lengths when moving the offset
for (idx, arg_len) in arg_lens.iter().enumerate() {
    // First argument, account for end-marker
    if idx == 0 {
        curr_offset -= arg_len + U64_SIZE;
    }

    // Not the first argument, just account for the string length
    else {
        curr_offset -= arg_len;
    }

    // Calculate the absolute address
    let absolute_addr = (stack_addr + curr_offset) as u64;

    // Push the absolute address onto the stack
    push_u64(&mut stack_data, absolute_addr);
}
It’s pretty cool! And it seems to work? Finally we cap the stack off with argc and we are done populating all of the stack data in a vector. Next, we’ll want to actually copy the data onto the stack allocation which is straightforward so no code snippet there.
The last piece of information I think worth noting here is that I created a constant called STACK_DATA_MAX and the length of the stack data cannot be more than that tunable value. We use this value to set up RSP when we jump to the program in memory and start executing. RSP is set so that it is at the absolute lowest address possible, which is the stack allocation size - STACK_DATA_MAX. This way, when the stack grows, we have left the maximum amount of slack space possible for the stack to grow into since the stack grows down in memory.
Executing the Loaded Program
Everything at this point should be setup perfectly in memory and all we have to do is jump to the target code and start executing. For now, I haven’t fleshed out a context switching routine or anything we’re literally just going to jump to the program and execute it and hope everything goes well. The code I used to achieve this is very simple:
pub fn start_bochs(bochs: Bochs) {
    // Set RAX to our jump destination which is the program entry, clear RDX,
    // and set RSP to the correct value
    unsafe {
        asm!(
            "mov rax, {0}",
            "mov rsp, {1}",
            "xor rdx, rdx",
            "jmp rax",
            in(reg) bochs.entry,
            in(reg) bochs.rsp,
        );
    }
}
The reason we clear RDX is because if the _start routine sees a non-zero value in RDX, it will interpret that to mean that we are attempting to register a hook located at the address in RDX to be invoked when the program exits, we don’t have one we want to run so for now we NULL it out. The other register values don’t really matter. We move the program entry point into RAX and use it as a long jump target and we supply our handcrafted RSP so that the program has a stack to use to do its relocations and run properly.
dude@lol:~/lucid/target/release$ ./lucid --bochs-args -AAAAA -BBBBBBBBBB
[17:43:19] lucid> Loading Bochs...
[17:43:19] lucid> Bochs loaded { Entry: 0x19F50, RSP: 0x7F513F11C000 }
Argument count: 3
Args:
   -./bochs
   --AAAAA
   --BBBBBBBBBB
Test alive!
Test alive!
Test alive!
Test alive!
Test alive!
Test alive!
dude@lol:~/lucid/target/release$
The program runs, parses our command line args, and exits all without crashing! So it looks like everything is good to go. This would normally be a good stopping place, but I was morbidly curious…
Will Bochs Run?
We have to see right? First we have to compile Bochs as a -static-pie ELF which was a headache in itself, but I was able to figure it out.
ude@lol:~/lucid/target/release$ ./lucid --bochs-args -AAAAA -BBBBBBBBBB
[12:30:40] lucid> Loading Bochs...
[12:30:40] lucid> Bochs loaded { Entry: 0xA3DB0, RSP: 0x7FEB0F565000 }
========================================================================
                        Bochs x86 Emulator 2.7
              Built from SVN snapshot on August  1, 2021
                Timestamp: Sun Aug  1 10:07:00 CEST 2021
========================================================================
Usage: bochs [flags] [bochsrc options]

  -n               no configuration file
  -f configfile    specify configuration file
  -q               quick start (skip configuration interface)
  -benchmark N     run Bochs in benchmark mode for N millions of emulated ticks
  -dumpstats N     dump Bochs stats every N millions of emulated ticks
  -r path          restore the Bochs state from path
  -log filename    specify Bochs log file name
  -unlock          unlock Bochs images leftover from previous session
  --help           display this help and exit
  --help features  display available features / devices and exit
  --help cpu       display supported CPU models and exit

For information on Bochs configuration file arguments, see the
bochsrc section in the user documentation or the man page of bochsrc.
00000000000p[      ] >>PANIC<< command line arg '-AAAAA' was not understood
00000000000e[SIM   ] notify called, but no bxevent_callback function is registered
========================================================================
Bochs is exiting with the following message:
[      ] command line arg '-AAAAA' was not understood
========================================================================
00000000000i[SIM   ] quit_sim called with exit code 1
Bochs runs! It couldn’t make sense of our non-sense command line arguments, but we loaded it and ran it successfully.
Next Steps
The very next step and blog post will be developing a context-switching routine that we will use to transition between Fuzzer execution and Bochs execution. This will involve saving our state each time and function basically the same way a normal user-to-kernel context switch functions.
After that, we have to get very familiar with Bochs and attempt to get a target up and running in vanilla Bochs. Once we do that, we’ll try to run that in the Fuzzer.
Resources
- I used this excellent blogpost from Faster Than Lime a lot when learning about how to load ELFs in memory: https://fasterthanli.me/series/making-our-own-executable-packer/part-17.
- Also shoutout @netspooky for helping me understand the stack layout!
- Thank you to ChatGPT as well, for being my sounding board (even if you failed to help me with my stack creation bugs)